CyberPanel Hosting
1. What is CyberPanel and Why Choose It for Your Website?
- Intro: Introduce CyberPanel as a web hosting control panel.
- What is CyberPanel?
- Explain it's a free, open-source control panel.
- Mention it uses OpenLiteSpeed/LiteSpeed Enterprise as the web server.
- Highlight key features: User-friendly interface, 1-click installers (WordPress, etc.), Let's Encrypt SSL, Email, DNS, FTP, PHP management, Backups, Security (ModSecurity, CSF).


- Why Choose CyberPanel for Your Website?
- Performance: LiteSpeed (OpenLiteSpeed) is known for speed and efficiency, especially with LiteSpeed Cache.

- Cost-Effective: Free core panel, reducing hosting costs.
- Performance: LiteSpeed (OpenLiteSpeed) is known for speed and efficiency, especially with LiteSpeed Cache.
- Conclusion: Reiterate CyberPanel as a strong contender for various hosting needs.
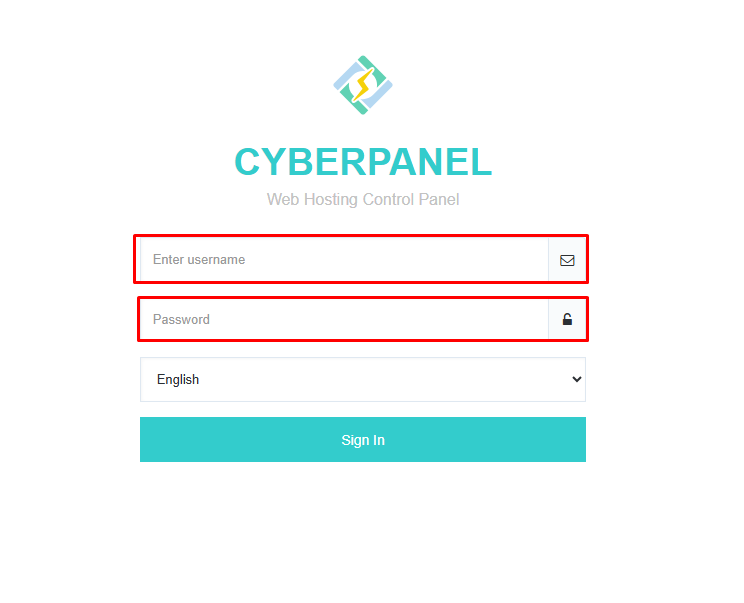
2. How to Log in to CyberPanel for the First Time
- Intro: Guide users on accessing their CyberPanel dashboard for the first time after installation.
- Prerequisites:
- Your server's IP address
- CyberPanel admin username (usually admin).
- CyberPanel admin password (set during installation or provided by your host).
- Steps:
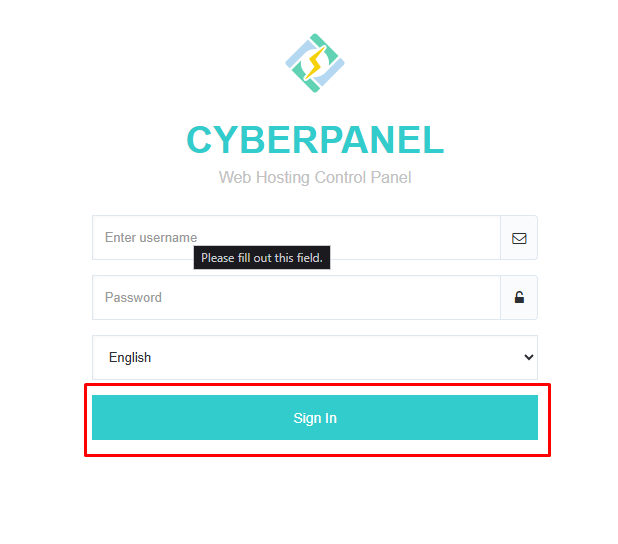
- Open Your Web Browser: Use any modern browser like Chrome, Firefox, or Edge.
- Navigate to the CyberPanel URL:
- In the address bar, type:
https://:8090 - Replace
- If you encounter an SSL warning (common for self-signed certs on first login), proceed by accepting the risk (e.g., "Advanced" -> "Proceed to...").

- In the address bar, type:
- Enter Your Credentials:
- On the CyberPanel login page, enter your Username (e.g., admin).
- Enter your Password.

- Click "Sign In":

- You're In! You should now see the CyberPanel dashboard.
- Troubleshooting Tip: If login fails, double-check IP, username, password, and ensure port 8090 is open in your server's firewall.
- Conclusion: You've successfully logged in. Now you can start managing your server.

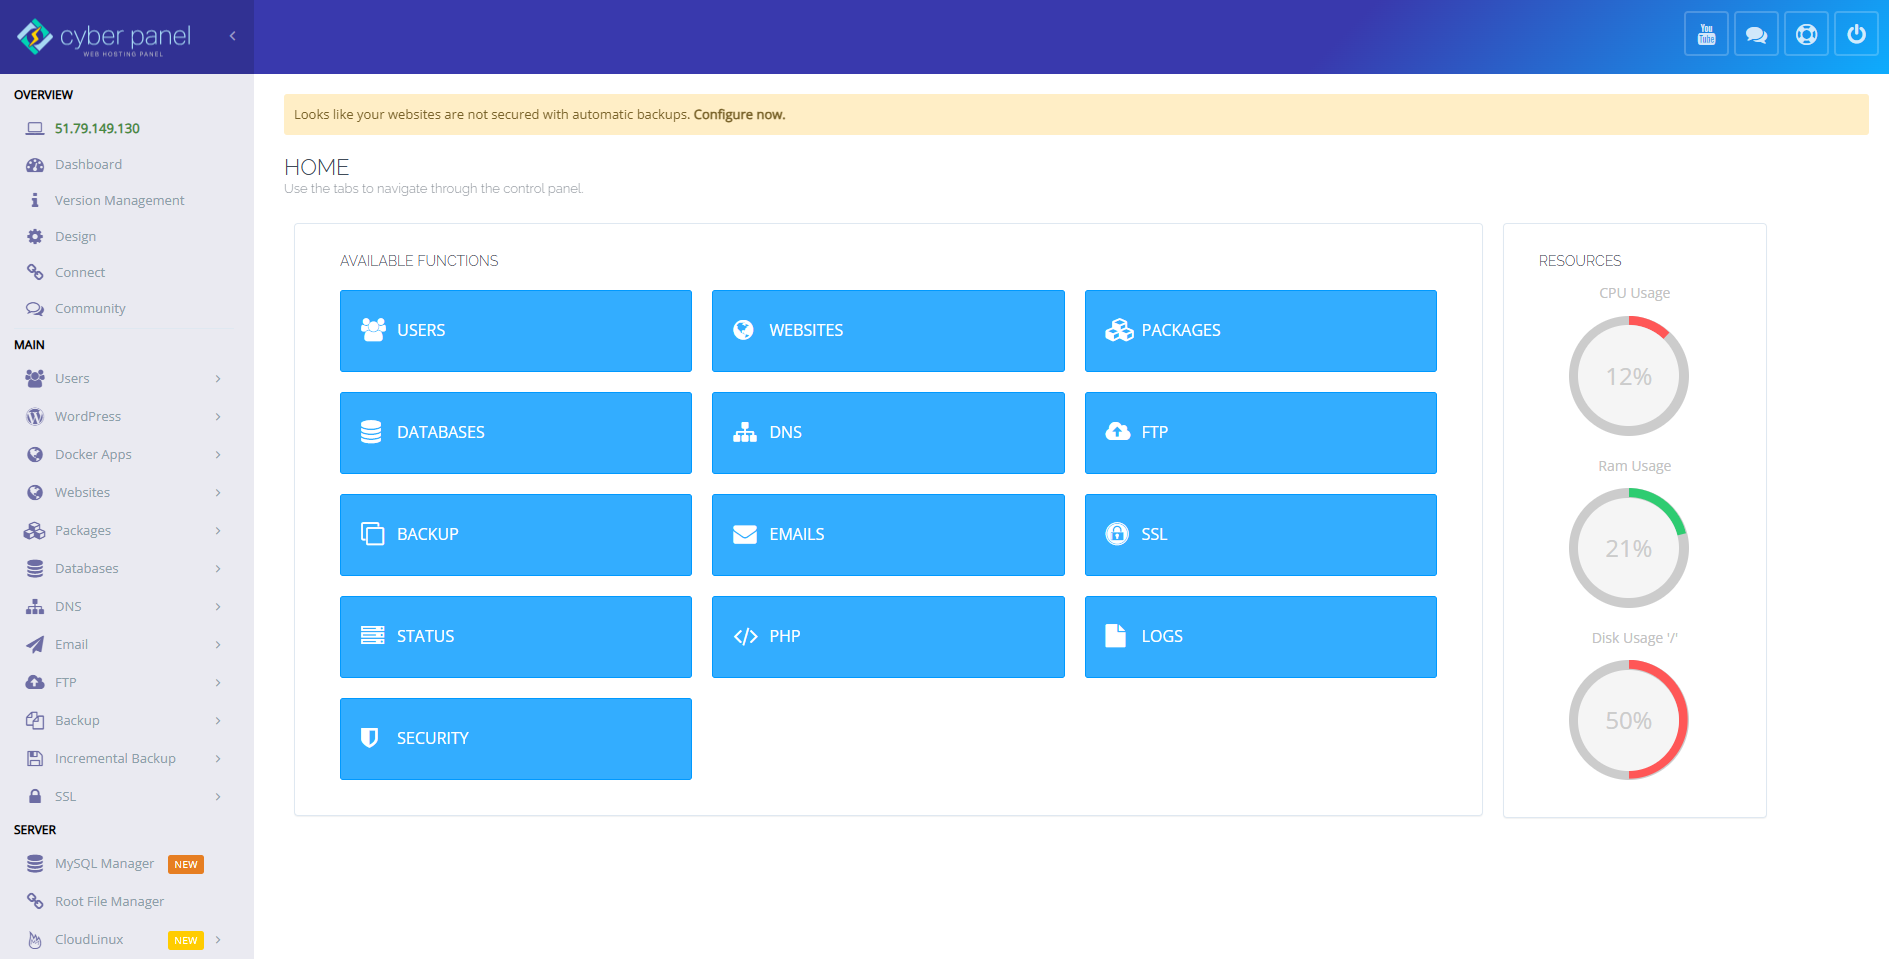
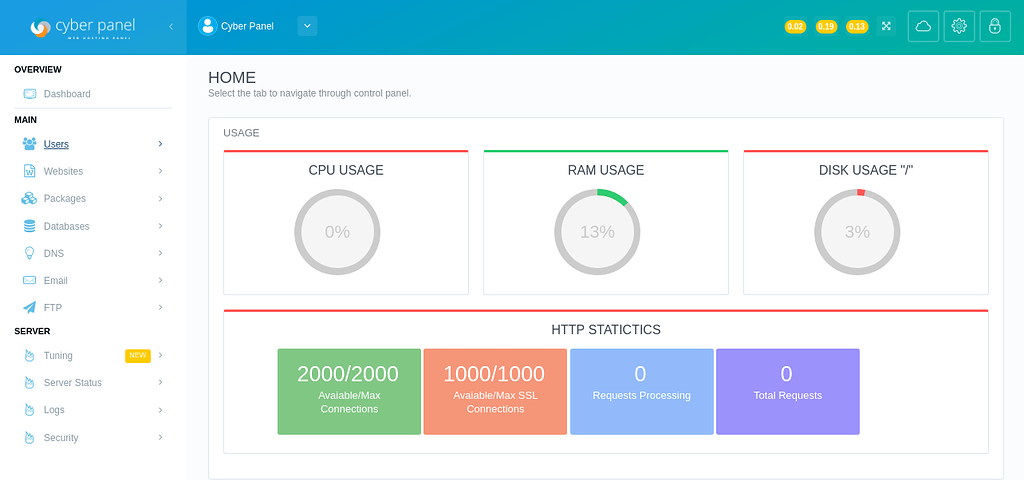
3. Overview of CyberPanel Dashboard and Features
- Intro: Familiarize users with the layout and main sections of the CyberPanel dashboard.
- Prerequisites: Logged into CyberPanel (refer to Topic 2).
- Main Dashboard Sections (with brief explanations):

- Top Bar:
- User icon (logout, profile settings)
- Notifications
- Version info

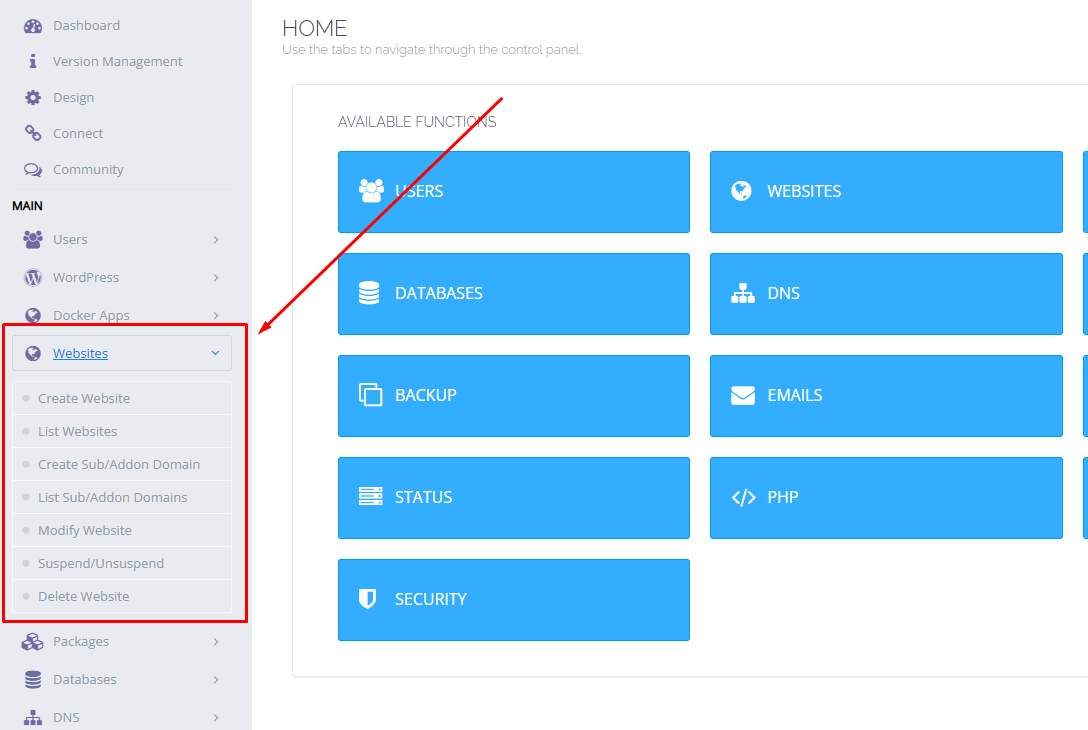
- Left Sidebar Menu: This is the primary navigation.
- Dashboard: Returns to the main overview
- Users: Manage admin and reseller users
- Websites: Create, list, and manage websites

- Packages: Define hosting packages (resource limits)
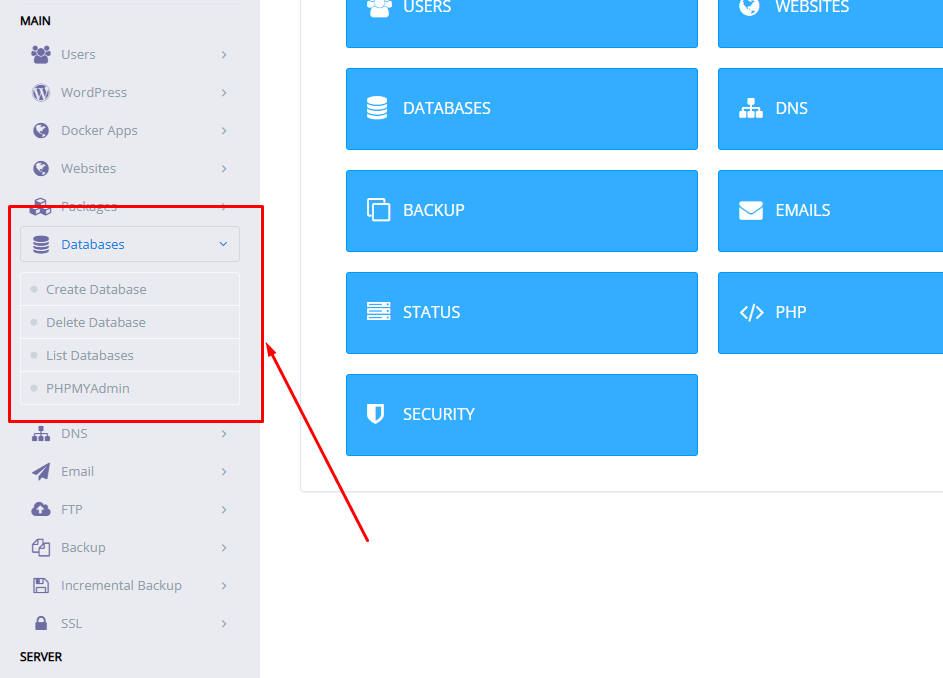
- Databases: Create and manage MySQL databases (phpMyAdmin access)

- DNS: Manage DNS zones (if CyberPanel is your DNS server)
- Email: Create and manage email accounts, access webmail

- FTP: Create and manage FTP accounts
- Backup: Configure and run backups
- SSL: Manage SSL certificates (Let's Encrypt)
- PHP: Change PHP versions, manage extensions
- Logs: Access server and website error/access logs
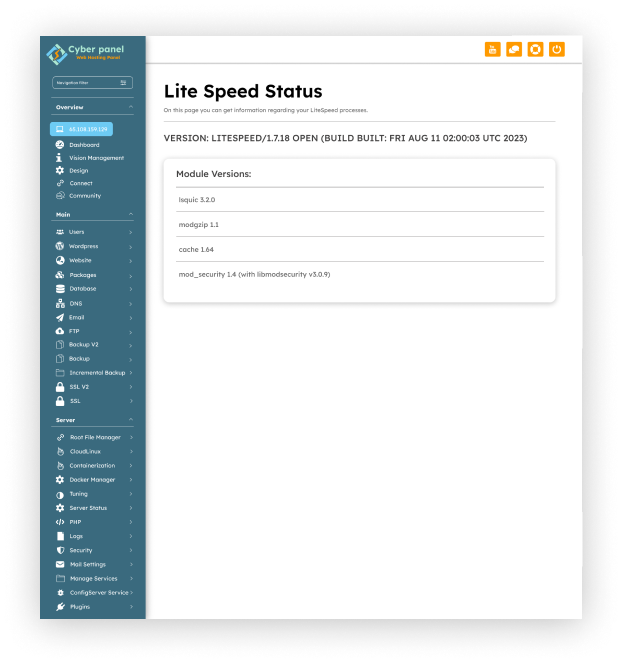
- Server Status: View LiteSpeed status, resource usage

- Main Content Area: Displays information and tools relevant to the selected menu item.
- Often shows quick stats like CPU, Memory, Disk usage

- Key Features Highlights: (reiterate with context of where to find them)
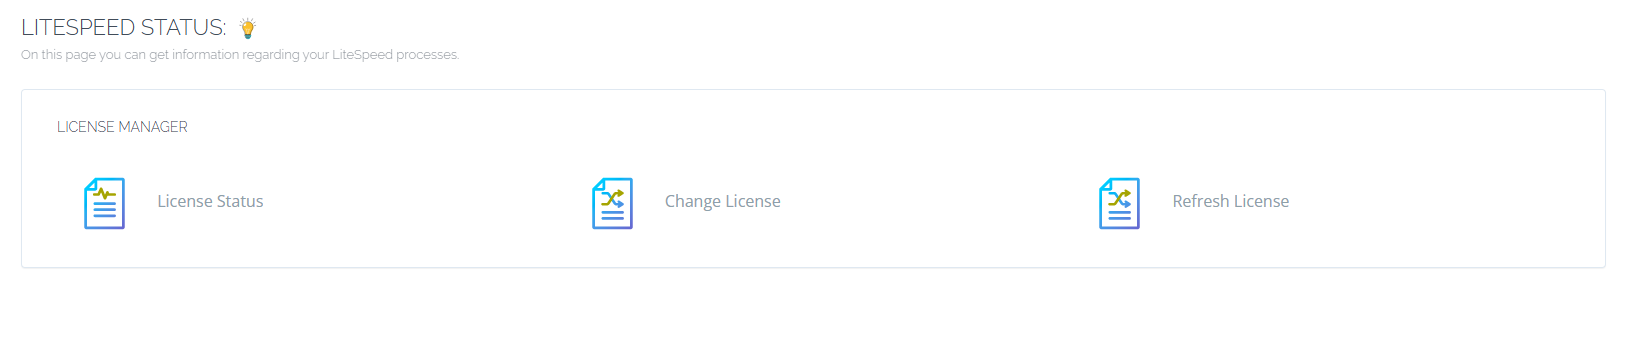
- LiteSpeed Web Server Management (Server Status)
- WordPress Staging/Cloning (under Websites → Manage)
- File Manager (under Websites → Manage)
- Git Manager (under Websites → Manage)
- Often shows quick stats like CPU, Memory, Disk usage
- Conclusion: Encourage users to explore the different sections to become comfortable with the interface.


4. How to Point Your Domain to CyberPanel Using Cloudflare
- Intro: Explain the process of connecting a domain registered/managed with Cloudflare to a CyberPanel server.
- Prerequisites:
- A domain name managed through Cloudflare
- Your CyberPanel server's IP address
- Cloudflare account login credentials
- Steps:
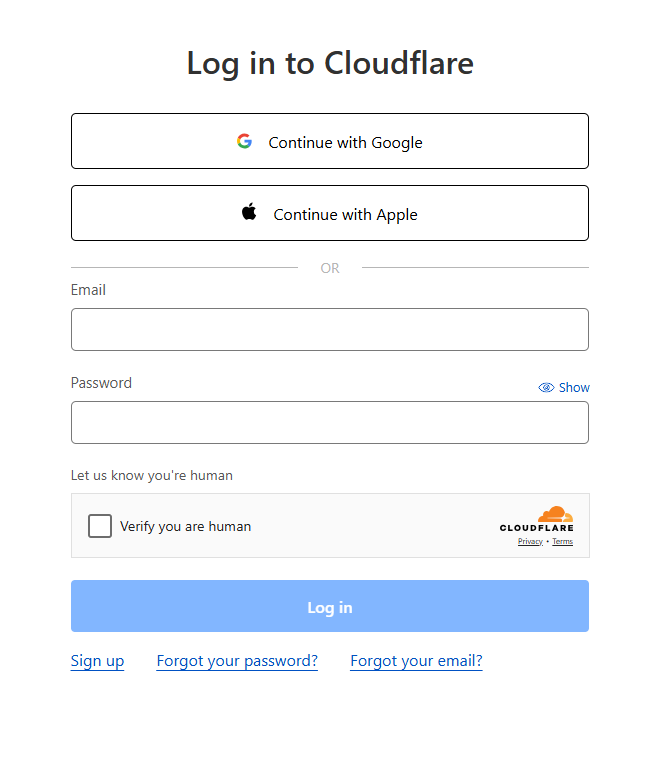
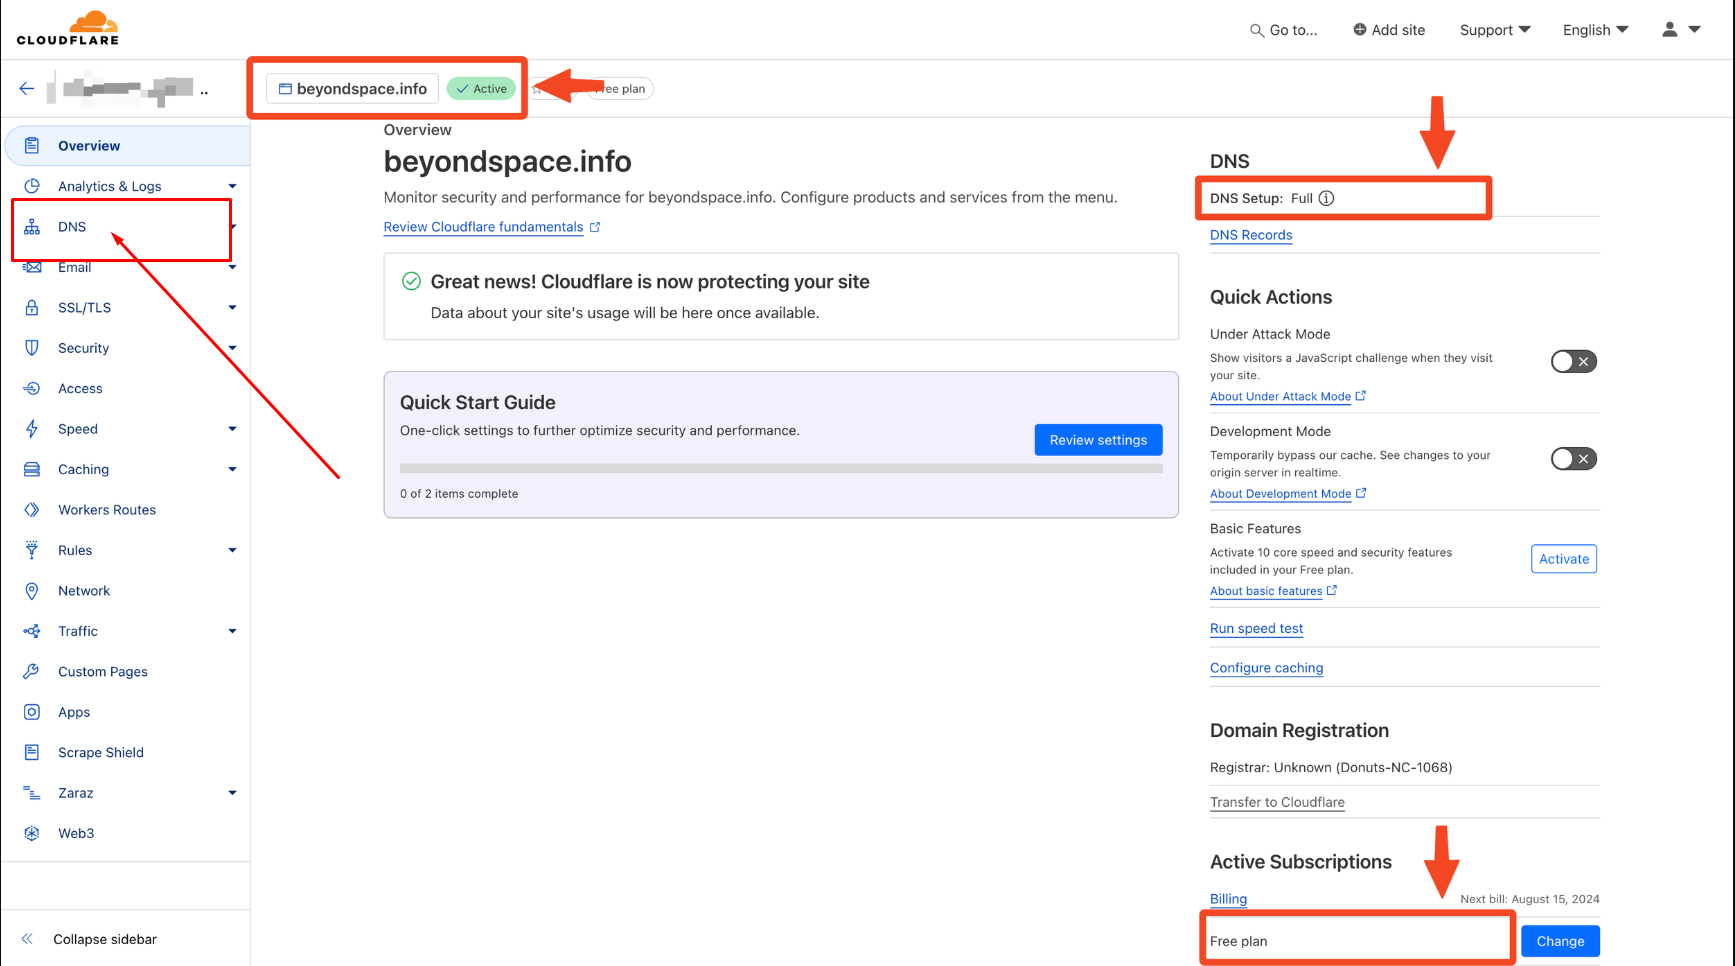
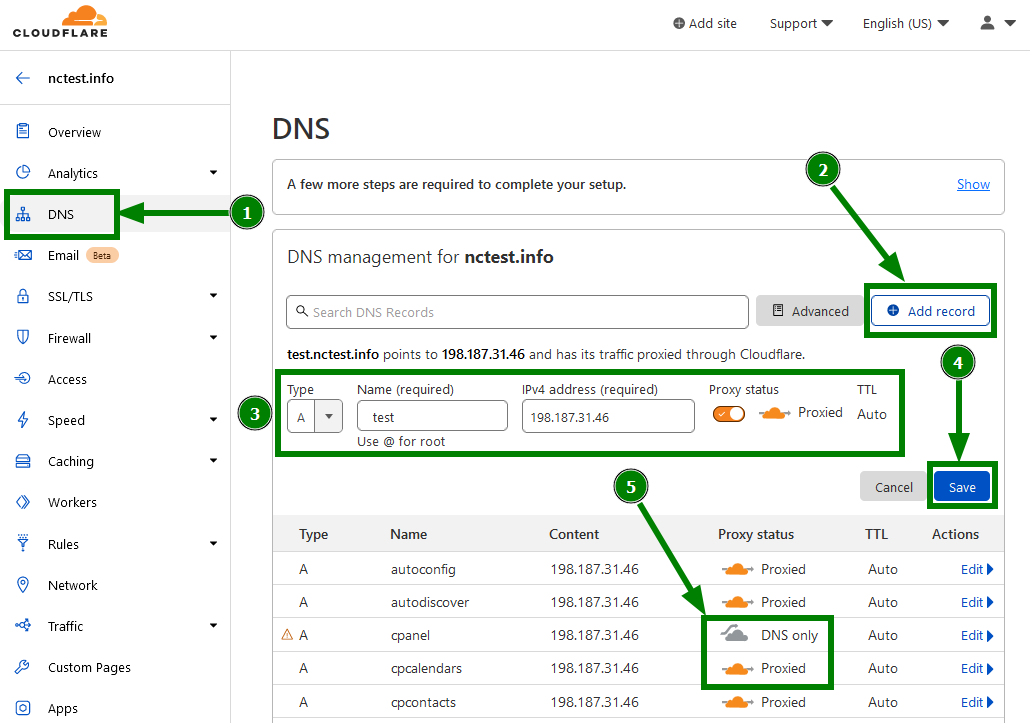
- Log in to Your Cloudflare Account: Go to dash.cloudflare.com.

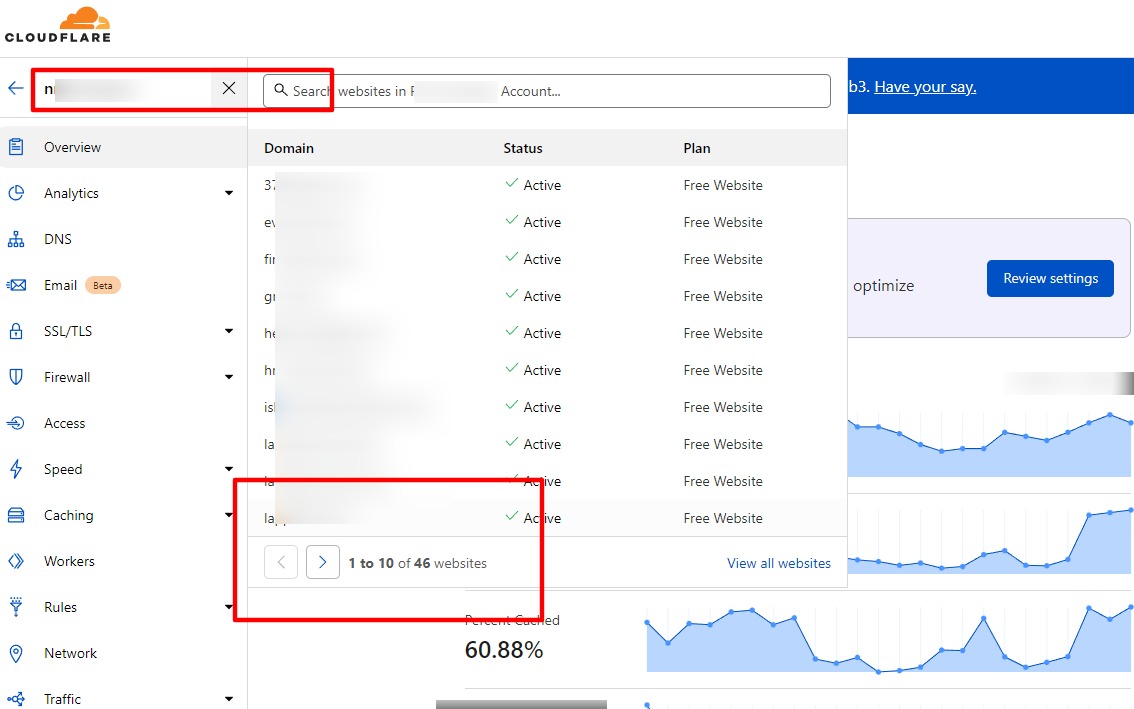
- Select Your Domain: Click on the domain name you want to point.

- Navigate to DNS Settings: Click on the "DNS" icon in the left sidebar or top menu.

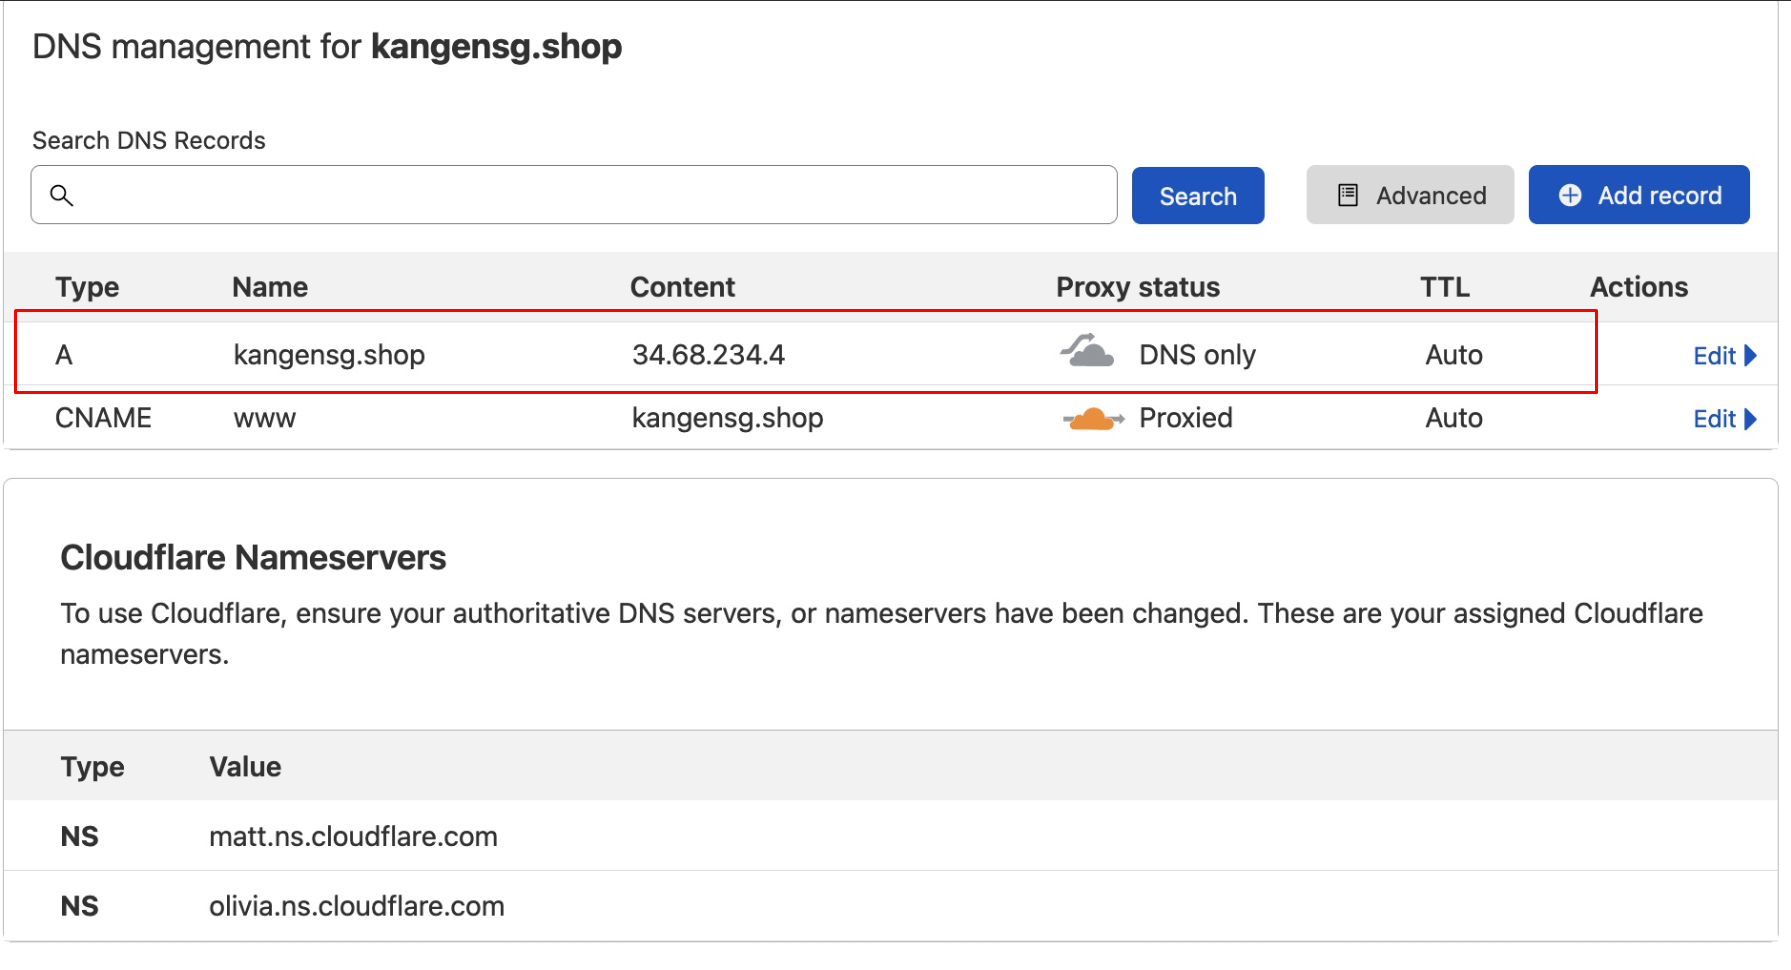
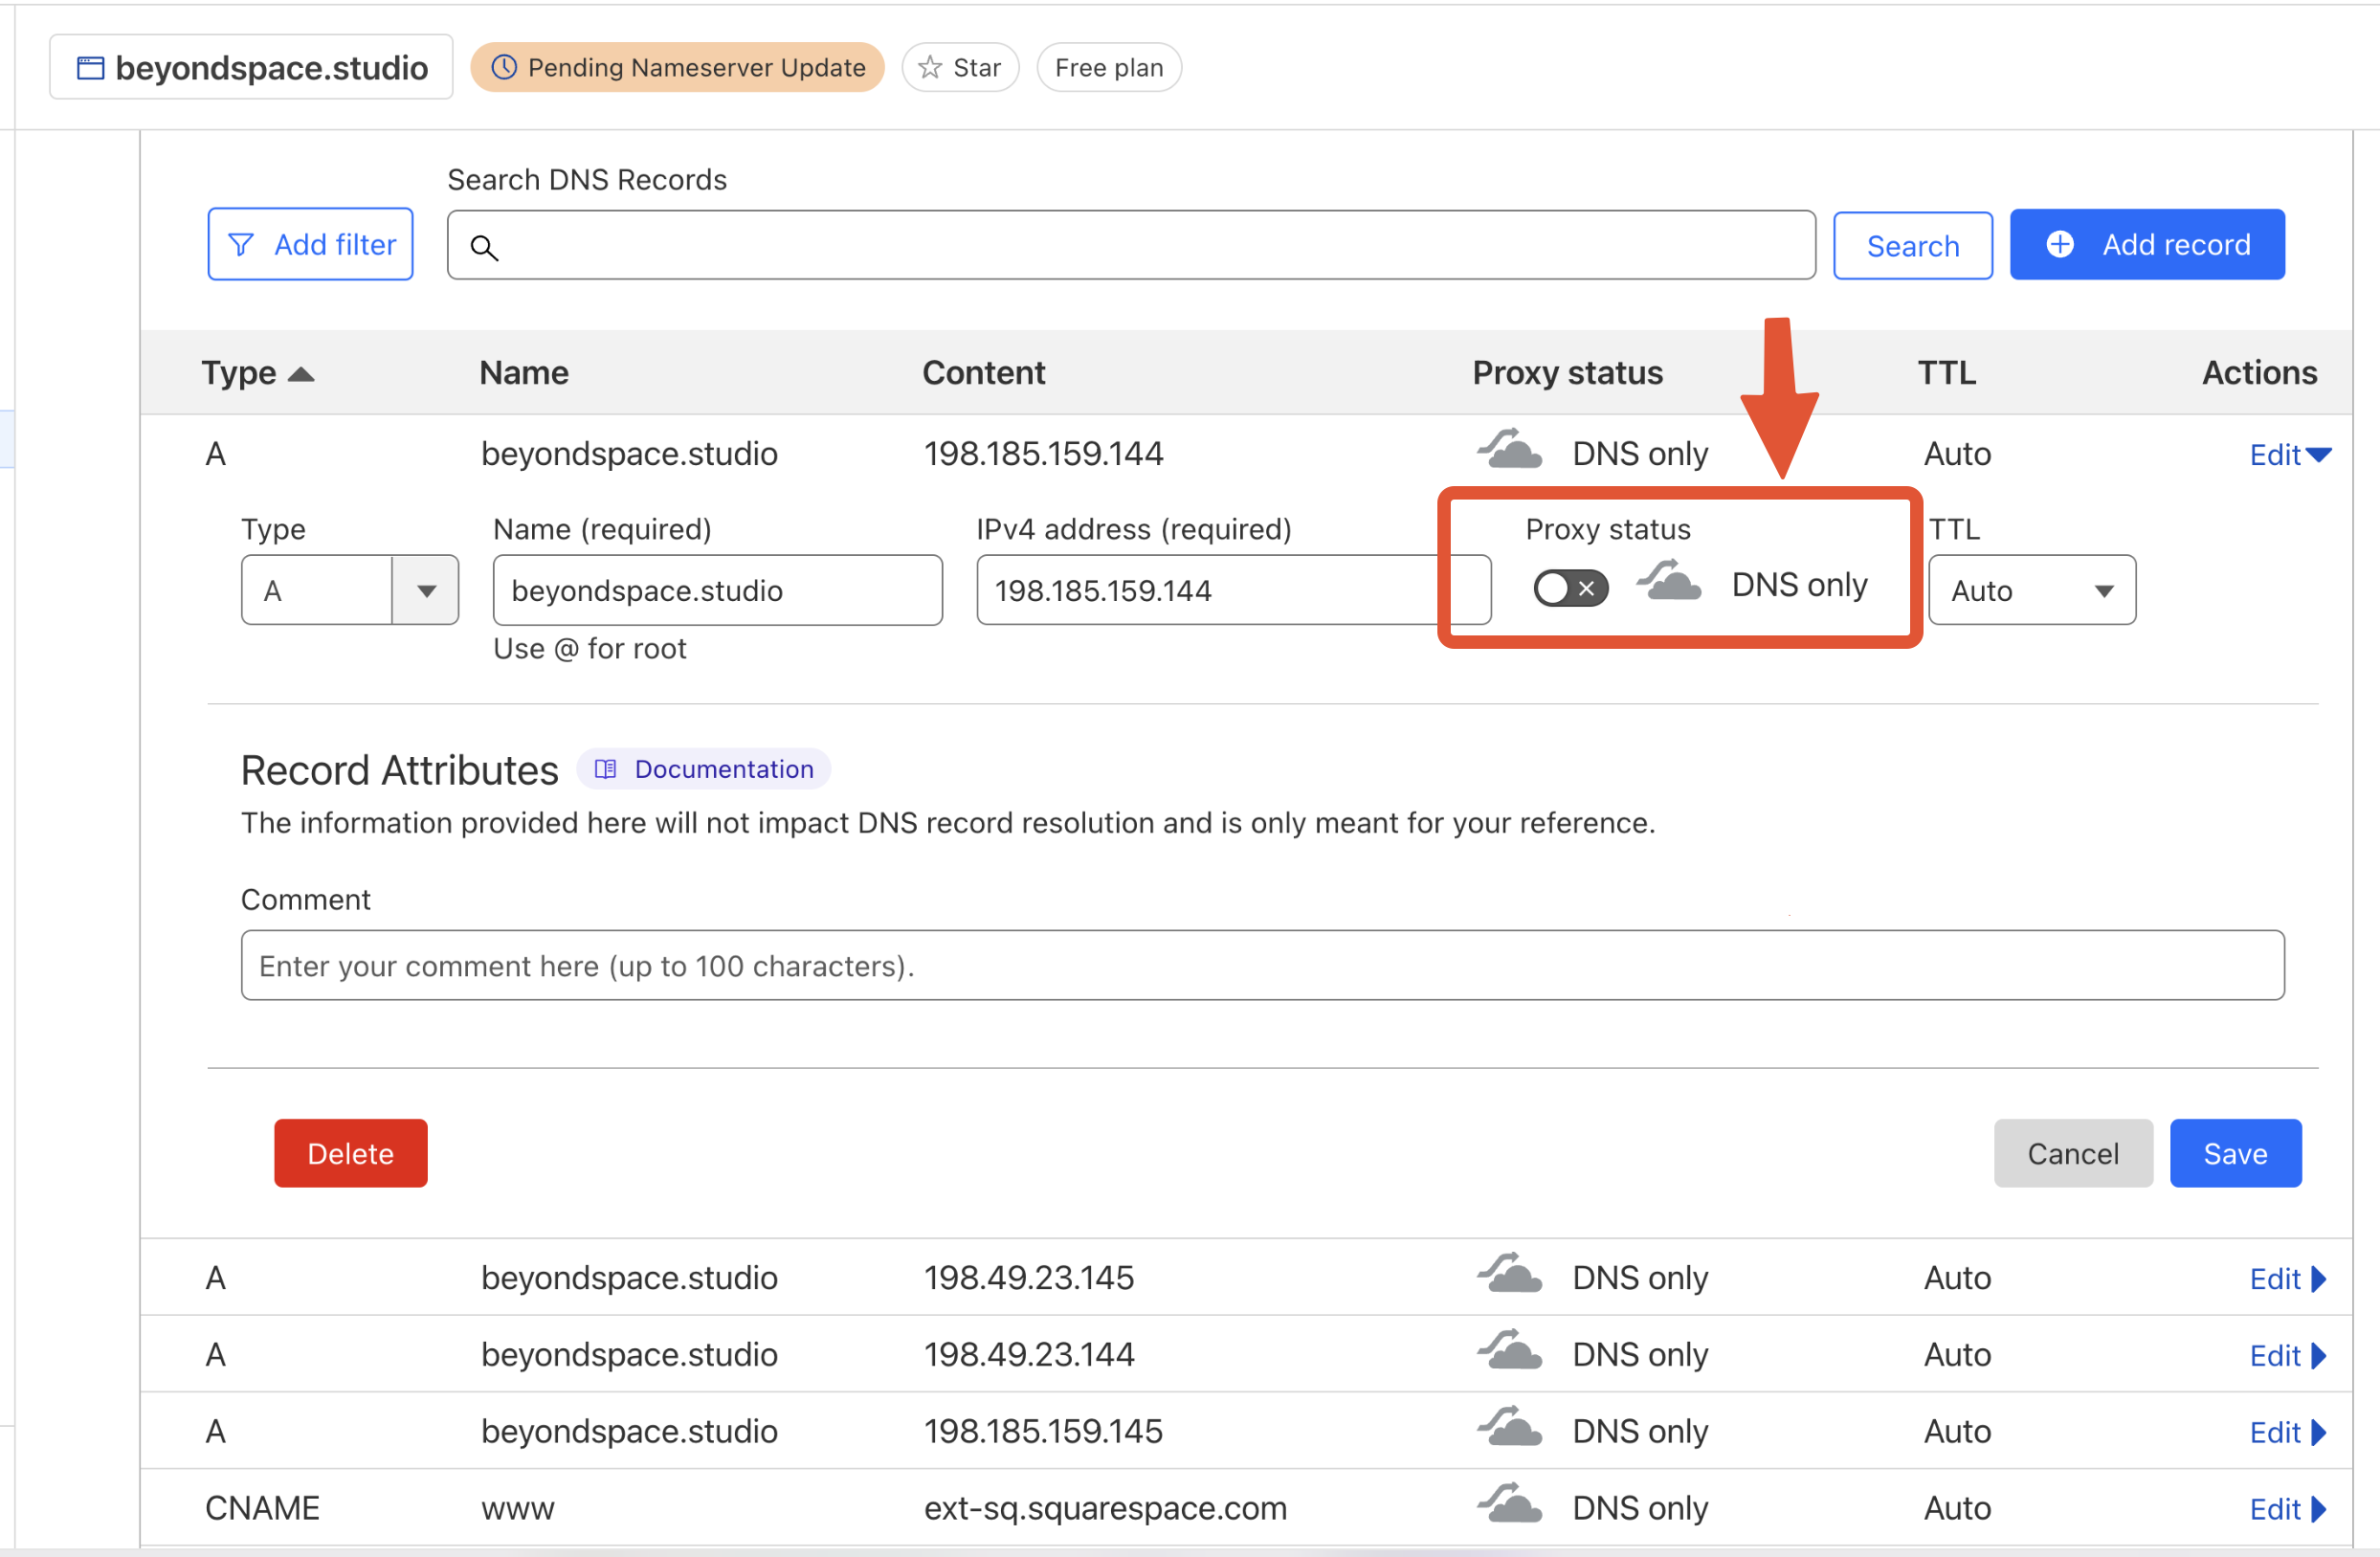
- Add/Update A Records:
- For the root domain (e.g., yourdomain.com):
- Click "+ Add record"
- Type: A
- IPv4 address: Enter your CyberPanel server's IP address
- Proxy status: Start with "DNS only" (grey cloud) for testing
- Click "Save"

- For www subdomain (e.g., www.yourdomain.com):
- Click "+ Add record"
- Type: A (or CNAME if you prefer)
- Name: www
- IPv4 address (if A record): Enter your CyberPanel server's IP address
- Target (if CNAME record): Enter @ or yourdomain.com
- Proxy status: "DNS only" for now
- Click "Save"

- For the root domain (e.g., yourdomain.com):
- Review DNS Records: You should see the newly added/updated A records in your list.

- Wait for DNS Propagation: Changes can take a few minutes to a few hours, though Cloudflare is usually fast.
- (Optional) Enable Cloudflare Proxy: Once you confirm the site loads correctly via the server IP, you can edit the records and change "Proxy status" to "Proxied" (orange cloud) to enable Cloudflare's CDN and security features.

- Conclusion: Your domain is now pointing to your CyberPanel server via Cloudflare. You can proceed to add the website in CyberPanel.
- Log in to Your Cloudflare Account: Go to dash.cloudflare.com.
5. How to Update DNS Records on GoDaddy, Namecheap, and Others
- Intro: General guide to updating DNS records, with specific steps for popular registrars.
- Prerequisites:
- Login credentials for your domain registrar
- The specific DNS records you need to add/update (e.g., A, MX, CNAME, TXT values)
- Cloudflare account login credentials (if using Cloudflare nameservers)
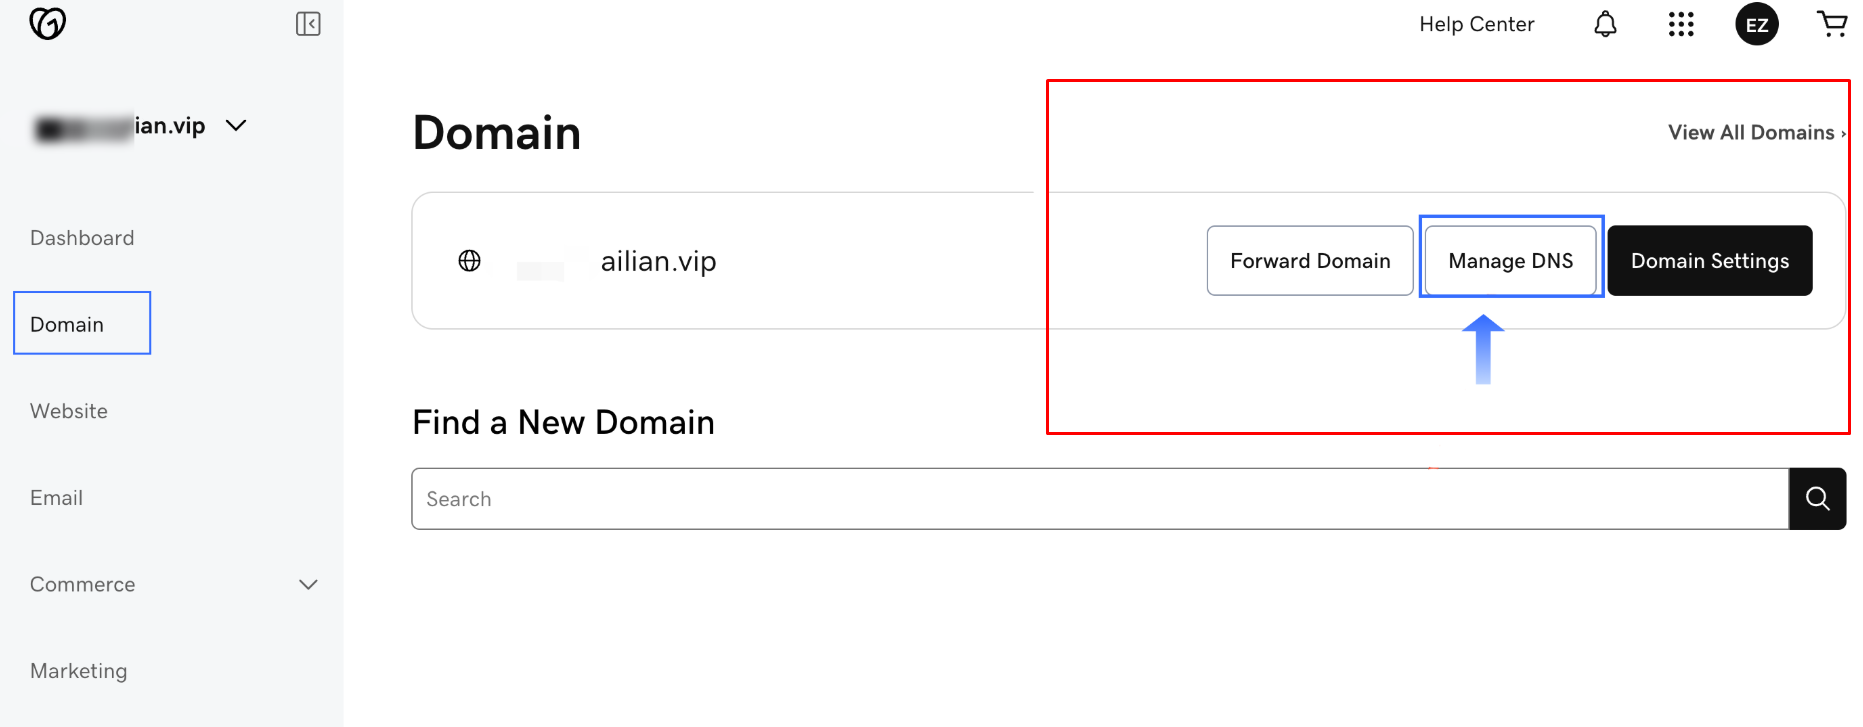
- General Steps (Applicable to Most Registrars):
- Log in to your domain registrar's account
- Navigate to your list of domains
- Select the domain you want to manage
- Look for options like "DNS Management," "Manage DNS," "Advanced DNS," or "Nameserver Settings"
- You'll typically see a list of existing records and options to "Add Record," "Edit Record," or "Delete Record"
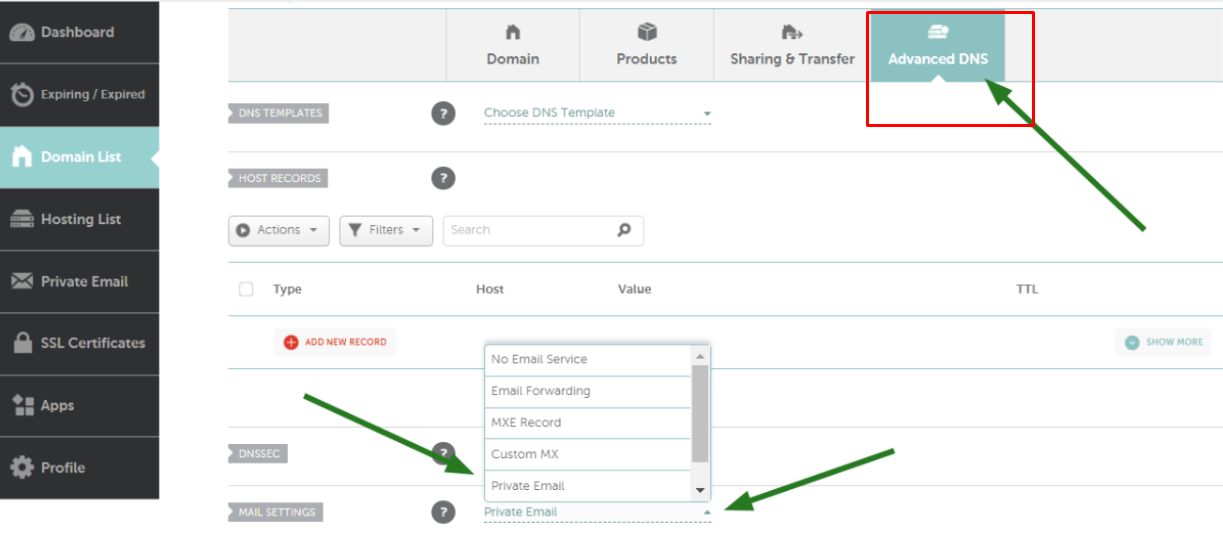
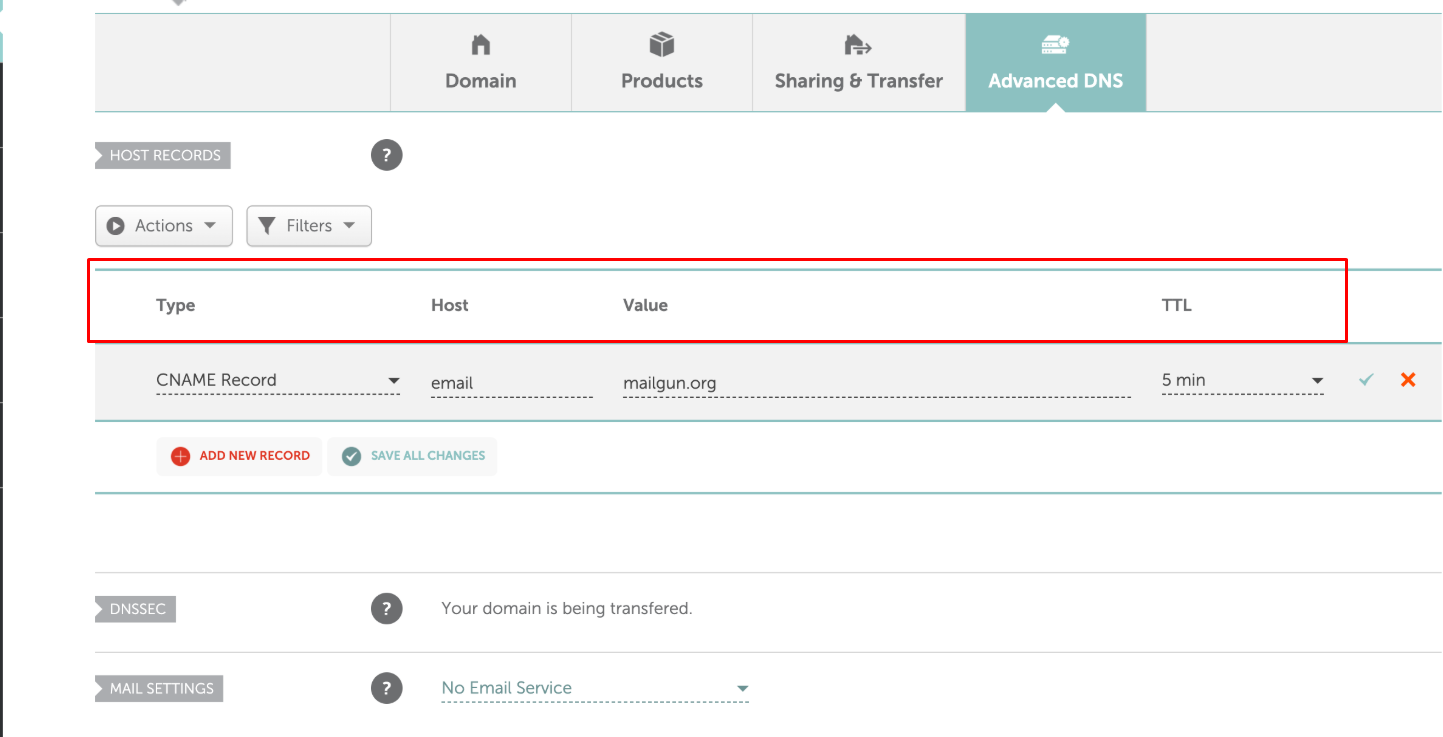
- Namecheap:
- Log in to Namecheap
- Go to "Domain List" from the sidebar
- Click the "Manage" button next to your domain

- Go to the "Advanced DNS" tab

- Under "Host Records," click "+ Add New Record"
- Select the record type (A, CNAME, MX, TXT), enter Host, Value, and TTL. Click the checkmark to save

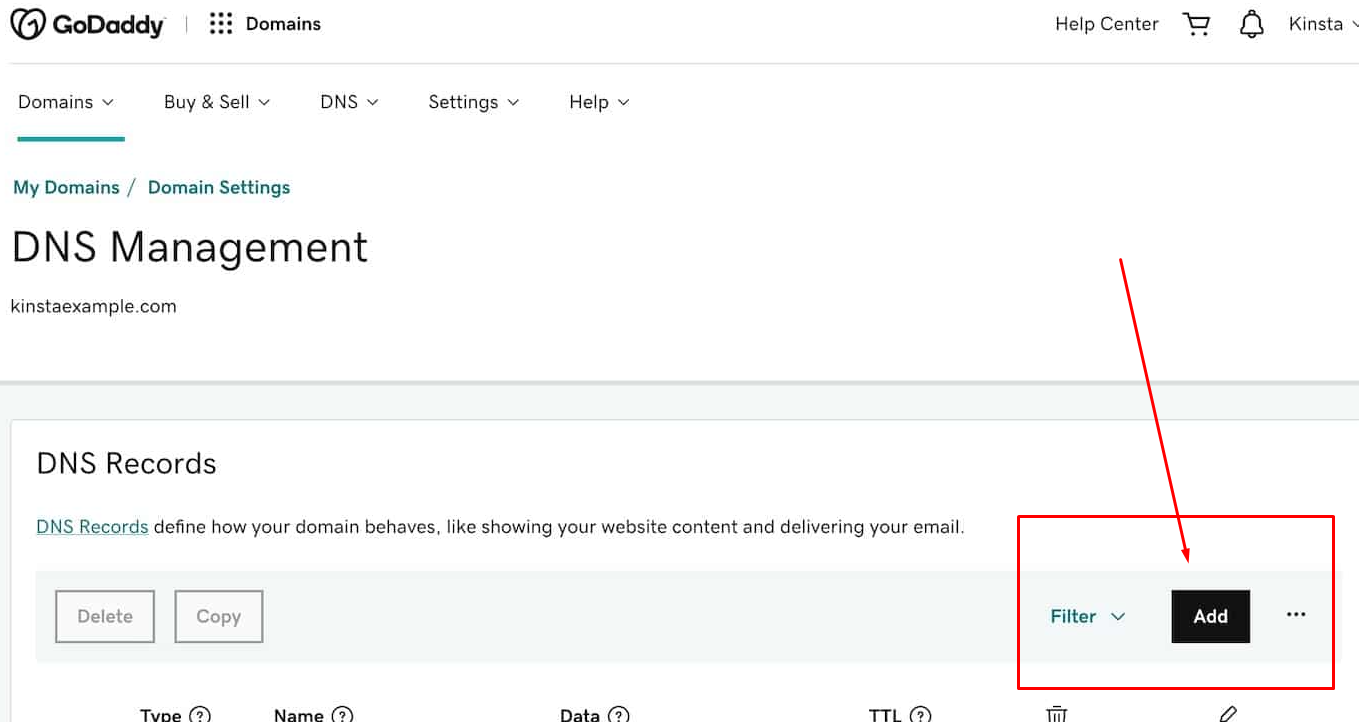
- GoDaddy:
- Log in to GoDaddy
- Go to "My Products." Find your domain and click "DNS" or the three dots (...) and select "Manage DNS"

- You'll see a list of DNS records. Click "Add" to add a new record or the pencil icon to edit an existing one
- Select Type, enter Name, Value, and TTL. Click "Add Record" or "Save"

- Others (General Guidance):
- UI varies but the principles are the same: find DNS management, add/edit records with Type, Name/Host, Value/Target, TTL
- Suggest users consult their specific registrar's help documentation if they can't find the settings
- Important Note on Nameservers: If your domain uses external nameservers (like Cloudflare's), you must manage DNS records at that external provider, not at your registrar.

- Conclusion: Emphasize DNS propagation time (typically 5 minutes to 48 hours)


6. Understanding A, MX, CNAME, and TXT Records for Email and Web
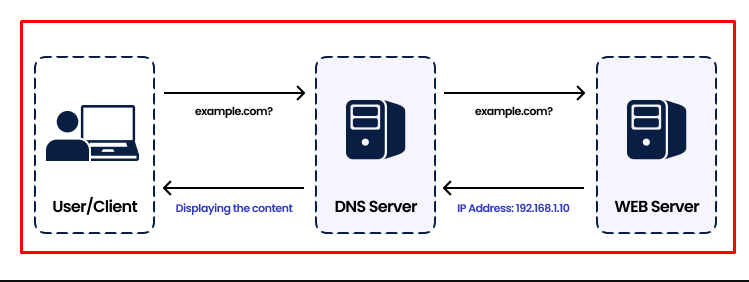
- Intro: Explain that DNS records are instructions that tell servers where to find your website, email, and other services.
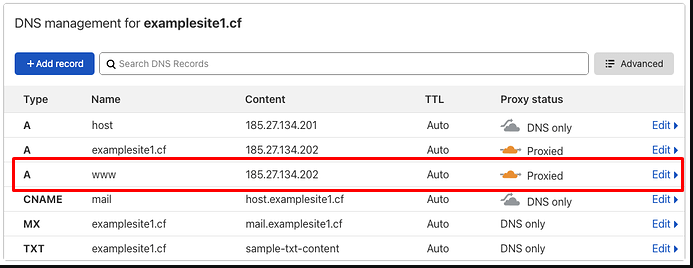
- A Record (Address Record):
- Purpose: Maps a domain name (or subdomain) directly to an IPv4 address. Essential for websites.
- Example:
- yourdomain.com A 192.0.2.1 (Points your main website to the server)
- blog.yourdomain.com A 192.0.2.2 (Points a subdomain to a server)

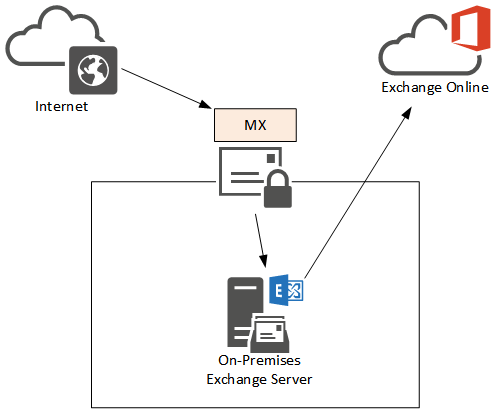
- MX Record (Mail Exchange Record):
- Purpose: Specifies the mail server(s) responsible for receiving emails for your domain.
- Components:
- Priority: A lower number means higher priority. Mail is tried at the lowest priority server first.
- Value/Target: The hostname of the mail server (e.g., mail.yourdomain.com or aspmx.l.google.com).
- Example:
- yourdomain.com MX 10 mail.yourdomain.com
- yourdomain.com MX 20 backupmail.yourdomain.com

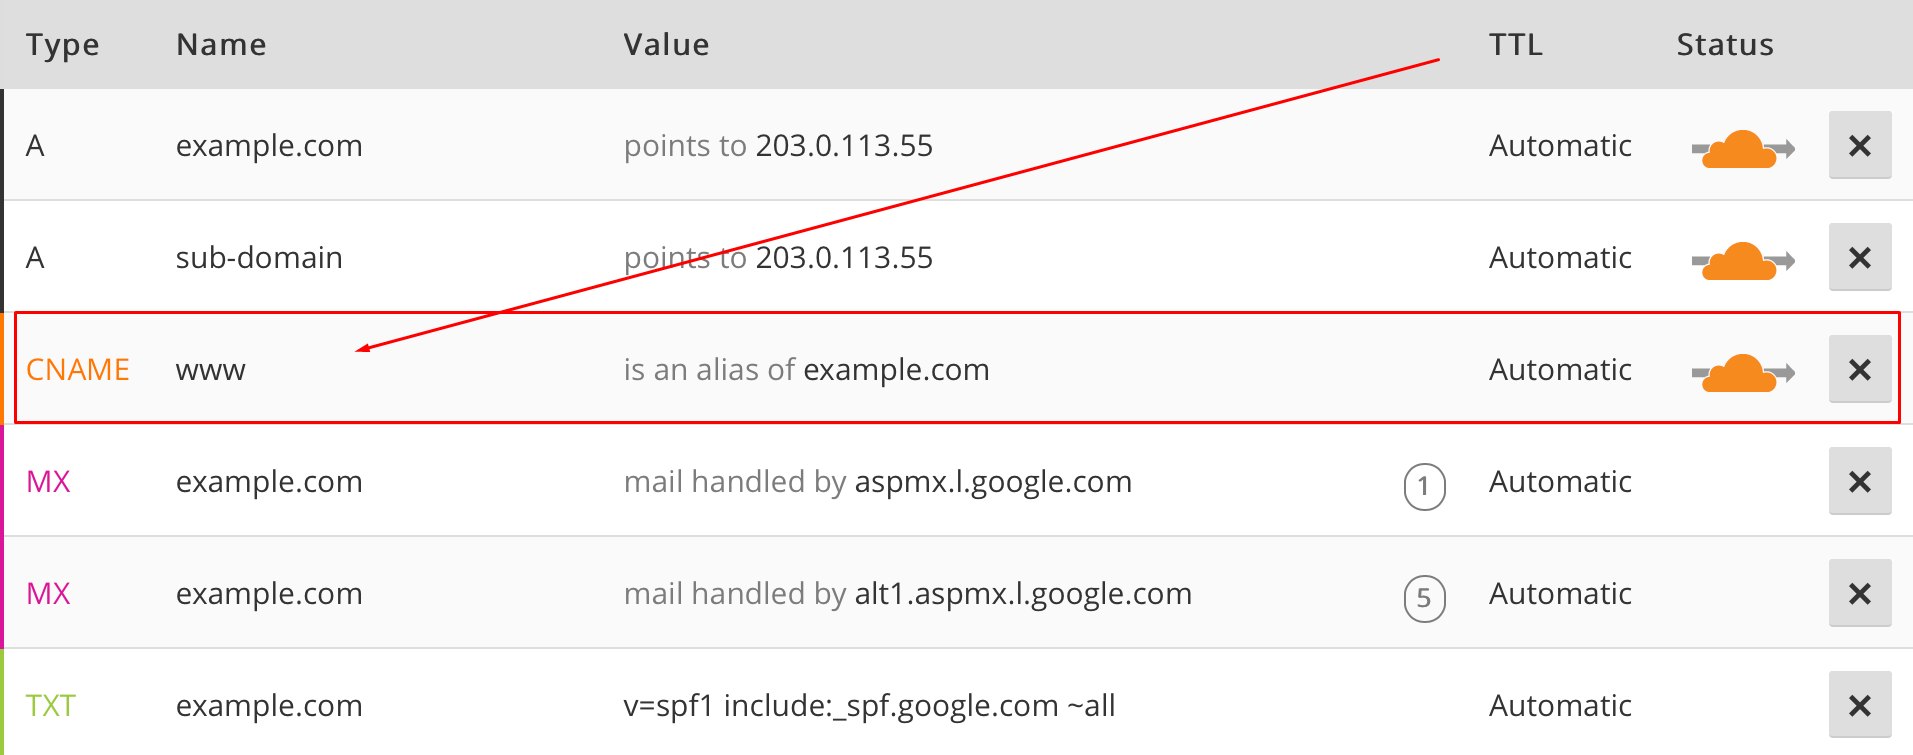
- CNAME Record (Canonical Name Record):
- Purpose: Maps a domain name (or subdomain) as an alias to another canonical (true) domain name. It does not point directly to an IP.
- Use Cases: Pointing www.yourdomain.com to yourdomain.com, pointing subdomains to external services (e.g., a helpdesk).
- Restriction: You usually cannot place a CNAME record on a root domain if other records (like MX) exist for it.
- Example:
- www.yourdomain.com CNAME yourdomain.com
- shop.yourdomain.com CNAME myshopifyprovider.com

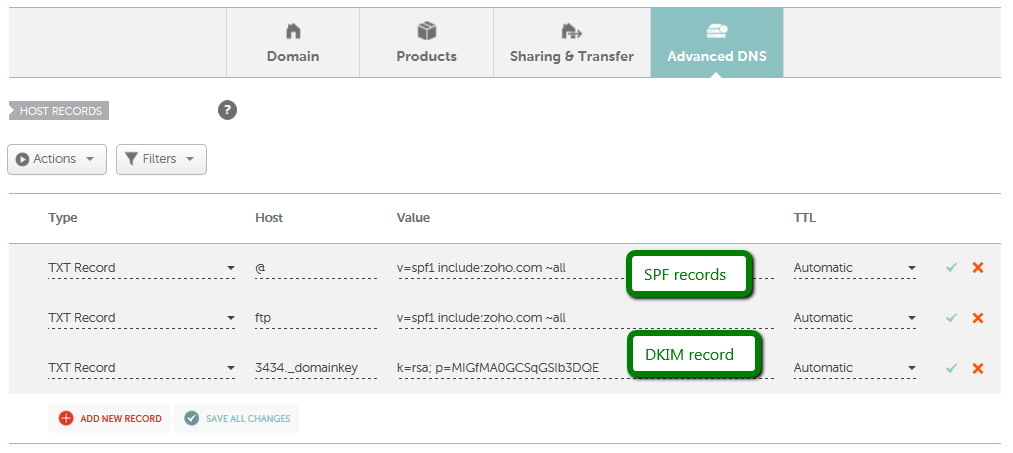
- TXT Record (Text Record):
- Purpose: Allows administrators to insert arbitrary text into DNS. Used for various verification and policy purposes.
- Common Uses:
- SPF (Sender Policy Framework): Helps prevent email spoofing. v=spf1 mx a -all
- DKIM (DomainKeys Identified Mail): Cryptographically signs emails. Contains a public key.
- DMARC (Domain-based Message Authentication, Reporting & Conformance): Email authentication policy.
- Domain Ownership Verification: For services like Google Search Console, Microsoft 365.
- Example:
- yourdomain.com TXT "v=spf1 mx -all"
- _dmarc.yourdomain.com TXT "v=DMARC1; p=reject; rua=mailto:dmarc@yourdomain.com"

- AAAA Record:
- Similar to A record, but for IPv6 addresses.
- Conclusion: Understanding these records is key to managing your online presence effectively.
7. How to Enable DNSSEC in Cloudflare for Better Security
- Intro: Explain DNSSEC (Domain Name System Security Extensions) adds a layer of security by verifying DNS responses are authentic.
- Prerequisites:
- Your domain is managed by Cloudflare (using Cloudflare's nameservers)
- Your domain registrar supports DNSSEC
- Steps:
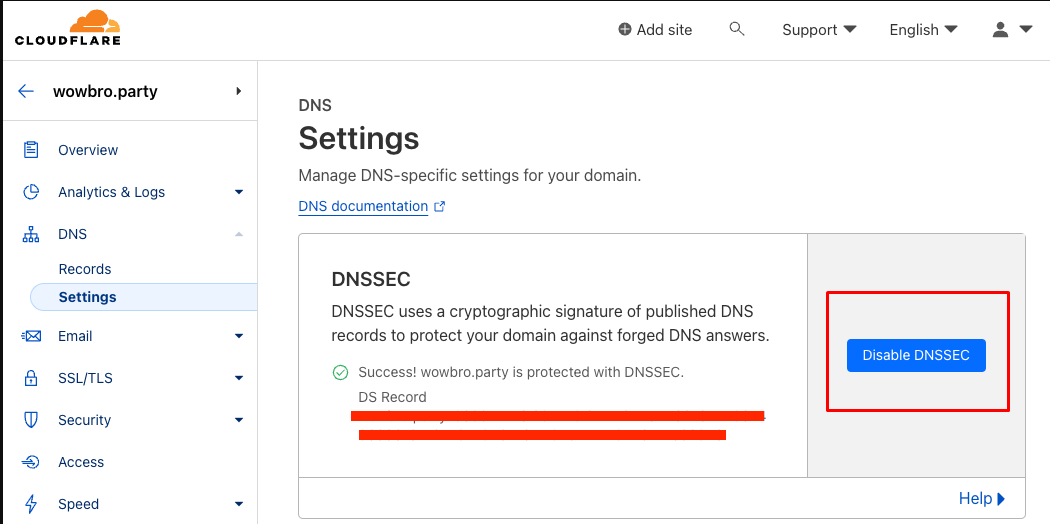
- Log in to Cloudflare: Go to dash.cloudflare.com
- Select Your Domain
- Navigate to DNS Settings: Click the "DNS" icon
- Go to the "Settings" Tab within DNS: (This might have changed UI slightly, but it's usually under DNS, then a sub-tab/section for DNSSEC)

- Enable DNSSEC:
- Find the DNSSEC section and click "Enable DNSSEC" or a similar button
- Cloudflare will generate the necessary DS (Delegation Signer) records

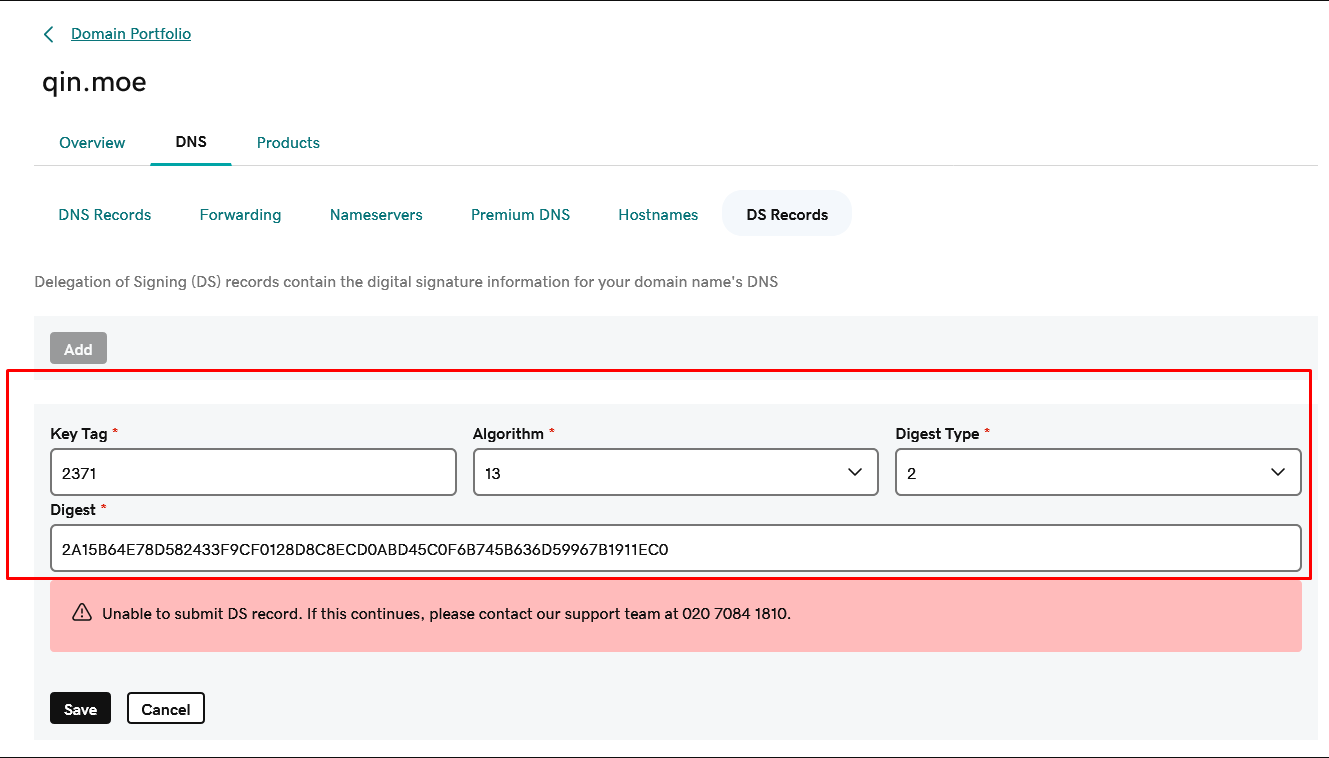
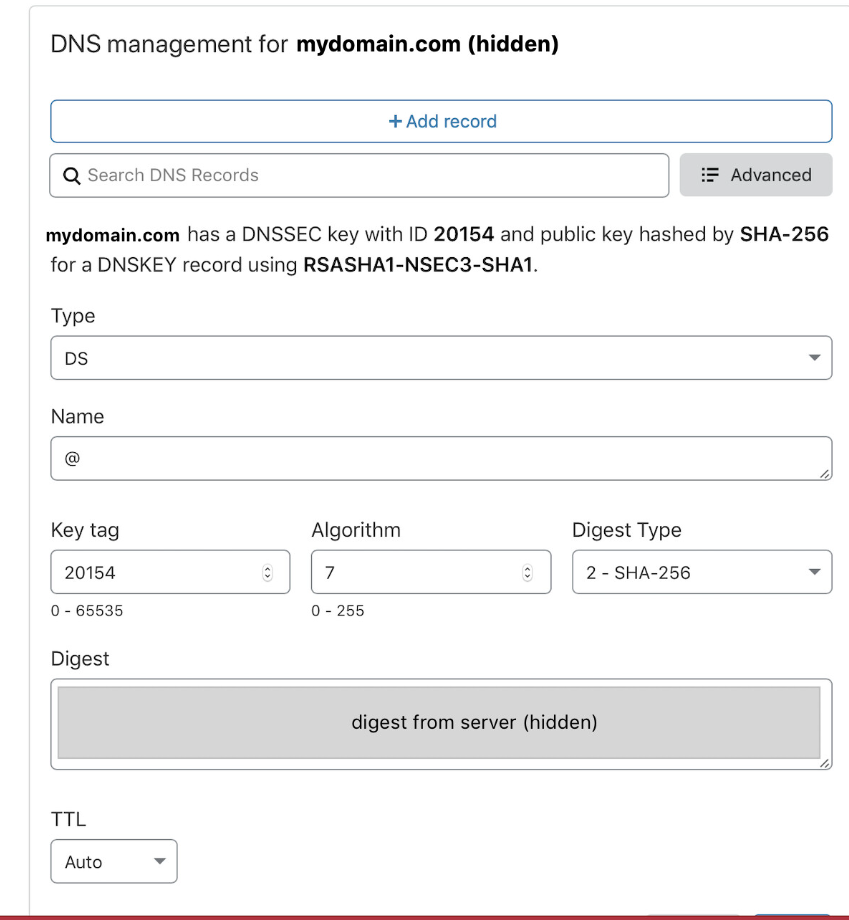
- Copy the DS Record Details:
- Cloudflare will display the DS record information (Key Tag, Algorithm, Digest Type, Digest)
- You'll need these for your registrar

- Log in to Your Domain Registrar: (e.g., Namecheap, GoDaddy)
- Navigate to DNSSEC Settings at Your Registrar:
- This varies greatly by registrar
- Look for "DNSSEC," "DS Records," or similar in your domain management area
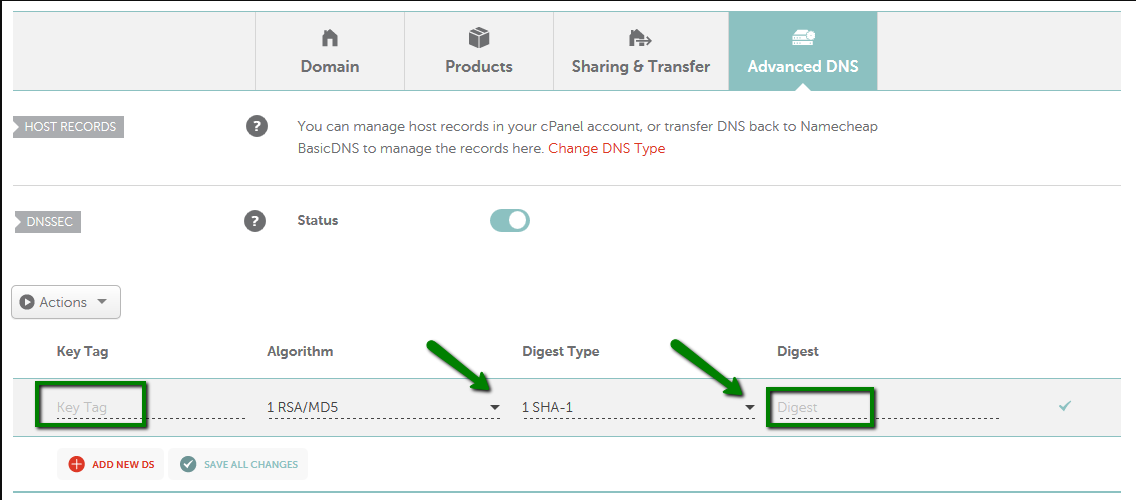
- Namecheap: Domain List -> Manage -> Advanced DNS -> DNSSEC section
- GoDaddy: My Products -> Domain -> Manage DNS -> Advanced Settings (bottom of page) -> DNSSEC

- Add the DS Record(s) from Cloudflare:
- Carefully enter the Key Tag, Algorithm, Digest Type, and Digest provided by Cloudflare into your registrar's interface
- Save the changes

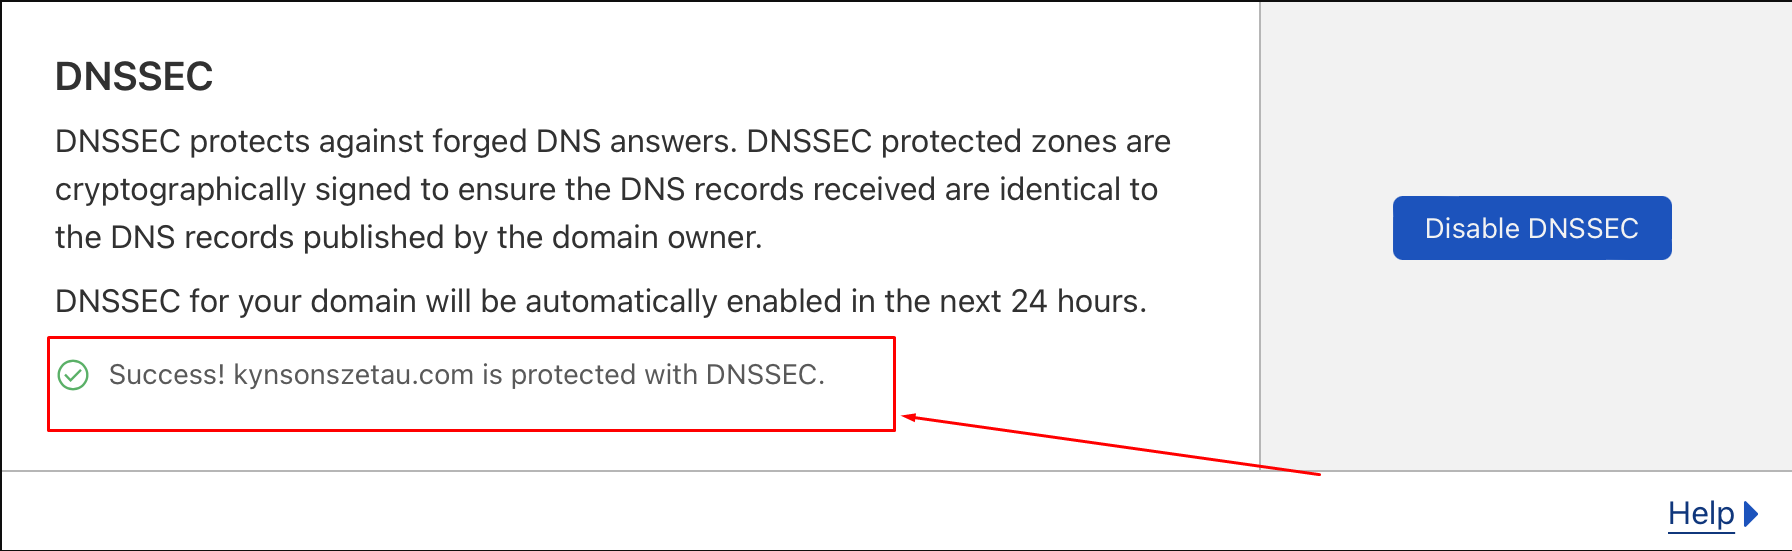
- Verify DNSSEC Activation:
- Back in Cloudflare, it might take some time for the status to update to "Active" or "Success"
- You can also use an online DNSSEC checker tool (like DNSViz or Verisign DNSSEC Debugger) to test your domain after a few hours

- Conclusion: DNSSEC is now enabled, enhancing the security and trustworthiness of your domain's DNS.
8. How to Create Email Accounts in CyberPanel
- Intro: Show users how to set up custom email addresses (e.g., you@yourdomain.com) using CyberPanel.
- Prerequisites:
- Domain added to CyberPanel (see Topic 15)
- MX records for your domain correctly pointing to your CyberPanel server (CyberPanel usually sets this up if it's the DNS server, or you need to do it manually at your DNS provider)
- Steps:
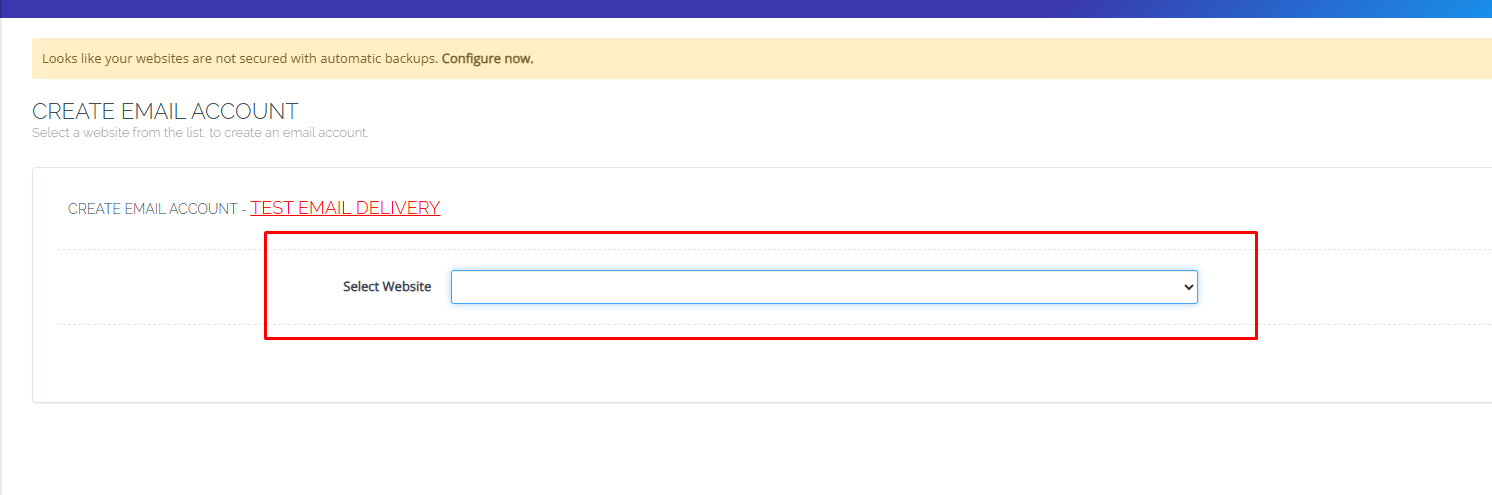
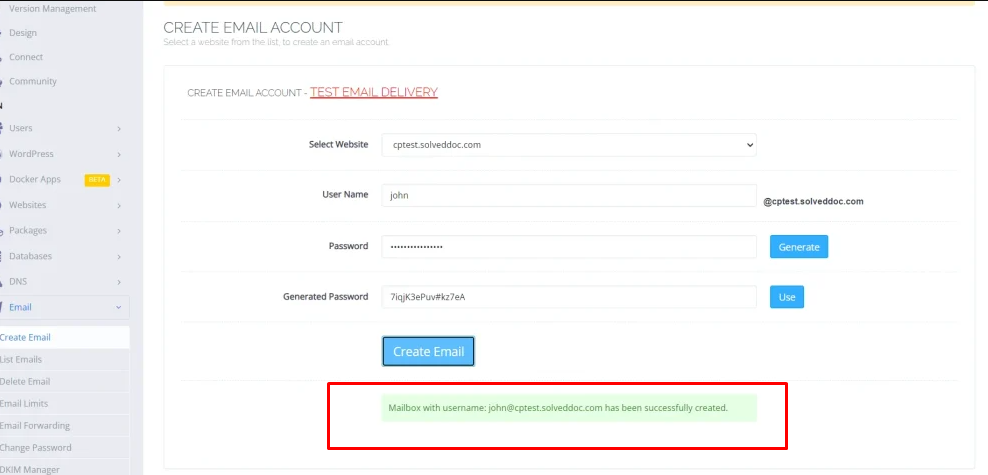
- Log in to CyberPanel
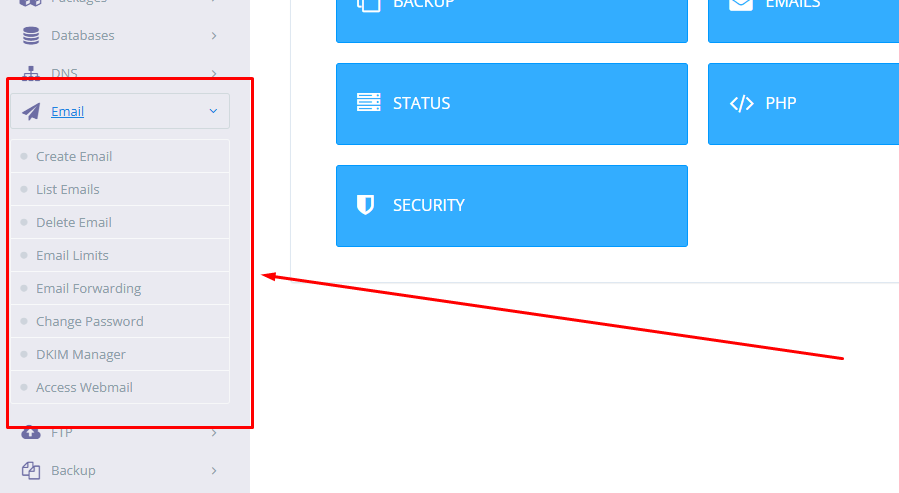
- Navigate to "Email": Click "Email" in the left sidebar
- Select "Create Email": Click "Create Email" from the Email submenu

- Select Website: Choose the domain for which you want to create the email account from the "Select Website" dropdown

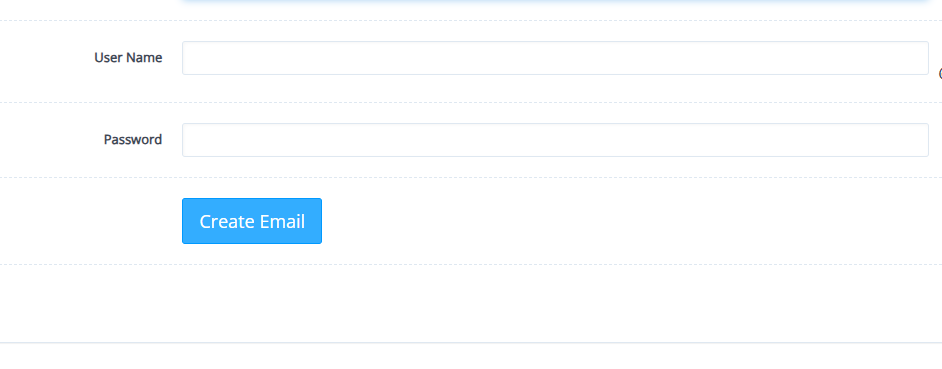
- Enter Email Details:
- Username: Enter the desired part before the @ (e.g., info, support, john.doe)
- Password: Create a strong password or use the "Generate" button
- Disk Quota (Optional): Set a limit for mailbox size (in MB). 0 for unlimited

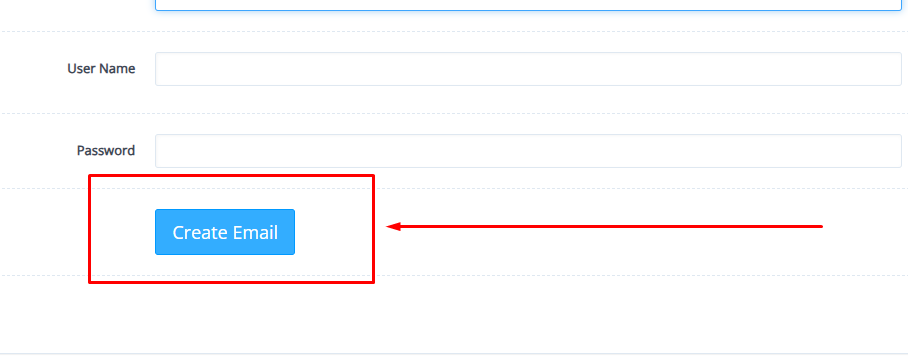
- Click "Create Email":

- Confirmation: You should see a success message

- List Emails (Optional): You can go to "Email" -> "List Emails" and select your domain to see the newly created account

- Conclusion: You've successfully created an email account. Next, learn how to access it.

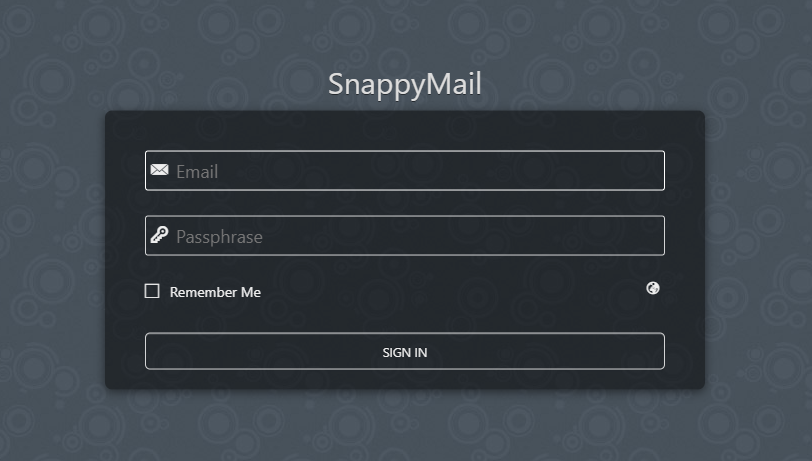
9. How to Access and Use Webmail on CyberPanel
- Intro: Explain how to check emails using the built-in webmail client (RainLoop or SnappyMail) in CyberPanel.
- Prerequisites:
- Email account created in CyberPanel (see Topic 8)
- Email account username (full email address) and password
- Steps to Access Webmail:
- Method 1: Direct URL:
- Open your web browser and go to:
https://(or/rainloop/ /snappymail/if that's the installed webmail client) - It's better to use
https://yourdomain.com/rainloop/once SSL is set up for your domain
- Open your web browser and go to:
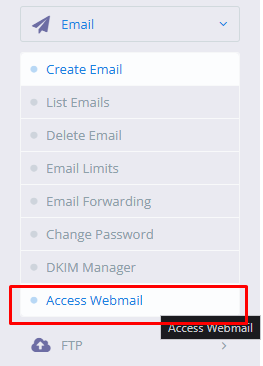
- Method 2: From CyberPanel Dashboard (Admin/User):
- Log in to CyberPanel
- Navigate to "Email" -> "Access Webmail"
- This will redirect you to the webmail login page
- Log in to Webmail:
- Email: Enter your full email address (e.g., info@yourdomain.com)
- Password: Enter the password for that email account
- Click "Login" or the arrow button

- Method 1: Direct URL:
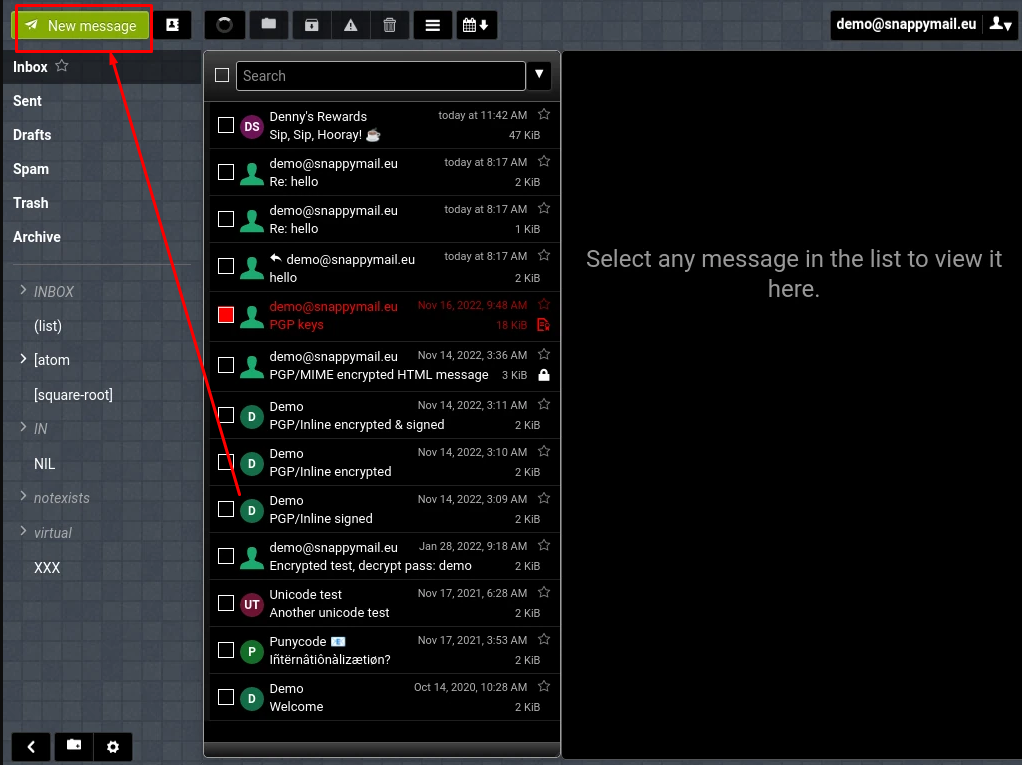
- Using Webmail Interface (RainLoop/SnappyMail):
- Inbox: View received emails
- Compose: Click "Compose" or a "New Message" icon to write an email

- Folders: Sent, Drafts, Spam, Trash are usually available
- Settings: Configure signature, display preferences, etc. (usually a gear icon)


- Conclusion: Webmail provides a convenient way to manage your emails from any browser.


10. Fixing Common Email Delivery Issues (SPF, DKIM, DMARC)
- Intro: Address why emails might go to spam or not be delivered, focusing on SPF, DKIM, and DMARC records.
- Prerequisites:
- Domain added to CyberPanel
- Email accounts created
- Understanding the "Why":
- Email providers (Gmail, Outlook) use these records to verify sender authenticity and combat spam/phishing
- Missing or misconfigured records are a primary cause of delivery problems
- 1. SPF (Sender Policy Framework):
- What it does: Lists authorized servers/IPs that can send email on behalf of your domain
- How CyberPanel Handles It: If CyberPanel manages your DNS, it usually adds a basic SPF record when a website/email is created
- Checking/Adding Manually:
- Go to your DNS provider (Cloudflare, Namecheap, GoDaddy, or CyberPanel -> DNS -> Add/Edit Records if CyberPanel is authoritative)
- Look for a TXT record for your root domain (@ or yourdomain.com)
- A common SPF record for CyberPanel:
v=spf1 a mx ip4:(or~all -allfor stricter policy)a: Allows the server IP defined in your domain's A recordmx: Allows servers listed in your MX recordsip4:: Explicitly allows your server's IP~all(SoftFail): Emails from other sources might be marked suspicious-all(HardFail): Emails from other sources should be rejected
- Add or modify the TXT record


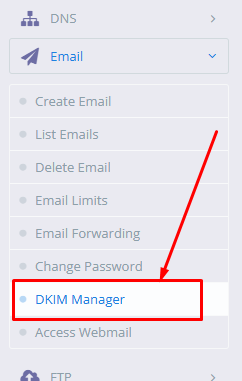
- 2. DKIM (DomainKeys Identified Mail):
- What it does: Adds a digital signature to outgoing emails, allowing receivers to verify the email hasn't been tampered with and originates from an authorized server
- How CyberPanel Handles It: CyberPanel automatically generates DKIM keys and the necessary DNS record when email services are enabled for a domain
- Setup Steps:
- In CyberPanel, go to "Email" -> "DKIM Manager"

- Select your domain. It should show DKIM keys are active/generated

- For External DNS (e.g., Cloudflare):
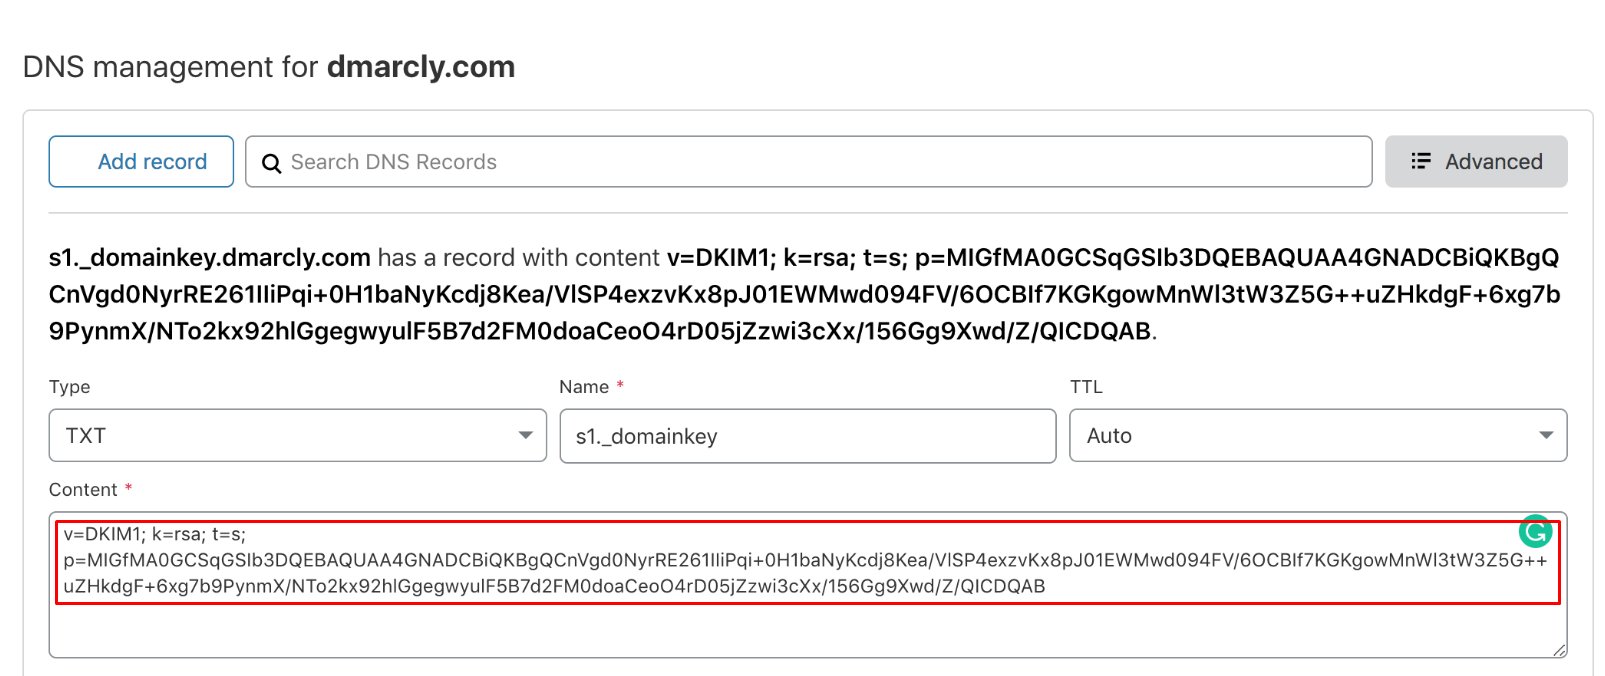
- 1. In DKIM Manager, CyberPanel will display the TXT record name (e.g., default._domainkey.yourdomain.com) and the value (the public key)
- 2. Copy this name and value
- 3. Go to your DNS provider and create a new TXT record with this name and value
- 4.

- 5.

- In CyberPanel, go to "Email" -> "DKIM Manager"
- 3. DMARC (Domain-based Message Authentication, Reporting & Conformance):
- What it does: Tells receiving mail servers what to do if an email fails SPF or DKIM checks (e.g., quarantine, reject). Also provides reporting
- How to Set Up:
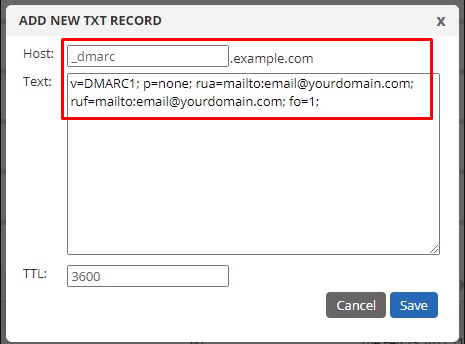
- Go to your DNS provider
- Create a TXT record with the name
_dmarc.yourdomain.com(or just_dmarcif your provider auto-appends the domain) - Value (start simple):
v=DMARC1; p=none; rua=mailto:your-email@yourdomain.comp=none: Monitor mode. No action taken on failing emails. Good for startingrua=mailto:your-email@yourdomain.com: Aggregate reports will be sent to this address
- Later, you can change
p=nonetop=quarantineorp=reject
- 4. Checking rDNS (Reverse DNS / PTR Record):
- Ensure your server's IP has a PTR record pointing back to your main server hostname (e.g., server.yourdomain.com)
- This is usually set by your VPS/server provider. Contact them if needed
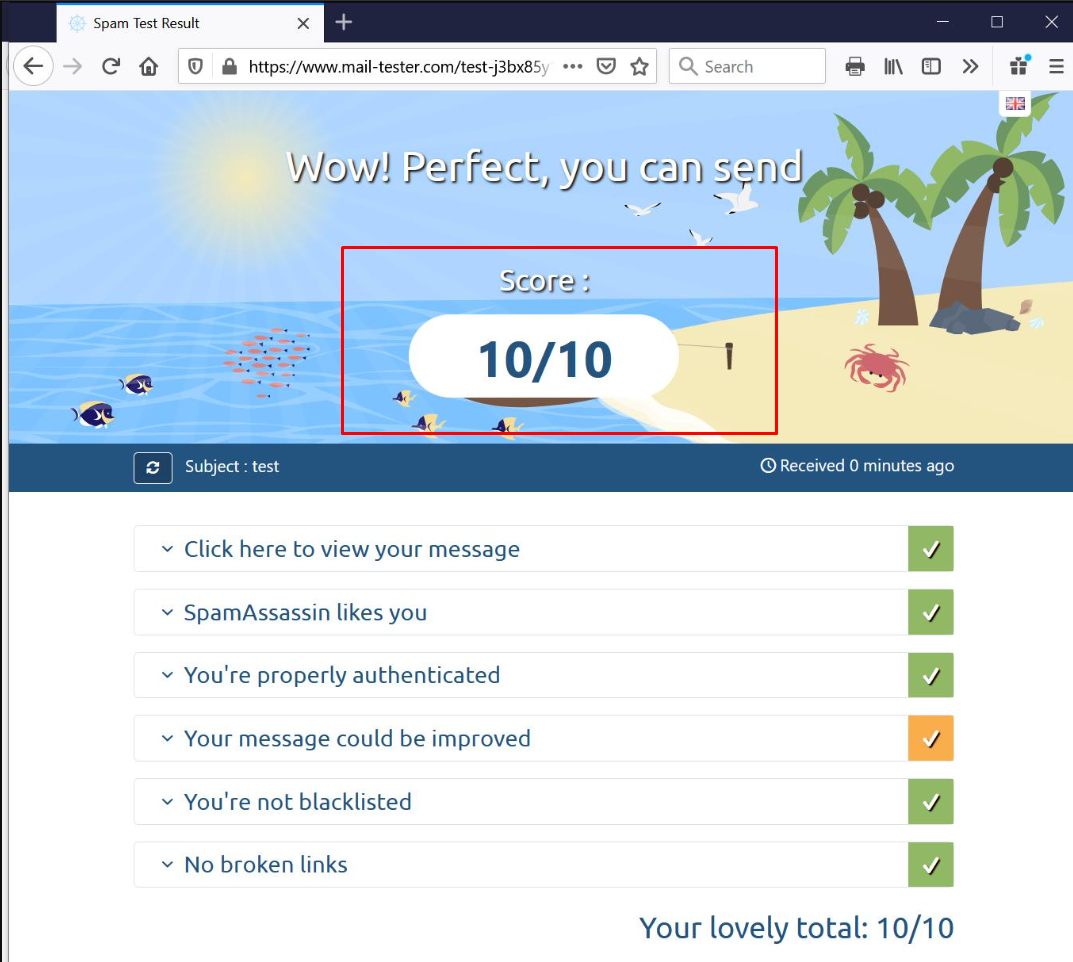
- 5. Using Email Testers:
- Use tools like mail-tester.com
- Send an email from your CyberPanel account to the address they provide
- It will analyze your email and DNS setup and give you a score and suggestions

- Conclusion: Properly configured SPF, DKIM, and DMARC significantly improve email deliverability.


11. How to Set Up Email on Gmail or Outlook (IMAP/SMTP)
- Intro: Guide users on configuring their CyberPanel email accounts in popular desktop/mobile clients like Gmail and Outlook.
- Prerequisites:
- Email account created in CyberPanel (full address and password)
- Your server's hostname (ideally mail.yourdomain.com which should have an SSL certificate). Using the server IP directly can cause SSL warnings in clients
- Finding Your Mail Server Settings:
- IMAP (Incoming Mail):
- Server: mail.yourdomain.com (or your server hostname/IP)
- Port: 993 (SSL/TLS) or 143 (STARTTLS/None)
- Encryption: SSL/TLS or STARTTLS
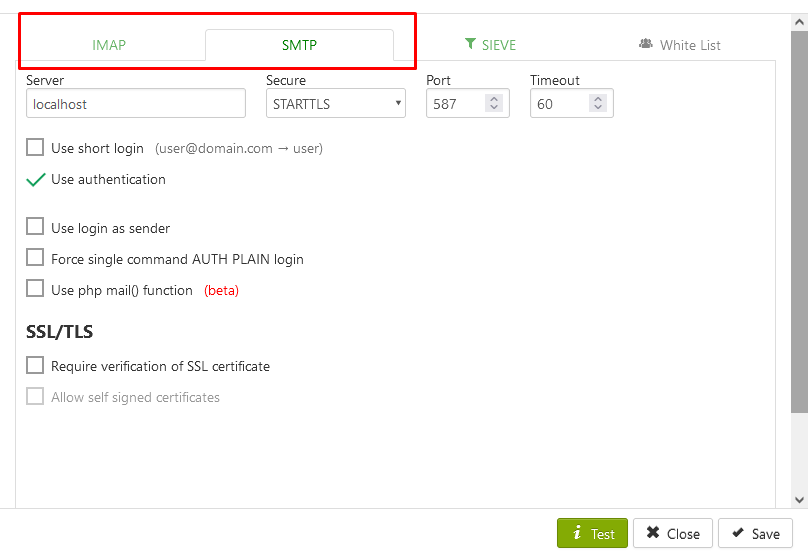
- SMTP (Outgoing Mail):
- Server: mail.yourdomain.com (or your server hostname/IP)
- Port: 465 (SSL/TLS) or 587 (STARTTLS/None)
- Encryption: SSL/TLS or STARTTLS
- Requires authentication (use same username/password as incoming)
- Username: Your full email address (e.g., info@yourdomain.com)
- Password: Your email account password

- IMAP (Incoming Mail):
- Setting Up in Gmail (as an external account):
- Log in to Gmail
- Click the Settings cog -> See all settings
- Go to the "Accounts and Import" tab
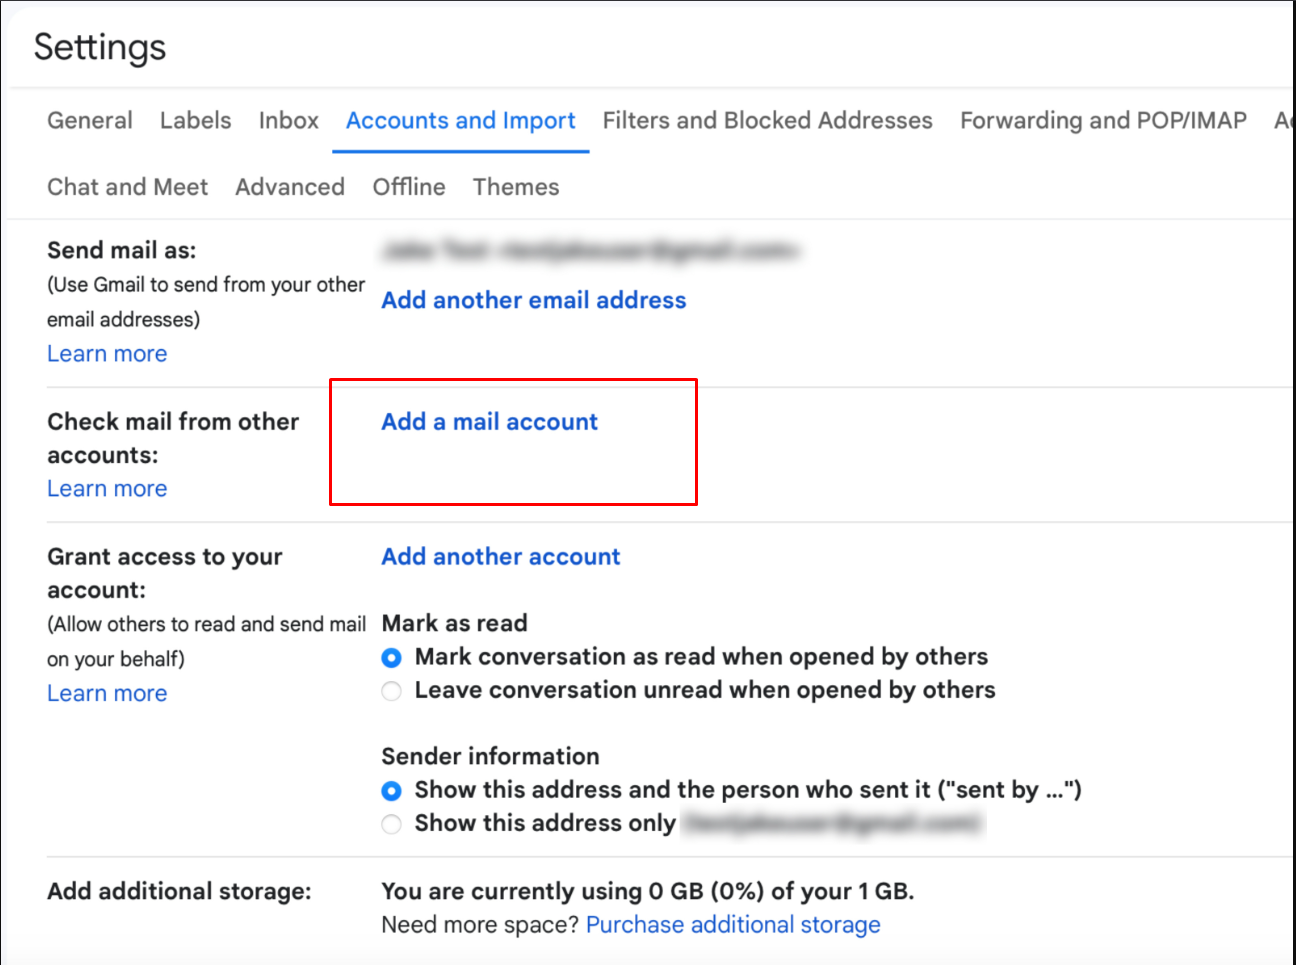
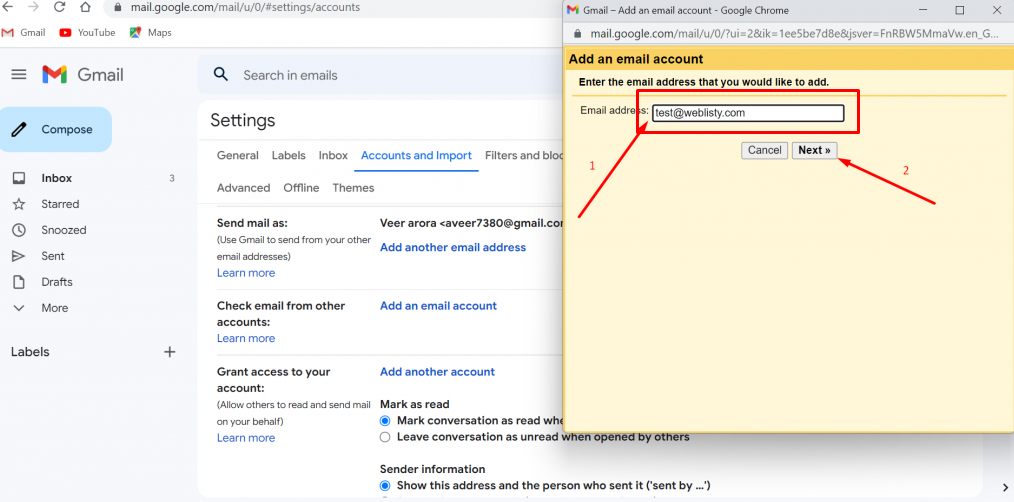
- Under "Check mail from other accounts," click "Add a mail account"

- Enter your email address (info@yourdomain.com). Click Next
- Select "Import emails from my other account (POP3)" (Gmail primarily offers POP3 for fetching. For IMAP-like behavior in Gmail, you'd typically use Gmail's mobile app or forward emails). Alternatively, if setting up "Send mail as":
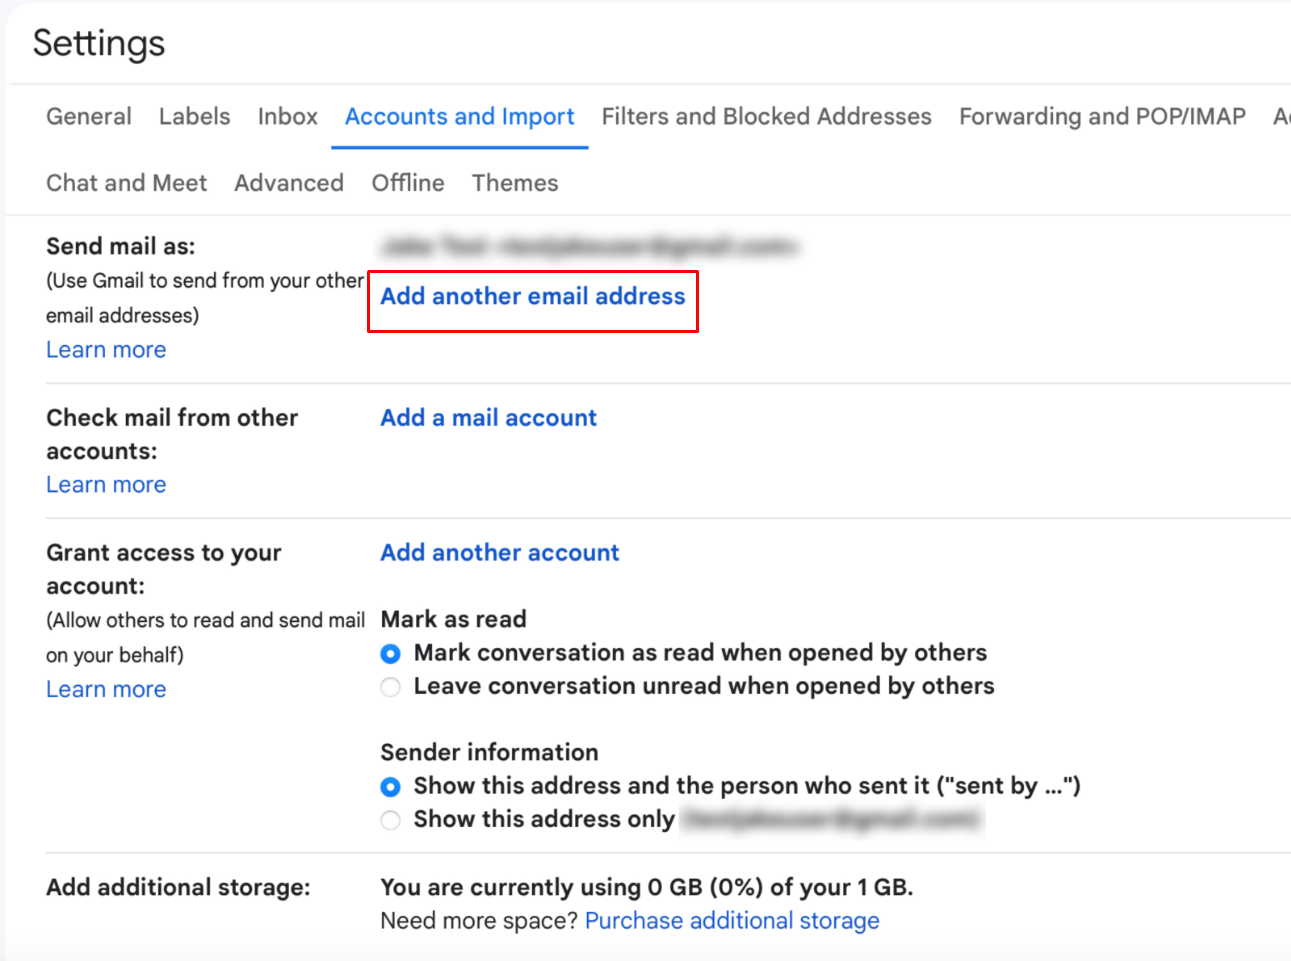
- Under "Send mail as," click "Add another email address"
- Enter your Name and Email Address. Keep "Treat as an alias" checked. Click "Next Step"

- Enter SMTP Server (e.g., mail.yourdomain.com), Port (587 or 465), Username (full email), Password. Select SSL or TLS. Click "Add Account"

- Gmail will send a verification email. Check your CyberPanel webmail, get the code, and enter it
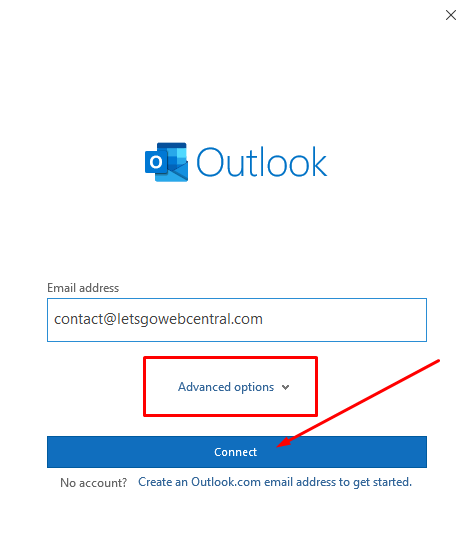
- Setting Up in Outlook (Desktop):
- Open Outlook
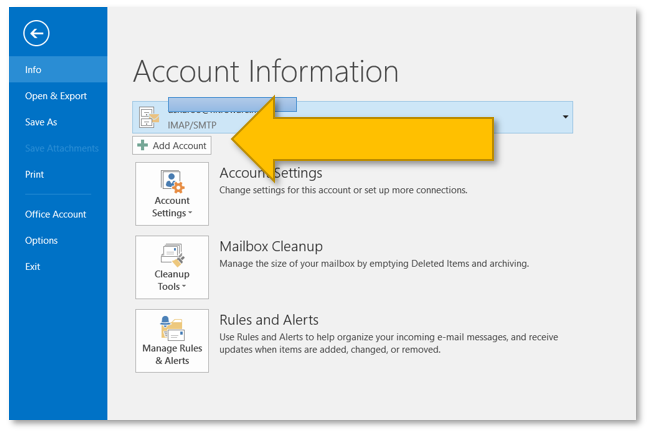
- Go to File -> Add Account

- Enter your email address. Click "Advanced options" and check "Let me set up my account manually." Click "Connect"

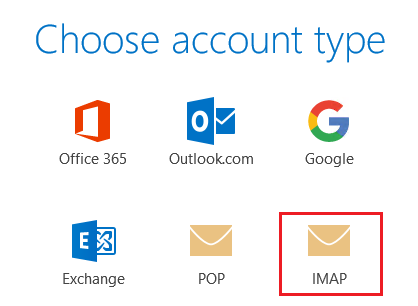
- Choose account type: IMAP

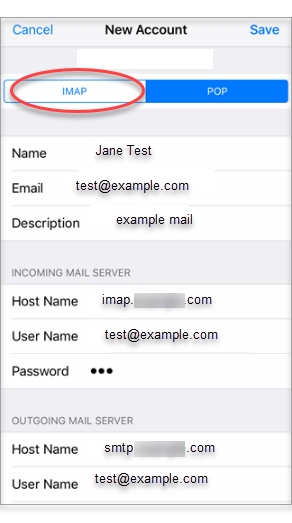
- Enter Incoming and Outgoing mail server details:
- Incoming mail (IMAP): Server, Port 993, Encryption: SSL/TLS
- Outgoing mail (SMTP): Server, Port 465 (or 587), Encryption: SSL/TLS (or STARTTLS)
- Ensure "Outgoing server requires authentication" is checked and uses same settings as incoming

- Click "Next," enter your password, and click "Connect"
- General Tips for Mobile Clients (iOS Mail, Android Email apps):
- The process is similar: Add Account -> Other/Manual Setup -> IMAP
- Enter the same server, port, username, and password details

- Troubleshooting:
- Double-check server names, ports, and SSL/TLS settings
- Ensure your server's mail hostname (mail.yourdomain.com) has a valid SSL certificate
- Check if ports 993, 465, 587 are open in your server's firewall and CyberPanel's firewall (CSF)
- Conclusion: You can now manage your CyberPanel emails conveniently from your favorite email clients.

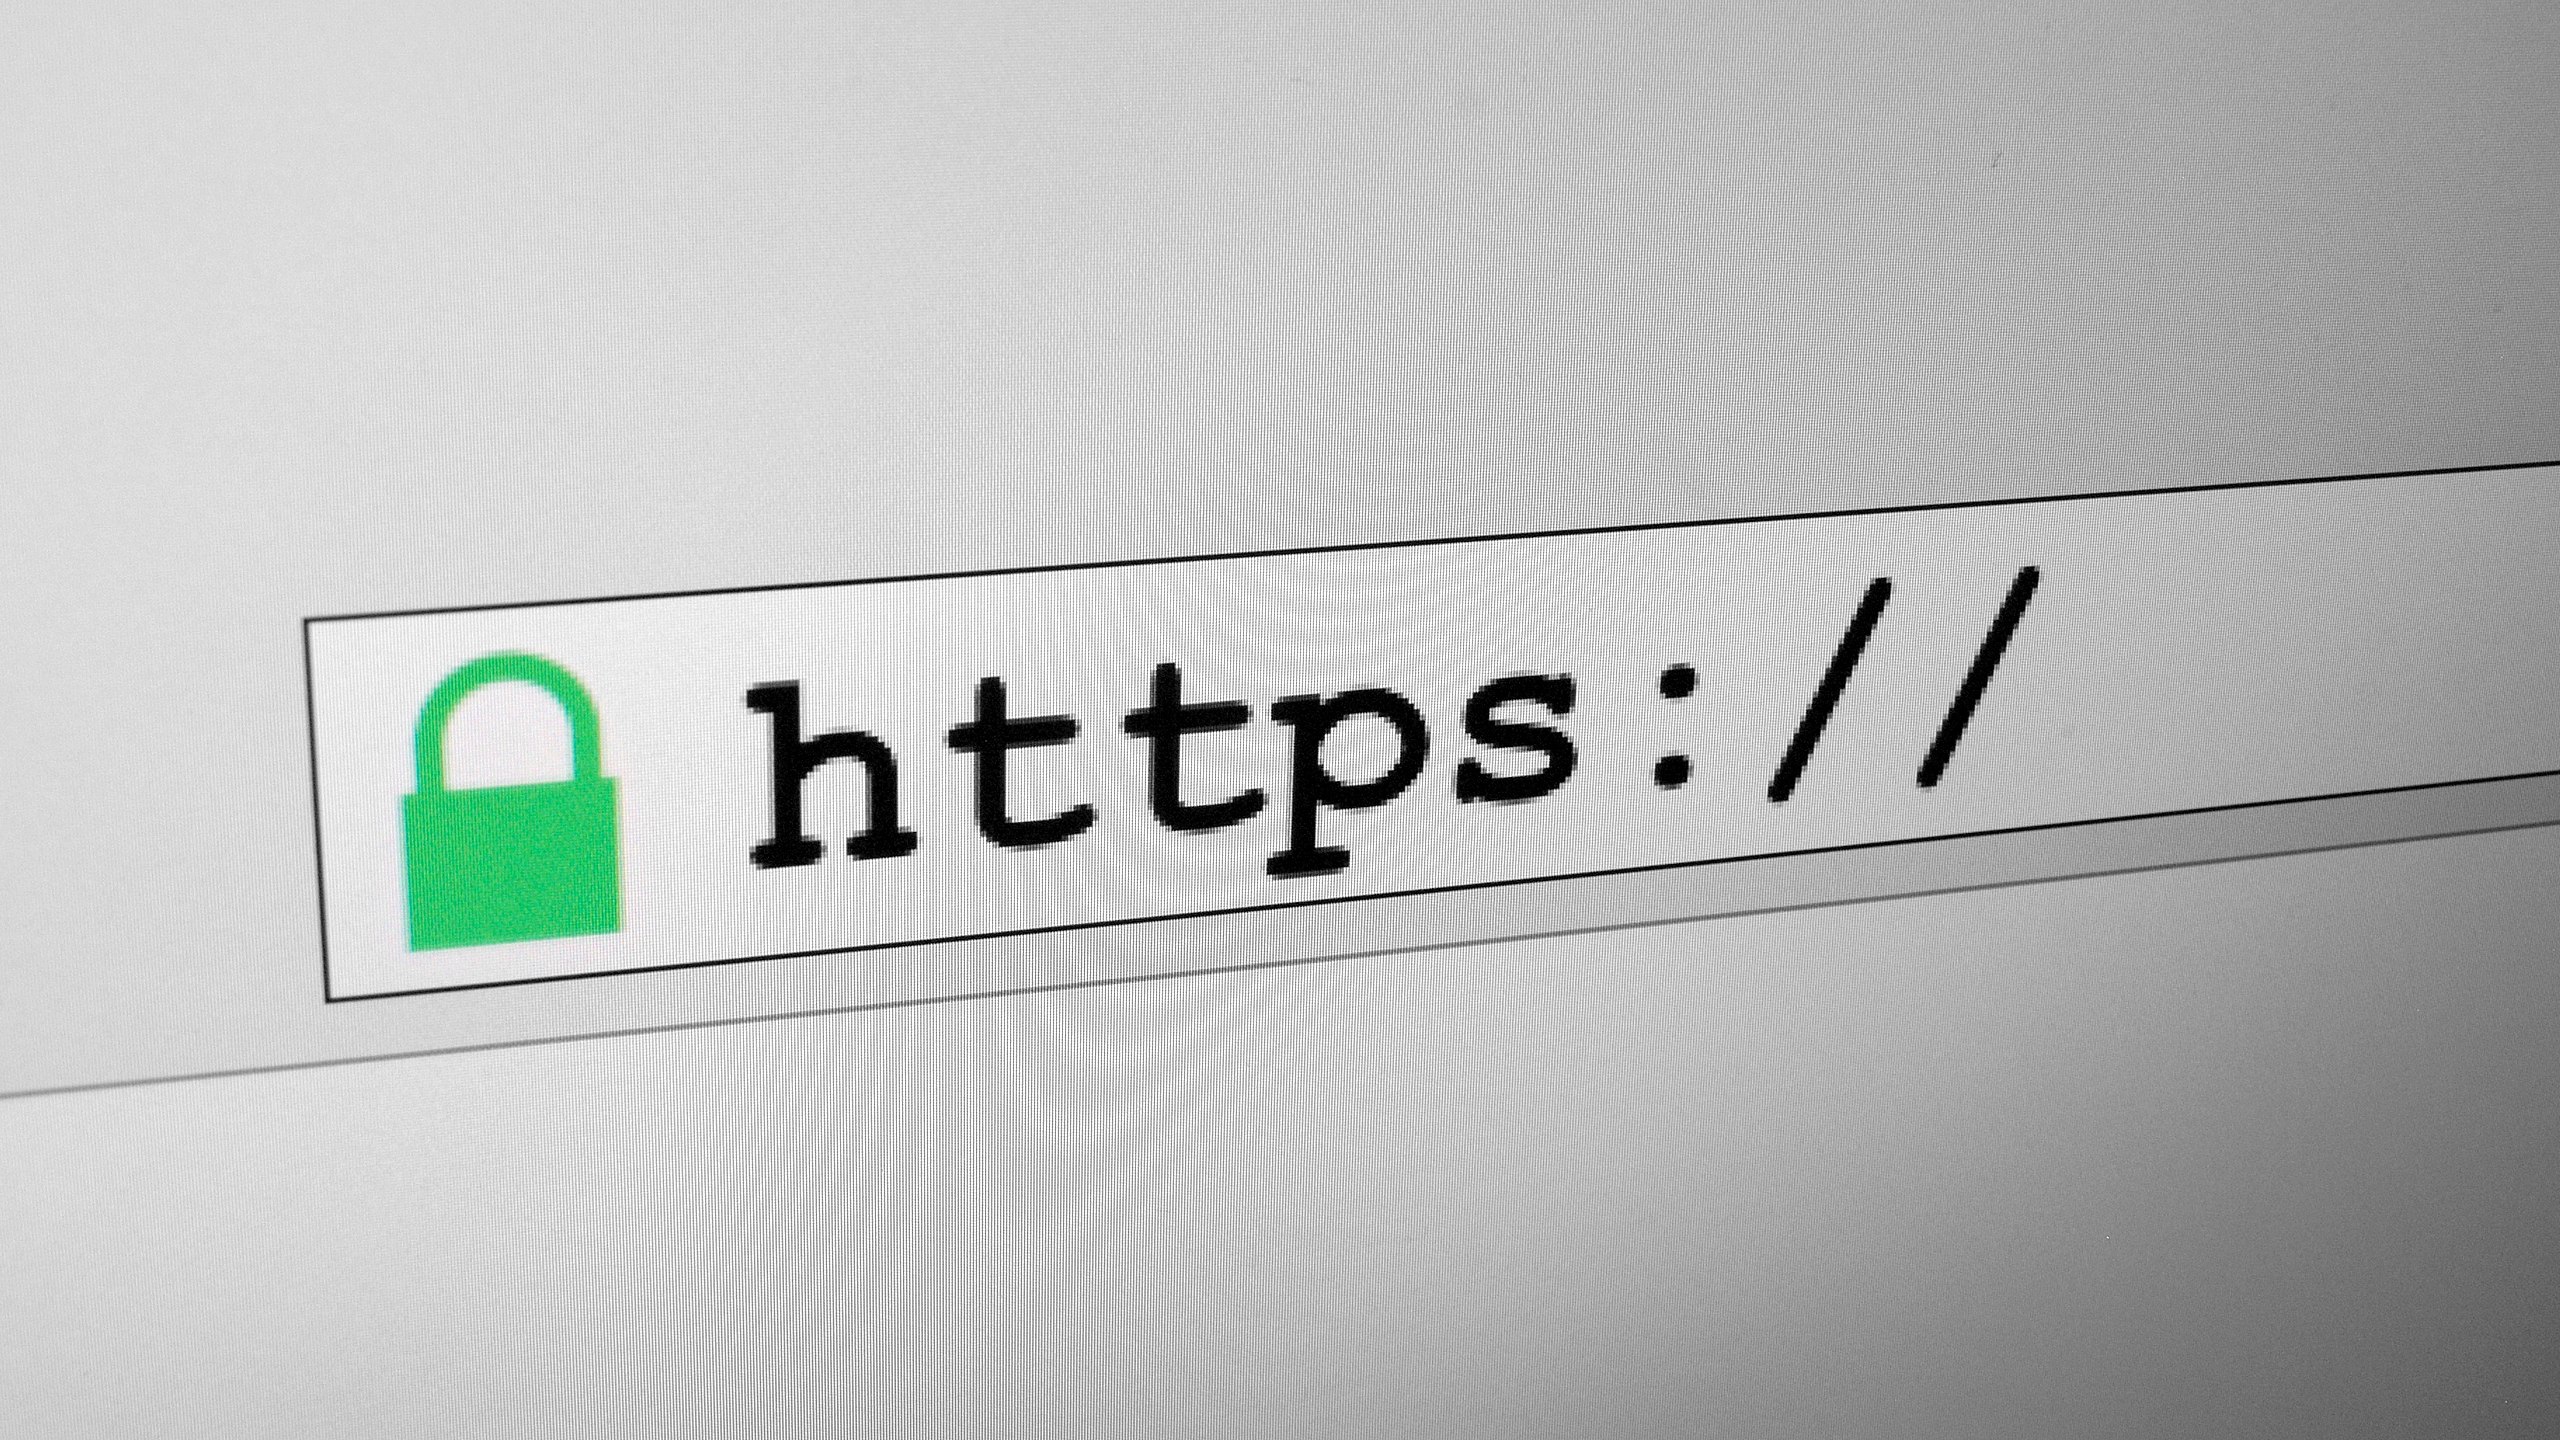
12. How to Install Free SSL Certificates with Let's Encrypt in CyberPanel
- Intro: Explain the importance of SSL for HTTPS and how CyberPanel makes it easy to install free Let's Encrypt certificates.
- Prerequisites:
- Domain added to CyberPanel
- Domain's DNS A record(s) (for yourdomain.com and www.yourdomain.com) correctly pointing to your CyberPanel server's IP
- DNS propagation must be complete
- Steps:
- Log in to CyberPanel
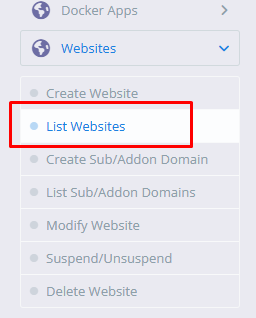
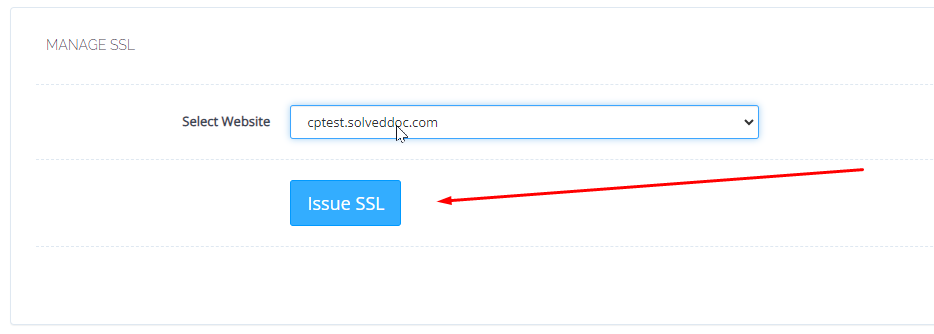
- Navigate to "Websites": Click "Websites" in the left sidebar
- Select "List Websites": Click "List Websites" from the submenu

- Choose Your Website: Find the domain for which you want to issue SSL and click its "Manage" button

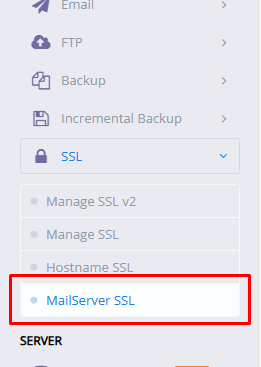
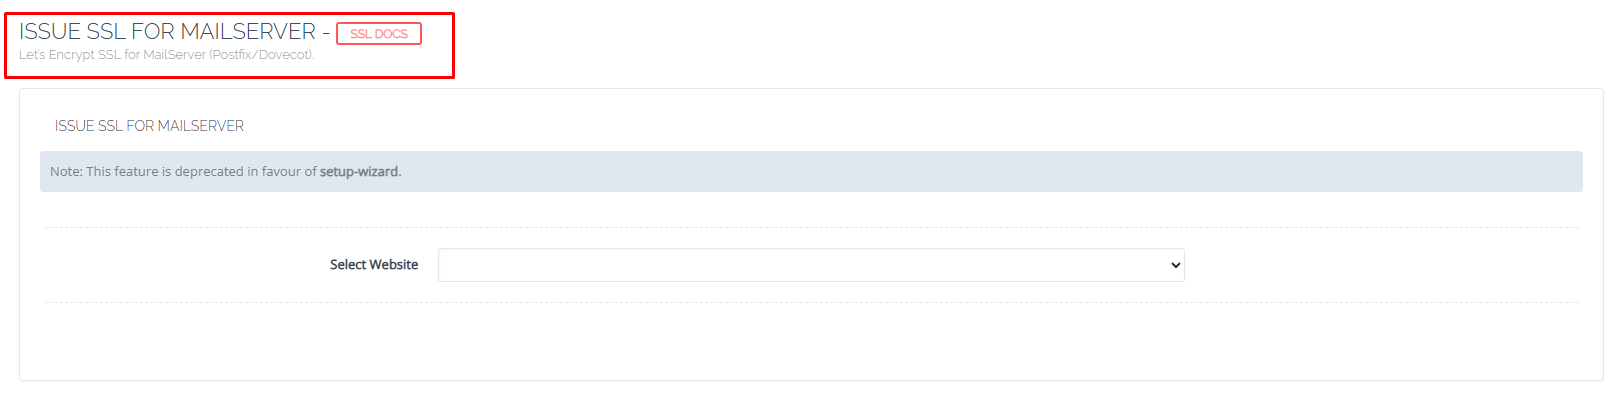
- Scroll to "SSL" Section: On the website management page, find the SSL management area. In newer versions, there's a prominent "Issue SSL" button. Older versions might have it under a heading like "SSL" or "Manage SSL"

- Issue Let's Encrypt SSL:
- You might see options for "Hostname SSL" (for the server hostname itself) and "Mail Server SSL" on a different page (SSL -> MailServer SSL). For a website, you're typically on the website's manage page
- Select the domain(s) you want to include (usually yourdomain.com and www.yourdomain.com)
- Click the "Issue SSL" button

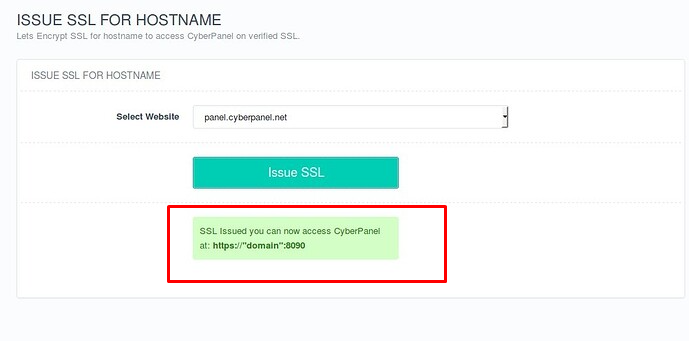
- Wait for Issuance: CyberPanel will communicate with Let's Encrypt to validate your domain and issue the certificate. This might take a minute or two
- Confirmation: You should see a success message indicating SSL has been issued

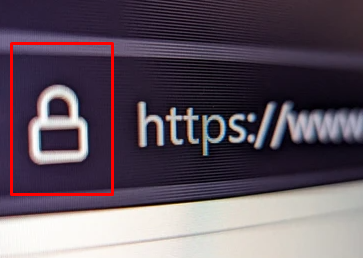
- Verification: Open your website in a browser using https://yourdomain.com. You should see a padlock icon

- Auto-Renewal: CyberPanel automatically sets up a cron job to renew Let's Encrypt certificates before they expire
- Conclusion: Your website is now secured with HTTPS using a free Let's Encrypt certificate.


13. Solving Common SSL Issues in CyberPanel
- Intro: Address frequent problems users encounter with SSL certificates in CyberPanel.
- Common Issues and Solutions:
- SSL Issuance Fails (Let's Encrypt):
- Cause A: DNS Not Propagated: Let's Encrypt cannot verify domain ownership if DNS A records aren't pointing correctly to your server or haven't propagated globally.
- Solution: Use a DNS checker tool (like dnschecker.org) to confirm your domain and www subdomain point to the correct server IP from multiple locations. Wait longer for propagation if needed.

- Solution: Use a DNS checker tool (like dnschecker.org) to confirm your domain and www subdomain point to the correct server IP from multiple locations. Wait longer for propagation if needed.
- Cause B: Incorrect Web Server Configuration / .htaccess block: Sometimes existing .htaccess rules or web server configs can interfere with Let's Encrypt's .well-known/acme-challenge validation path.
- Solution: Temporarily rename or disable .htaccess files in your website's public_html directory and try issuing SSL again. Check OpenLiteSpeed vHost config for any conflicting rules.
- Cause C: Rate Limits: Let's Encrypt has rate limits (e.g., 50 certs per registered domain per week).
- Solution: Wait for the rate limit to reset. Use the staging environment for testing if you're issuing many certs.
- Cause D: Firewall Blocking: Server or Cloudflare firewall might block Let's Encrypt validation servers.
- Solution: Temporarily disable CSF or ModSecurity, or whitelist Let's Encrypt IPs if known. Ensure port 80 is open, as HTTP-01 challenge uses it.
- Cause A: DNS Not Propagated: Let's Encrypt cannot verify domain ownership if DNS A records aren't pointing correctly to your server or haven't propagated globally.
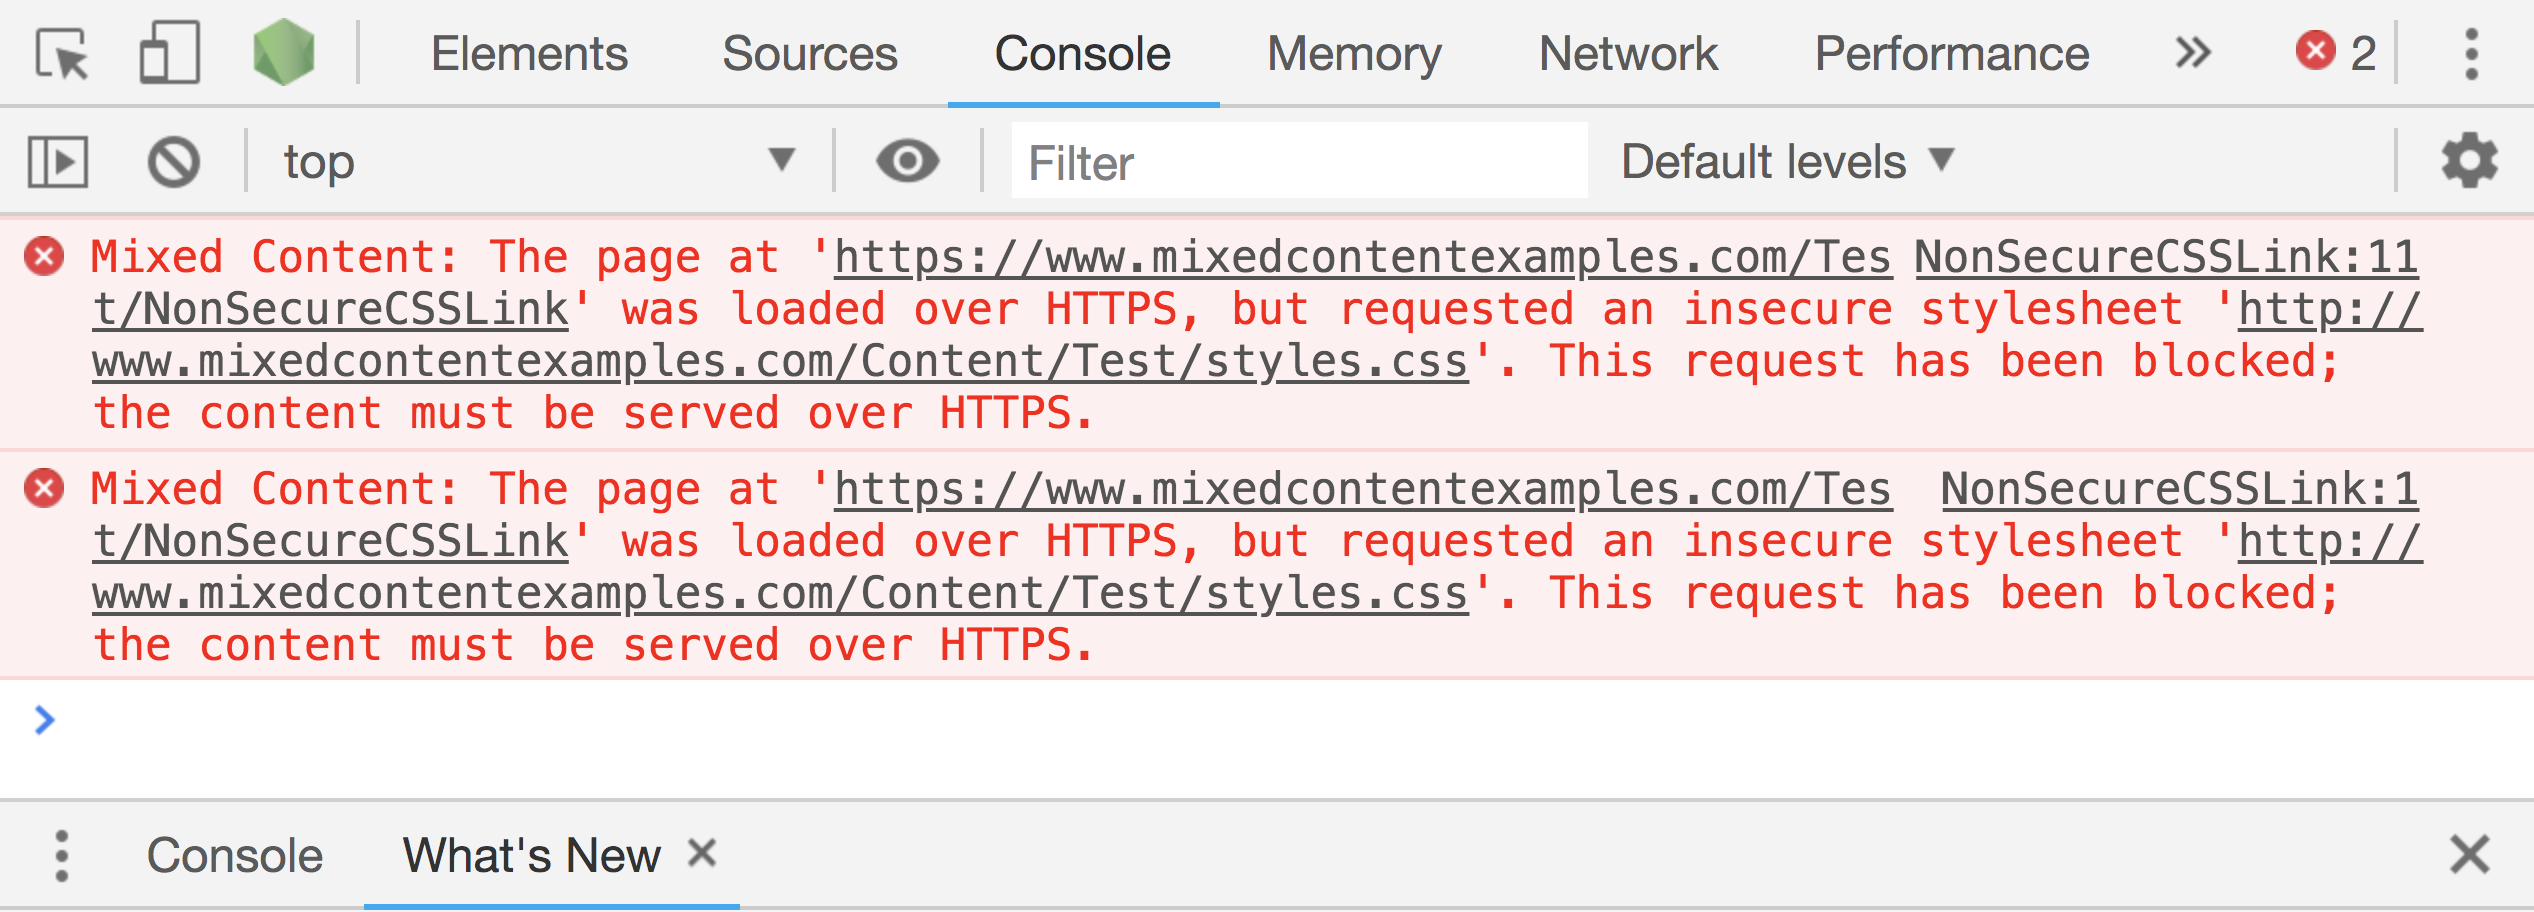
- Mixed Content Warnings:
- Cause: The page is loaded via HTTPS, but some resources (images, scripts, CSS) are still loaded via HTTP.
- Solution:
- Update all internal links/resource URLs in your website code/CMS to use https:// or relative paths (/images/pic.jpg).
- Use a plugin (e.g., Really Simple SSL for WordPress) to help fix mixed content.
- Check browser developer console (F12) "Console" tab for specific mixed content errors.

- Certificate Not Renewing Automatically:
- Cause A: Cron Job Issues: The CyberPanel cron job for renewal might not be running.
- Solution: Check cron logs. Ensure cron daemon is active. Manually try to renew SSL for a domain via CyberPanel to see if it works.
- Cause B: DNS Changed: If DNS records were changed after initial issuance, renewal might fail.
- Solution: Ensure DNS is still pointing correctly.
- Cause C: Old CyberPanel Version: Older versions might have bugs.
- Solution: Update CyberPanel to the latest version.
- Cause A: Cron Job Issues: The CyberPanel cron job for renewal might not be running.
- "SSL_ERROR_NO_CYPHER_OVERLAP" or similar browser errors:
- Cause: Mismatch in supported SSL/TLS protocols or cipher suites between browser and server.
- Solution:
- Ensure OpenLiteSpeed is updated.
- Check OpenLiteSpeed SSL configuration (usually defaults are fine). This is more advanced.
- Try a different browser or clear browser cache/SSL state.
- SSL for Mail Server (mail.yourdomain.com):
- Issue: Email clients show certificate warnings.
- Solution:
- Ensure mail.yourdomain.com has an A record pointing to your server IP.
- In CyberPanel, go to "SSL" -> "MailServer SSL."

- Select your domain (yourdomain.com). CyberPanel will attempt to issue SSL for mail.yourdomain.com.
- Restart Postfix/Dovecot if prompted or from Server Status -> Services Status.

- General Troubleshooting Steps:
- Check CyberPanel Logs: Look in /home/cyberpanel/error-logs or website-specific logs.
- Check OpenLiteSpeed Logs: /usr/local/lsws/logs/error.log and stderr.log.
- SSL Issuance Fails (Let's Encrypt):
- Conclusion: Systematically checking these common areas can resolve most SSL issues.

14. How to Force HTTPS for All Pages in CyberPanel
- Intro: Explain why forcing HTTPS is crucial (security, SEO) and how to implement it in CyberPanel/OpenLiteSpeed.
- Prerequisites:
- Valid SSL certificate installed for your domain (see Topic 12)
- Method 1: Using CyberPanel's Built-in Option (if available for the website)
- Log in to CyberPanel
- Go to "Websites" -> "List Websites"
- Click "Manage" for the desired website
- Look for a "Rewrite Rules" section or a specific "Force HTTPS" toggle. Some CyberPanel versions have this more explicitly
- If a toggle exists, enable it and save
- Method 2: Using .htaccess (Most Common for Apache-like behavior, OpenLiteSpeed supports this)
- Log in to CyberPanel
- Go to "Websites" -> "List Websites"
- Click "Manage" for the desired website
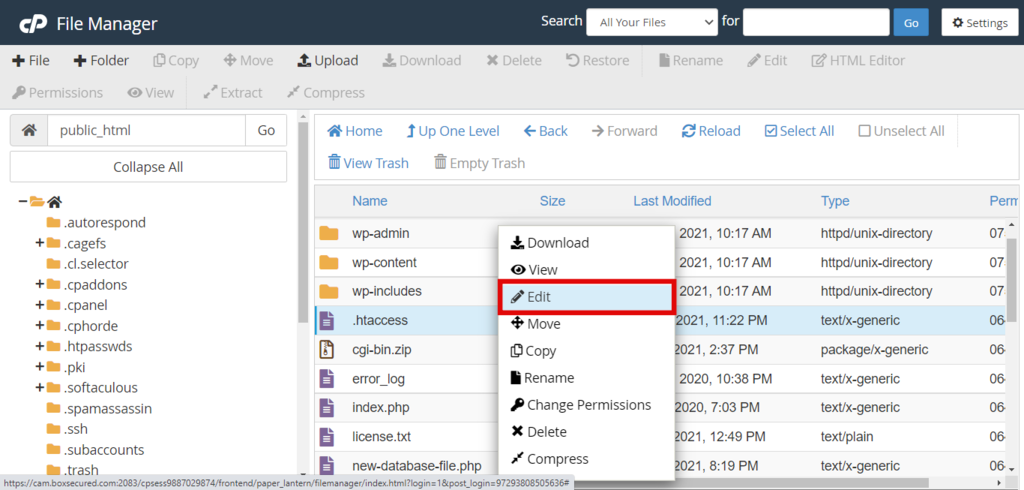
- Click on "File Manager"

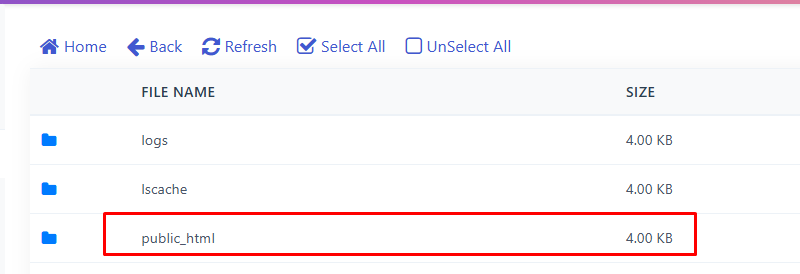
- Navigate to the public_html directory for your website

- Locate the .htaccess file. If it doesn't exist, create one
- Edit the .htaccess file and add the following rules at the top:
RewriteEngine On
RewriteCond %{HTTPS} off
RewriteRule ^(.*)$ https://%{HTTP_HOST}%{REQUEST_URI} [L,R=301]
- Save the file
- Method 3: OpenLiteSpeed WebAdmin Console (More Advanced)
- Access OpenLiteSpeed WebAdmin:
http://(credentials are set during OLS installation or can be reset):7080 - Navigate to "Virtual Hosts" -> Select your vhost (e.g., yourdomain.com)
- Go to the "Rewrite" tab
- Enable Rewrite: Yes
- In "Rewrite Rules," add:
RewriteCond %{HTTPS} !=on
RewriteRule ^(.*)$ https://%{SERVER_NAME}%{REQUEST_URI} [R=301,L]
- Save and perform a "Graceful Restart" of LiteSpeed from the Actions menu
- Access OpenLiteSpeed WebAdmin:
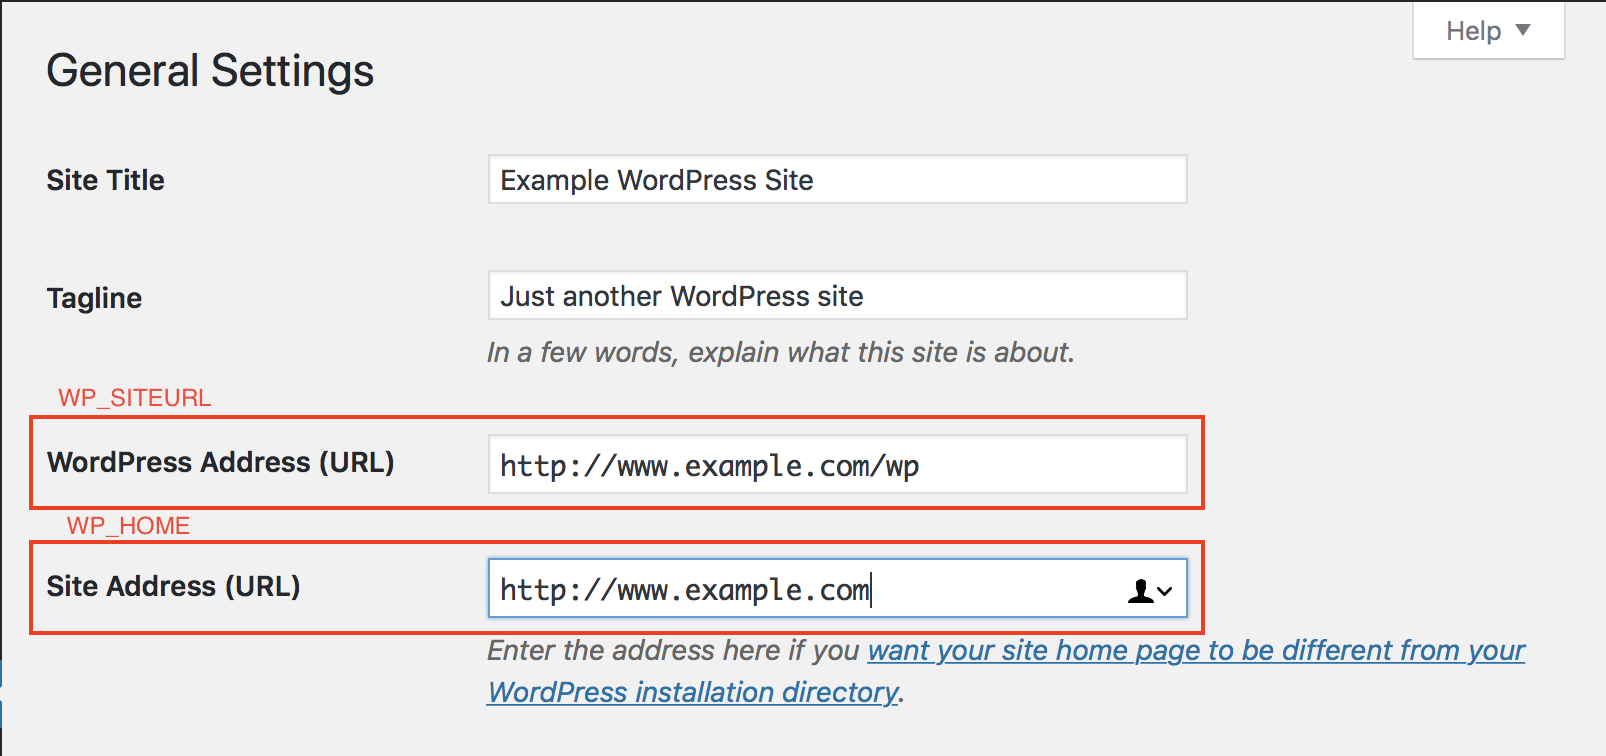
- For WordPress Sites:
- After implementing one of the above, also ensure your WordPress Address (URL) and Site Address (URL) in Settings -> General are set to
https:// - Plugins like "Really Simple SSL" can also help, but server-level redirection is generally better

- After implementing one of the above, also ensure your WordPress Address (URL) and Site Address (URL) in Settings -> General are set to
- Testing:
- Clear your browser cache
- Try accessing your site using
http://yourdomain.com. It should automatically redirect tohttps://yourdomain.com
- Conclusion: Forcing HTTPS ensures all visitors use a secure connection.


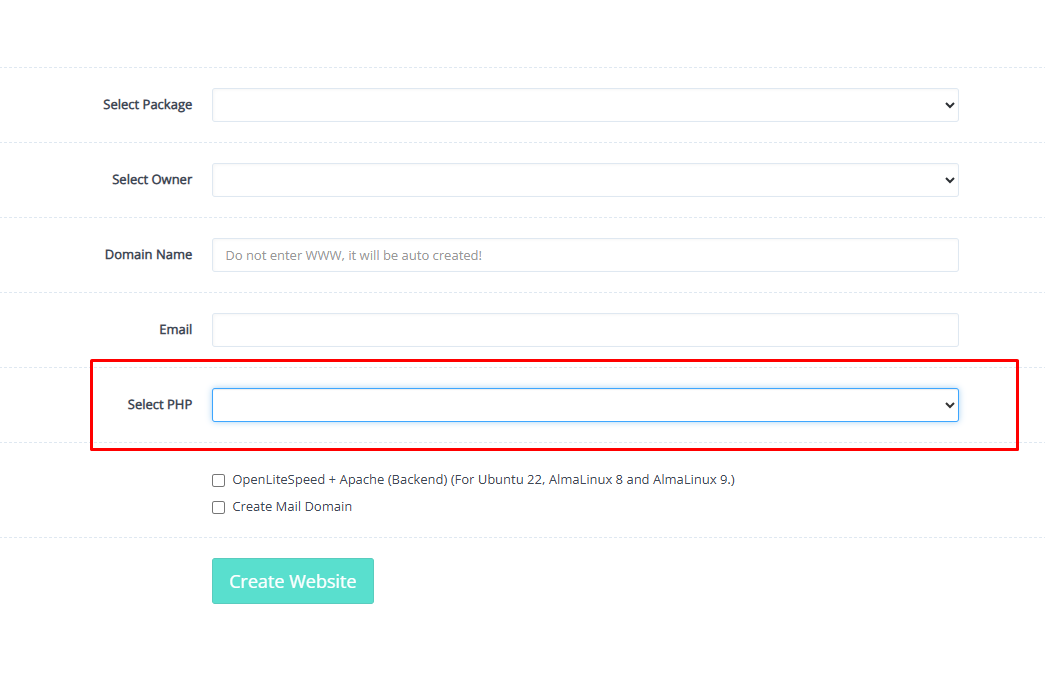
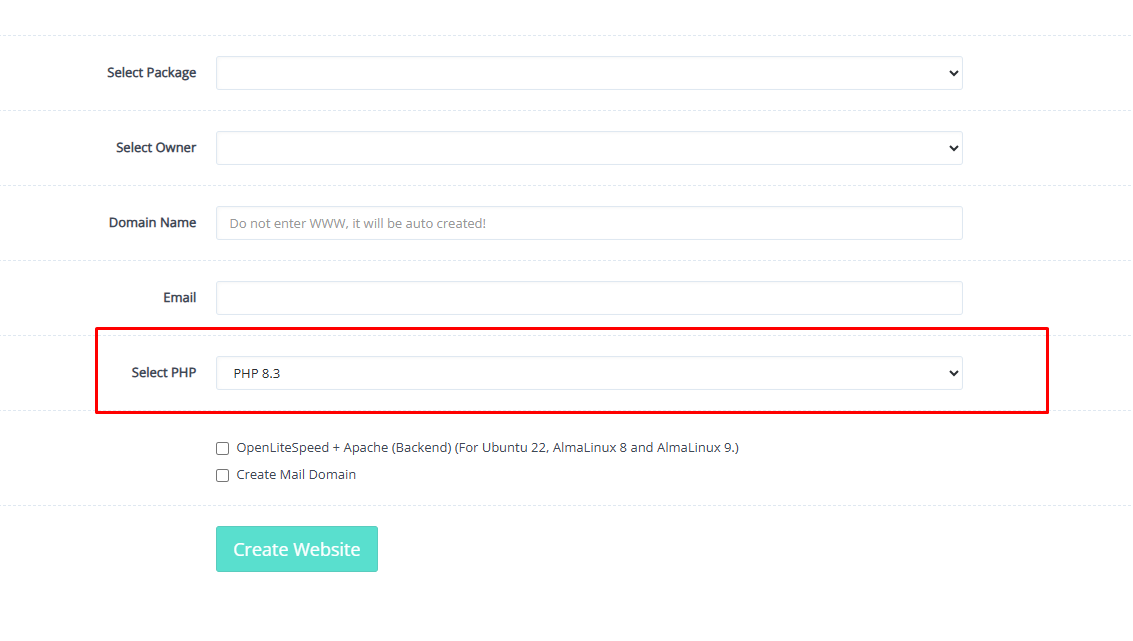
15. How to Add a Website in CyberPanel
- Intro: Step-by-step guide to creating/hosting a new website within CyberPanel.
- Prerequisites:
- Your domain name
- DNS A record(s) for your domain (and www) should ideally be pointing to your CyberPanel server's IP before adding the site, or you'll do it right after
- Steps:
- Log in to CyberPanel
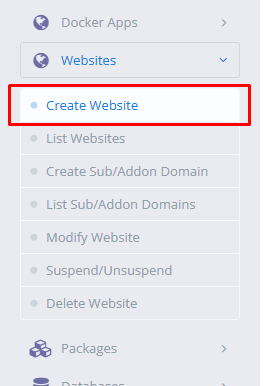
- Navigate to "Websites": Click "Websites" in the left sidebar
- Select "Create Website": Click "Create Website" from the submenu

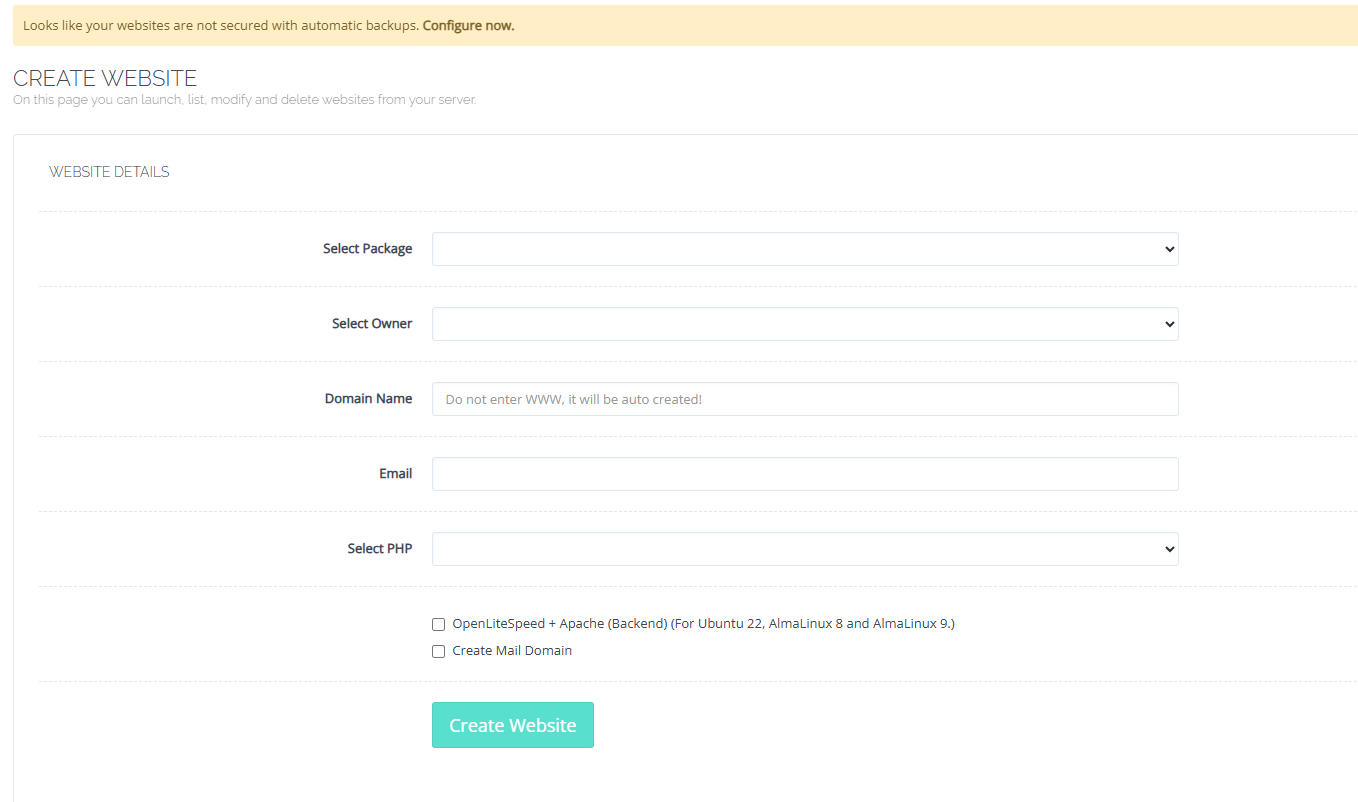
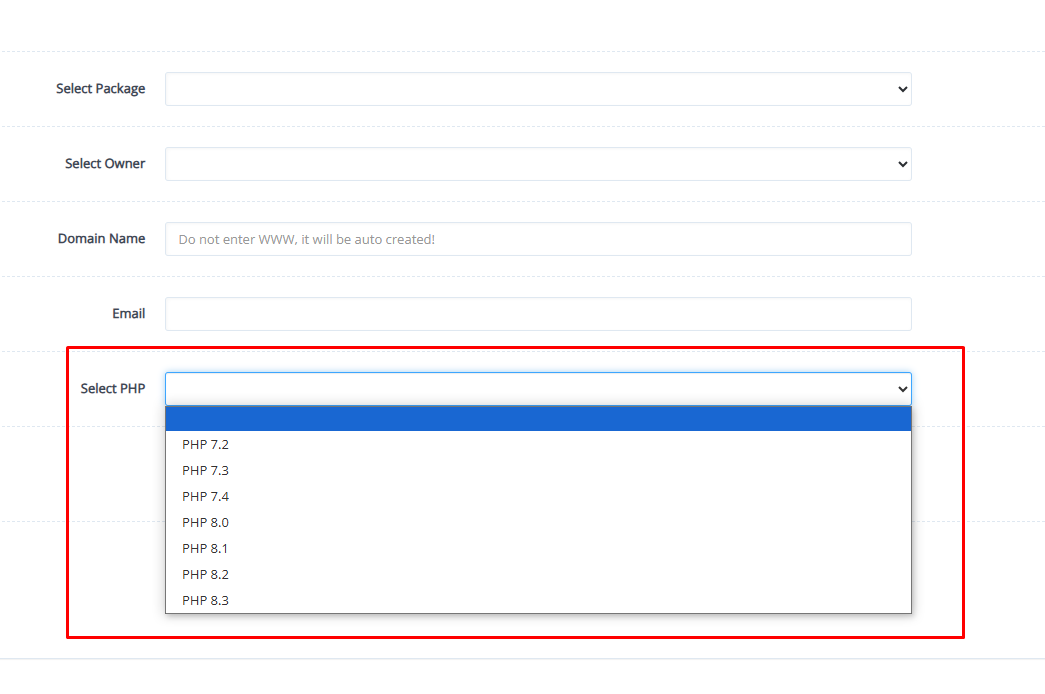
- Fill in Website Details:
- Select Package: Choose a pre-defined package (e.g., Default) or create one under "Packages." This sets resource limits
- Select Owner: Usually admin or the user you are logged in as
- Domain Name: Enter your full domain name (e.g., yournewsite.com)
- Email: Enter an admin email address for the site
- Select PHP: Choose the desired PHP version for this site (e.g., PHP 7.4, 8.0, 8.1)

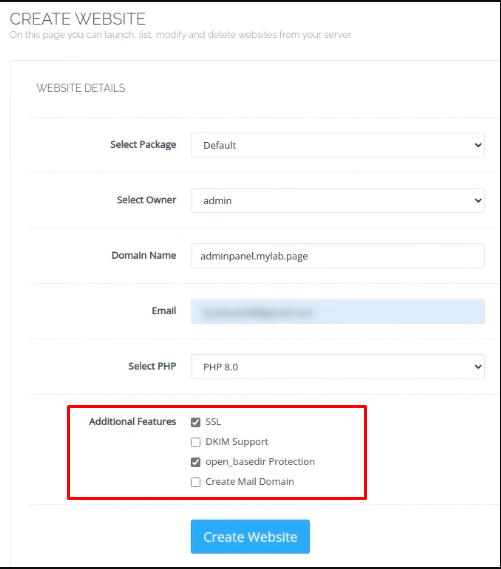
- Additional Features (Checkboxes):
- SSL: Check this if your DNS is already pointing and you want to issue Let's Encrypt SSL immediately. If DNS isn't ready, you can do this later (Topic 12)
- DKIM Support: Check this to enable DKIM for email on this domain
- open_basedir Protection: Check for enhanced security (restricts PHP script access)
- Create Mail Domain: Check this if you plan to host emails for this domain on CyberPanel

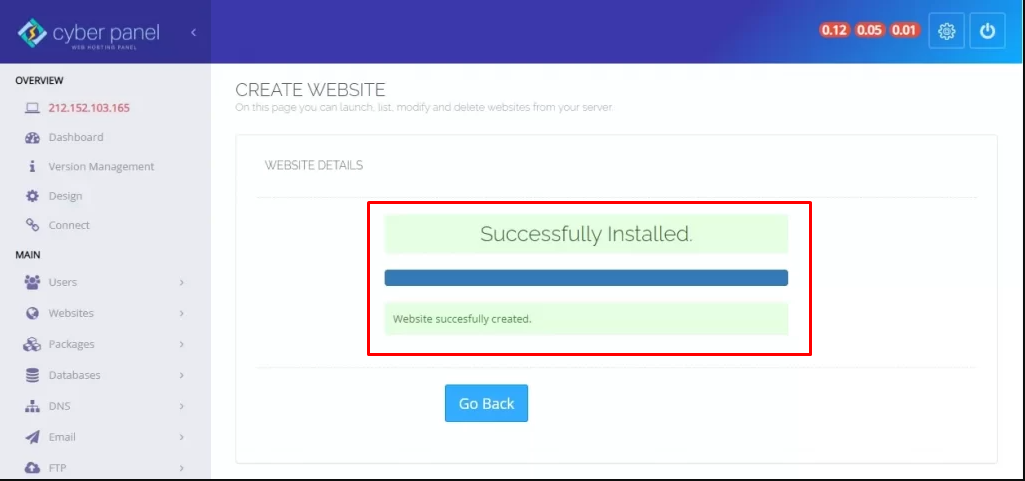
- Click "Create Website":

- Wait for Creation: CyberPanel will set up the virtual host, directories, and any selected features
- Confirmation: You should see a success message

- Verify (if DNS is pointed):
- If DNS is already pointed and SSL was issued, try visiting
https://yournewsite.com - If DNS is not yet pointed, now is the time to go to your DNS provider (Cloudflare, Namecheap, etc.) and add A records for
yournewsite.comandwww.yournewsite.compointing to your server IP
- If DNS is already pointed and SSL was issued, try visiting
- Next Steps: Upload website files (Topic 17), install WordPress (Topic 16 if applicable), set up email (Topic 8)
- Conclusion: Your new website environment is now set up in CyberPanel.

16. How to Upload a WordPress Site to CyberPanel
- Intro: Explain two main methods: using CyberPanel's WordPress installer (for new sites) and manually uploading an existing WordPress site. This tutorial will focus more on the manual upload.
- Prerequisites (for manual upload):
- A website added in CyberPanel (Topic 15)
- A backup of your existing WordPress site:
- All WordPress files (a .zip archive is best)
- A .sql export of your WordPress database
- FTP client (like FileZilla) or access to CyberPanel File Manager
- Database created in CyberPanel (Topic 22)
- Method 1: Using CyberPanel's 1-Click WordPress Installer (Briefly)
- Log in to CyberPanel
- Go to "Websites" -> "List Websites" -> "Manage" for your site
- Scroll to "Application Installer" and click "WP Plus" (or similar WordPress installer option)

- Fill in the details (blog title, admin user, password, email, path - usually leave empty for root)
- Click "Install Now"

- This is for a new WordPress installation
- Method 2: Manually Uploading an Existing WordPress Site
- Upload WordPress Files:
- Using File Manager:
- In CyberPanel, go to "Websites" -> "List Websites" -> "Manage" for your site -> "File Manager"
- Navigate to the public_html directory
- Delete any default files (like index.html) if present
- Click "Upload," select your WordPress .zip file, and upload it

- Once uploaded, select the .zip file and click "Extract." Extract to public_html

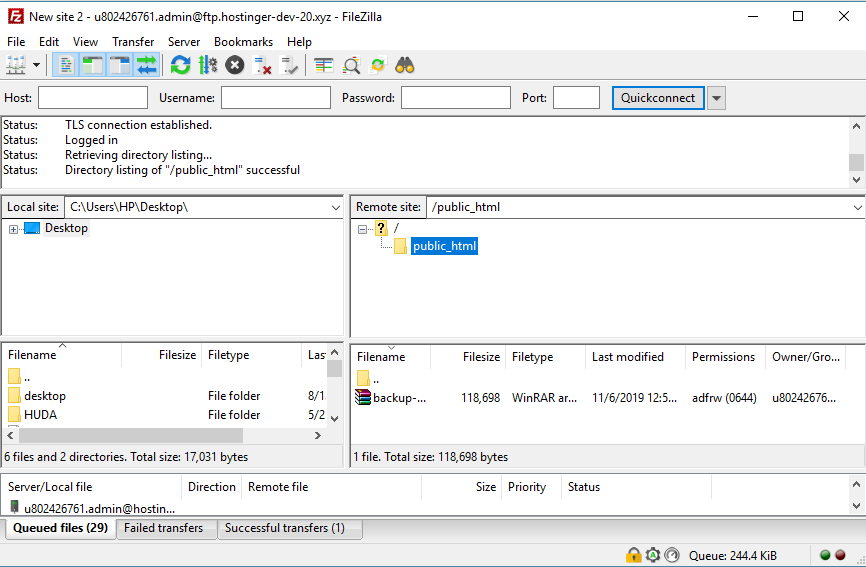
- Using FTP:
- Create an FTP account in CyberPanel ("FTP" -> "Create FTP Account")

- Connect to your server using an FTP client (FileZilla) with the FTP credentials
- Navigate to the public_html directory
- Upload your unzipped WordPress files here

- Create an FTP account in CyberPanel ("FTP" -> "Create FTP Account")
- Using File Manager:
- Create a Database (if not already done):
- Follow Topic 22: "How to Create and Manage Databases in CyberPanel." Note the database name, username, and password
- Import Your Database:
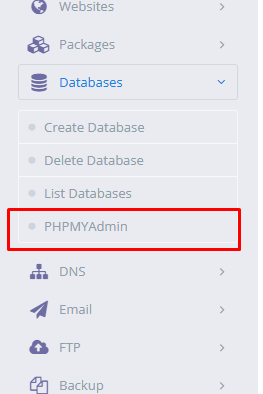
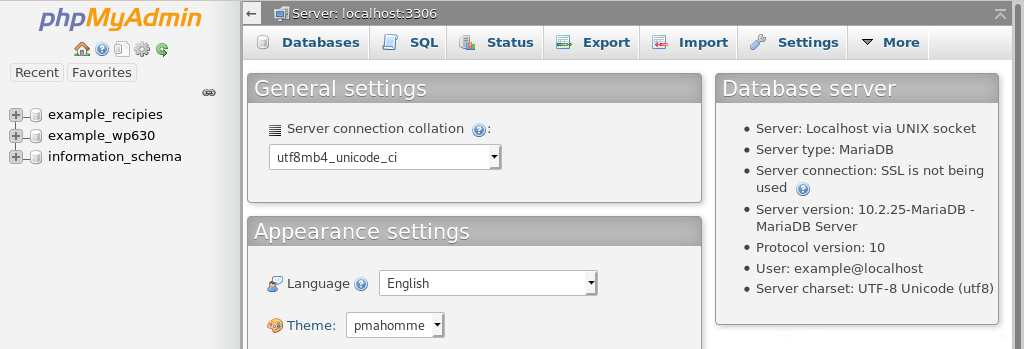
- In CyberPanel, go to "Databases" -> "phpMyAdmin"

- Select your newly created database from the left sidebar in phpMyAdmin
- Click the "Import" tab
- Click "Choose File," select your .sql database backup file
- Ensure character set is utf8mb4 (usually default)
- Click "Go" (or "Import")

- In CyberPanel, go to "Databases" -> "phpMyAdmin"
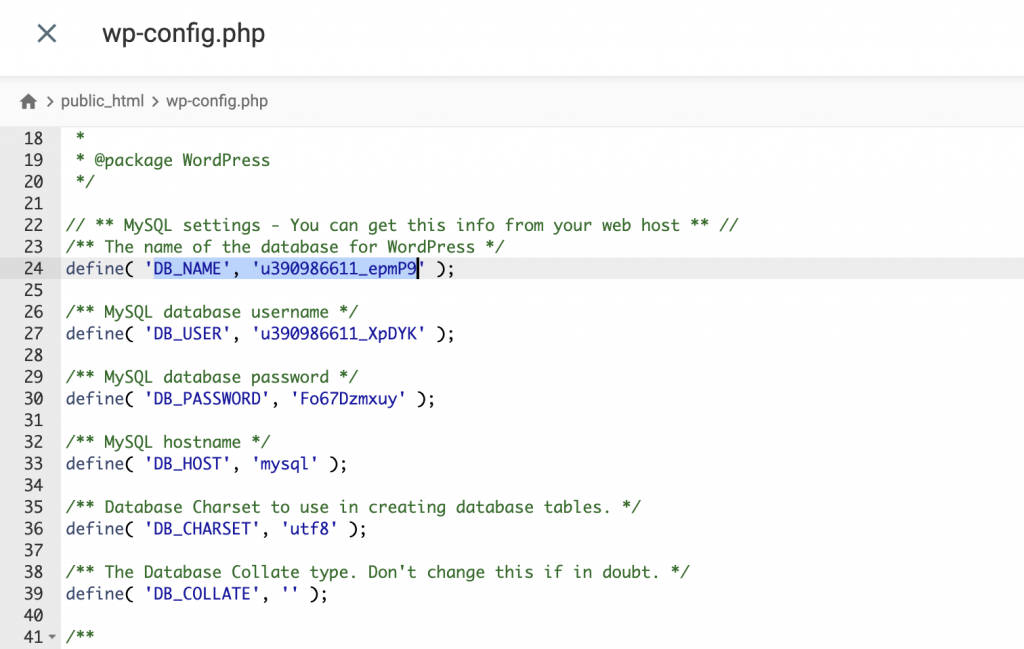
- Update wp-config.php:
- In CyberPanel File Manager (or via FTP), locate and edit the wp-config.php file in your public_html directory
- Update the following lines with your CyberPanel database details:
define( 'DB_NAME', 'your_cyberpanel_db_name' );
define( 'DB_USER', 'your_cyberpanel_db_user' );
define( 'DB_PASSWORD', 'your_cyberpanel_db_password' );
define( 'DB_HOST', 'localhost' ); // Usually localhost
- Update Site URL (if migrating from a different domain/URL):
- This is crucial. You might need to use a tool like "Velvet Blues Update URLs" plugin after logging into WordPress, or directly update siteurl and home options in the wp_options table via phpMyAdmin if you can't log in

- This is crucial. You might need to use a tool like "Velvet Blues Update URLs" plugin after logging into WordPress, or directly update siteurl and home options in the wp_options table via phpMyAdmin if you can't log in
- Check Permalinks: Log in to your WordPress admin (yourdomain.com/wp-admin), go to Settings -> Permalinks, and just click "Save Changes" (even if you don't change anything) to regenerate .htaccess rules
- Upload WordPress Files:
- Conclusion: Your WordPress site is now uploaded and configured on CyberPanel.


17. How to Use File Manager and FTP in CyberPanel
- Intro: Explain that File Manager and FTP are two ways to manage your website files on the server.
- Part 1: Using CyberPanel File Manager
- Prerequisites: Website added to CyberPanel.
- Steps:
- Access File Manager:
- Log in to CyberPanel
- Go to "Websites" -> "List Websites"
- Click "Manage" for the desired website
- Click the "File Manager" button

- Navigating:
- You'll typically land in the website's home directory (e.g., /home/yourdomain.com)
- The website's public files are in public_html. Double-click to enter folders

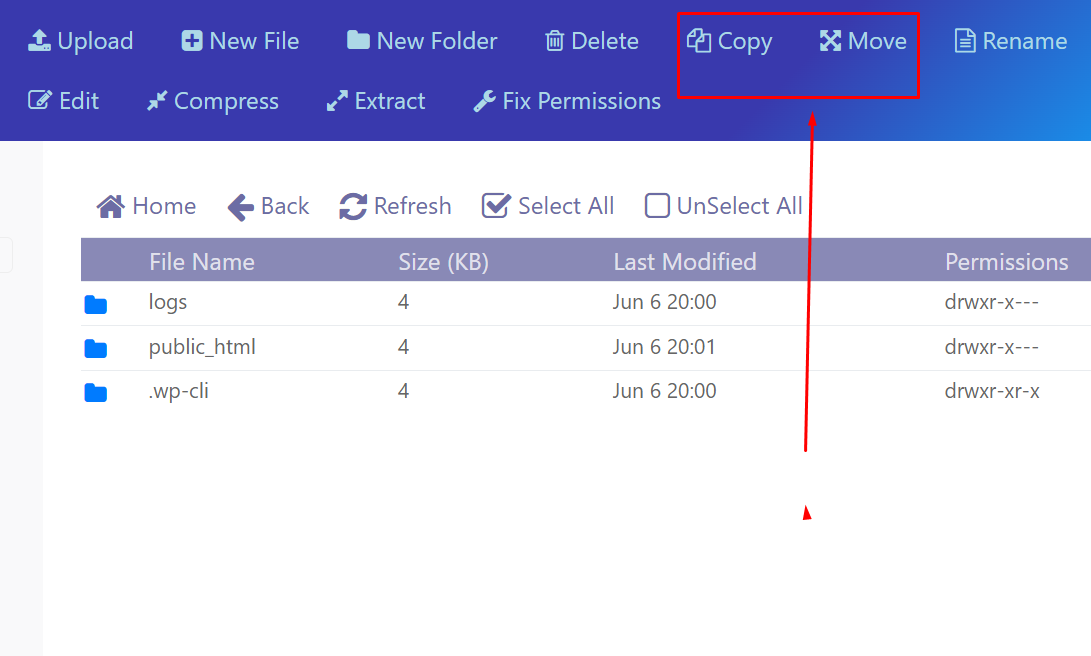
- Common Operations:
- Upload Files: Click the "Upload" button, select files, or drag-and-drop

- Create Folder/File: Click "New Folder" or "New File"

- Edit File: Select a file, click "Edit." A text editor will open

- Copy/Move: Select file(s)/folder(s), click "Copy" or "Cut," navigate to the destination, click "Paste"

- Delete: Select file(s)/folder(s), click "Delete." Confirm
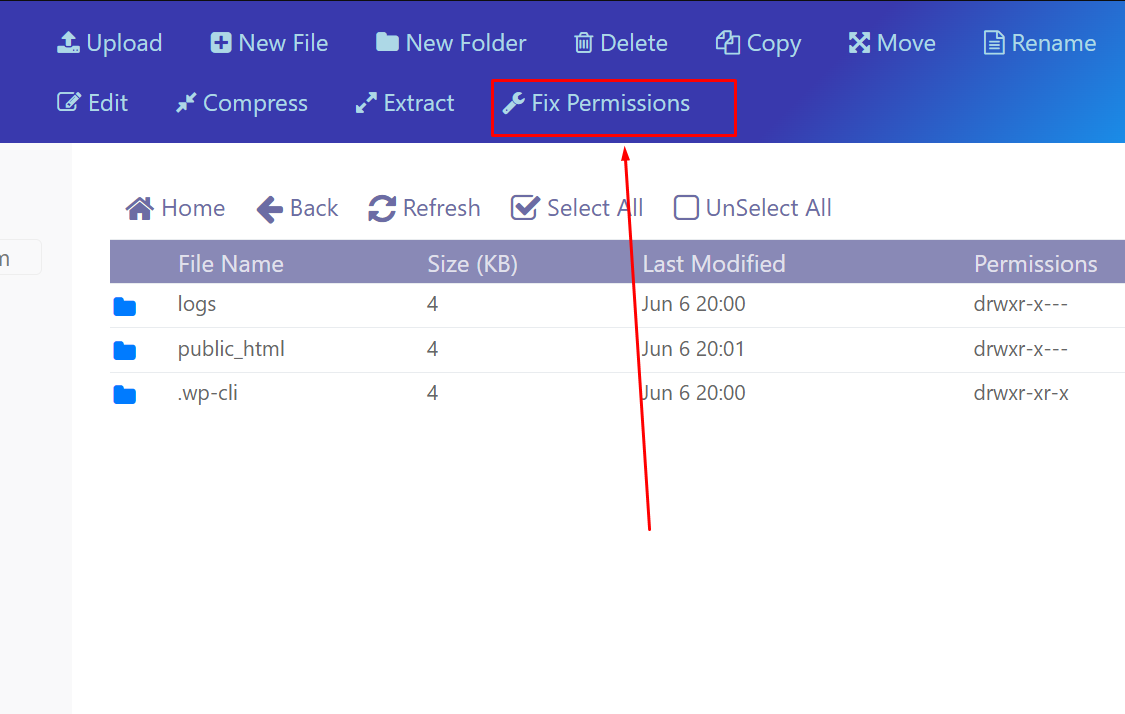
- Permissions (CHMOD): Select a file/folder, click "Permissions." Set numeric values or check boxes

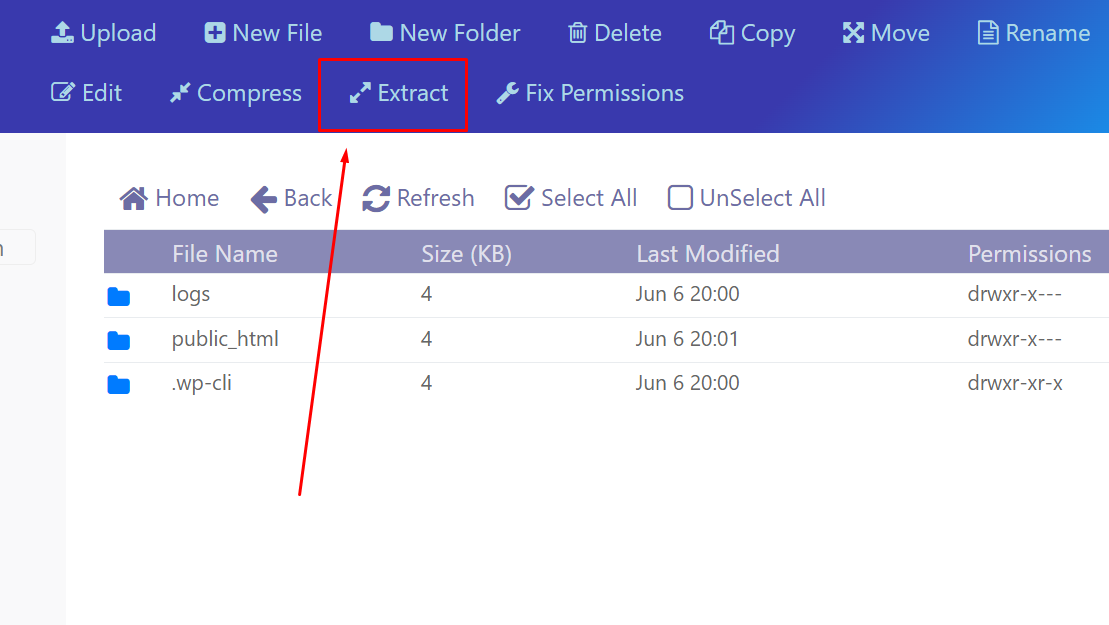
- Extract Archive: Upload a .zip (or other supported archive), select it, click "Extract"

- Compress (Create Archive): Select files/folders, click "Compress." Choose archive type and name
- Upload Files: Click the "Upload" button, select files, or drag-and-drop
- Access File Manager:
- Part 2: Using FTP (File Transfer Protocol)
- Prerequisites:
- An FTP client installed on your computer (e.g., FileZilla, Cyberduck)
- Steps:
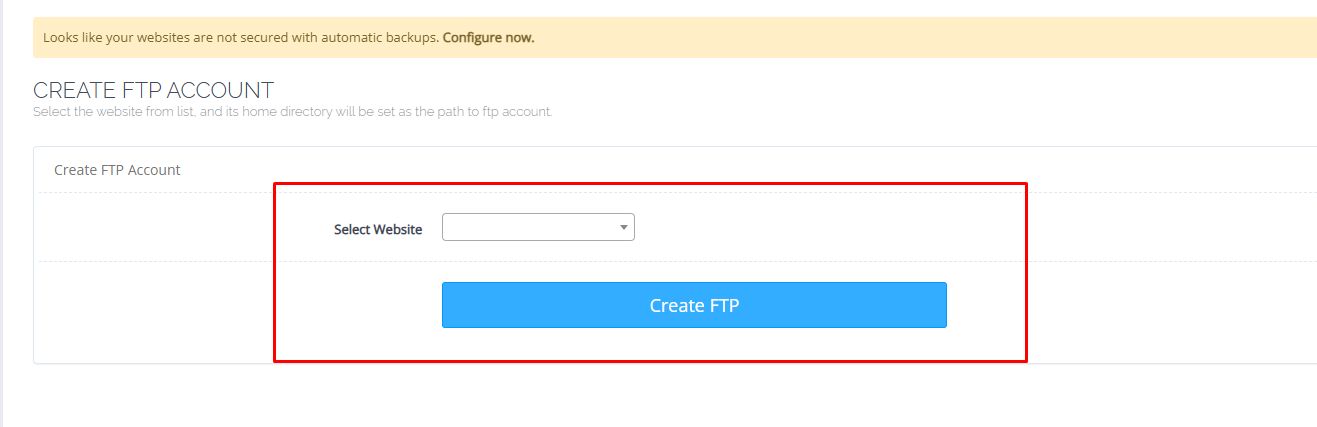
- Create an FTP Account in CyberPanel:
- Log in to CyberPanel
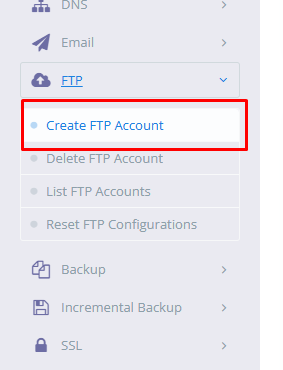
- Go to "FTP" -> "Create FTP Account"

- Select the website (domain)
- Enter a username (e.g., myftpuser)
- Enter a strong password
- Set the path (usually defaults to the website's home directory, or you can set it to public_html)
- Click "Create FTP"

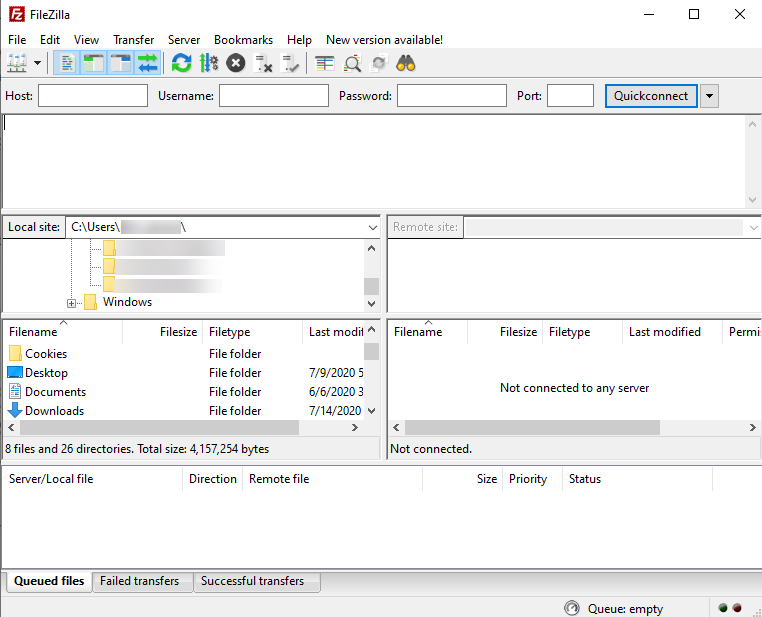
- Configure Your FTP Client (e.g., FileZilla):
- Open FileZilla
- Host: Your server's IP address or your domain name (if DNS is pointed)
- Username: The full FTP username (e.g., myftpuser@yourdomain.com or just myftpuser - CyberPanel will clarify this on the FTP list page)
- Password: The FTP password you created
- Port: 21 (standard FTP). For SFTP (more secure, if enabled on server), use port 22
- Click "Quickconnect" or save it in Site Manager

- Transferring Files:
- The left pane in FileZilla is your local computer; the right pane is your server
- Navigate to public_html on the server side
- Drag and drop files/folders between panes to upload or download

- Create an FTP Account in CyberPanel:
- Prerequisites:
- Conclusion: File Manager offers quick web-based access, while FTP is robust for larger transfers.


18. How to Set PHP Version for Each Site
- Intro: Explain that different web applications may require different PHP versions, and CyberPanel allows per-site PHP version management.
- Prerequisites:
- Website added to CyberPanel
- Multiple PHP versions installed on your server (CyberPanel usually installs a few by default, and more can be added via "Server" -> "PHP" -> "Install PHP Extensions")
- Steps:
- Log in to CyberPanel
- Navigate to "Websites": Click "Websites" in the left sidebar
- Select "List Websites": Click "List Websites" from the submenu
- Choose Your Website: Find the domain for which you want to change the PHP version and click its "Manage" button

- Locate "Change PHP" Option: On the website management page, scroll down. You should find a section or dropdown labeled "Change PHP" or "PHP Version"

- Select New PHP Version: Click the dropdown menu and choose the desired PHP version from the list of installed versions (e.g., PHP 7.4, PHP 8.0, PHP 8.1)

- Click "Change PHP": (Or a similar "Save" button)

- Confirmation: CyberPanel will apply the change. It might take a few moments. You should see a success message
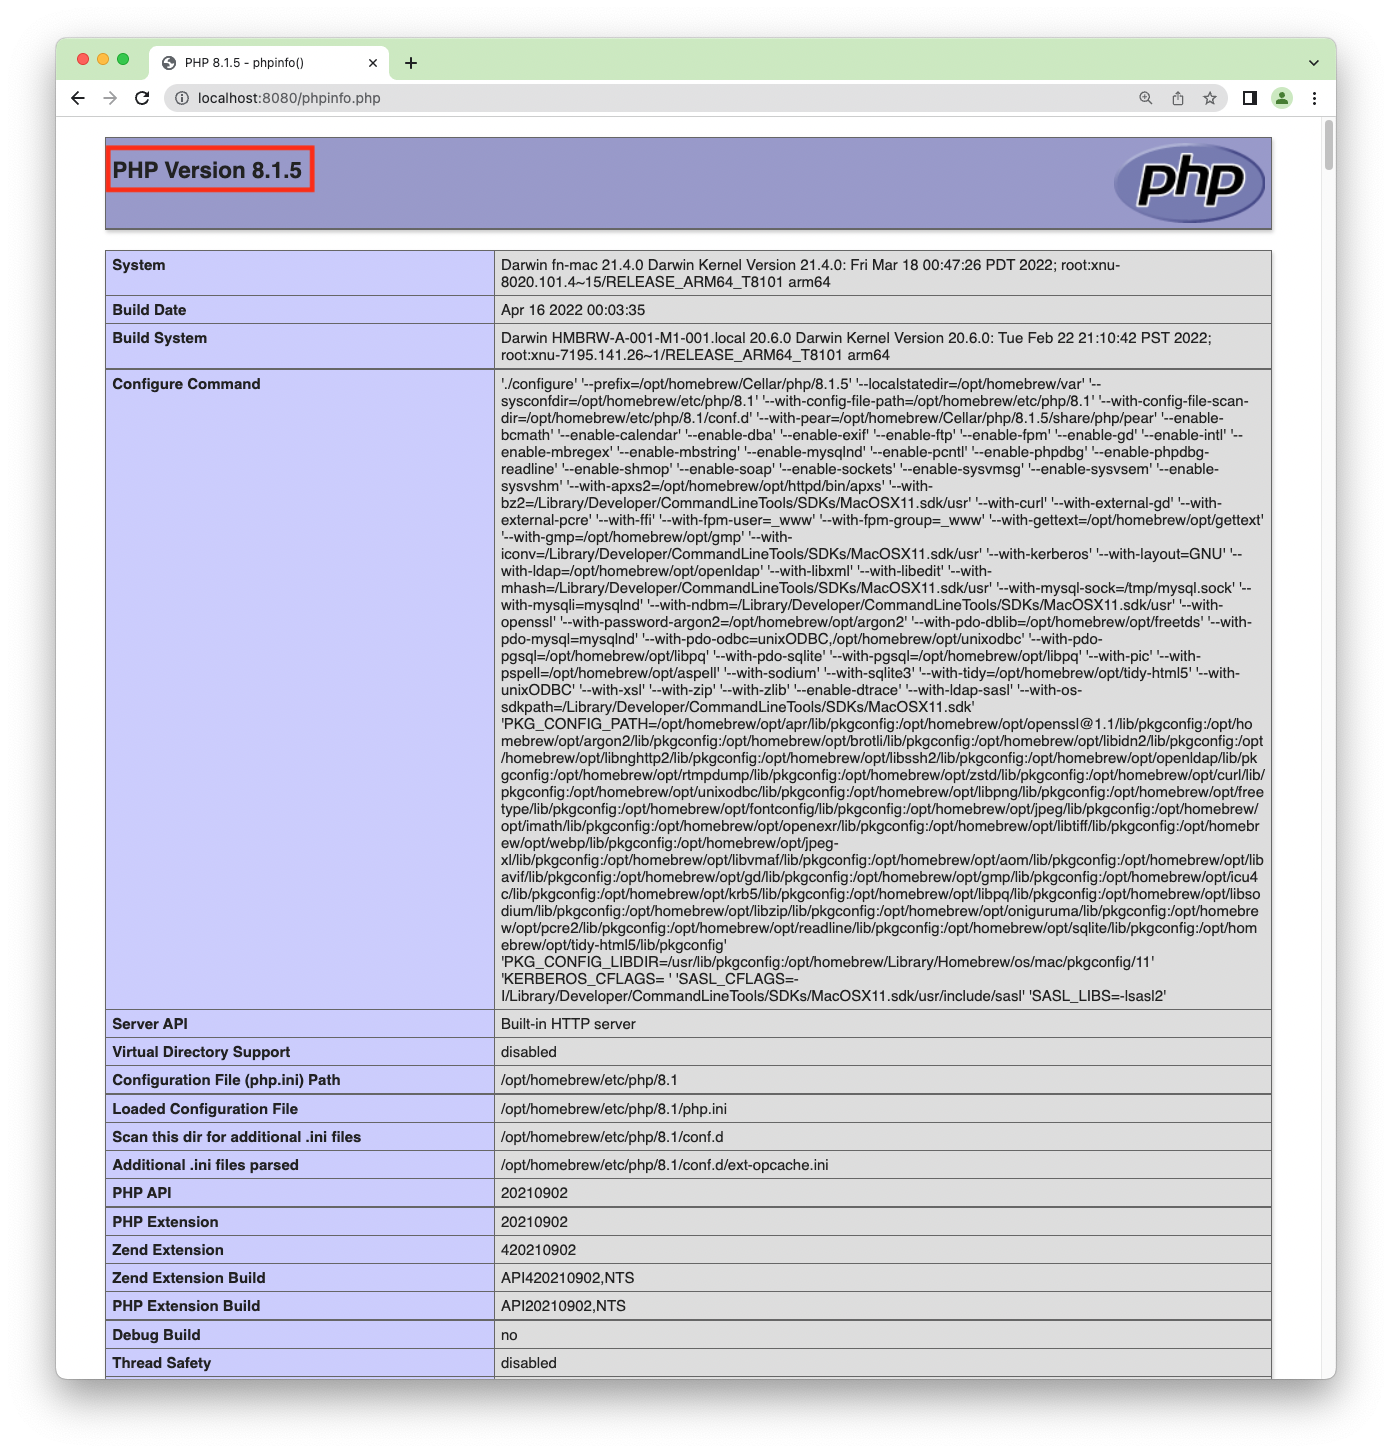
- Verify (Optional):
- Create a phpinfo.php file in your website's public_html directory with the content:
- Access yourdomain.com/phpinfo.php in your browser. The displayed PHP version should match what you selected
- Important: Delete the phpinfo.php file after verifying for security reasons

- Create a phpinfo.php file in your website's public_html directory with the content:
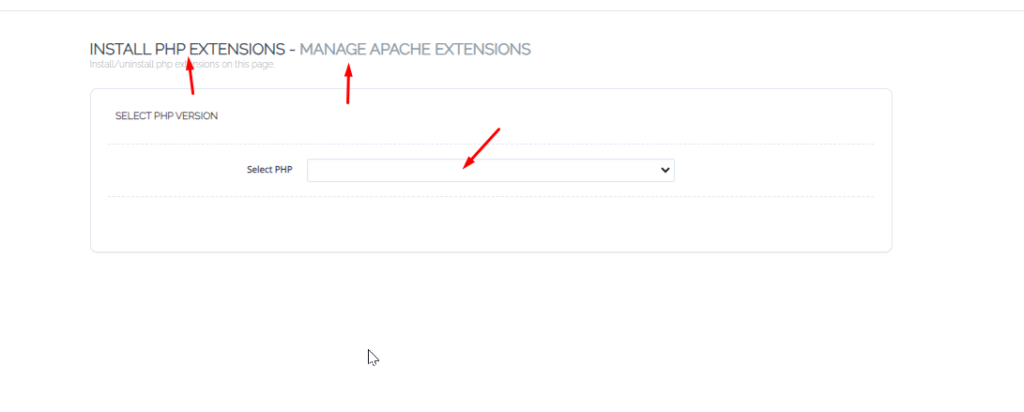
- Managing PHP Extensions:
- If you need specific PHP extensions for the selected version:
- Go to "Server" -> "PHP" -> "Install PHP Extensions" (or "Manage PHP Extensions")
- Select the PHP version you're using for the site
- Install or uninstall extensions as needed

- If you need specific PHP extensions for the selected version:
19. How to Set Up Automatic Backups in CyberPanel
- Intro: Emphasize the importance of regular backups and show how to configure CyberPanel's automated backup feature.
- Prerequisites:
- Sufficient disk space on your server or a remote storage destination configured (FTP, S3, etc. - if using remote)
- Steps:
- Log in to CyberPanel
- Navigate to "Backup": Click "Backup" in the left sidebar
- Select "Create Backup Schedule" (or "Schedule Backup"):
- Configure Backup Settings:
- Select Website: Choose the website you want to back up. You can select "ALL" to back up all websites
- Select Destination:
- Local: Backups will be stored on the same server (in /home/backup/)
- Remote (SFTP/FTP): Requires server IP/hostname, port, username, password, and remote path
- Amazon S3: Requires Access Key, Secret Key, Bucket Name, and Region
- Frequency:
- Daily: Specify the time (HH:MM) for the daily backup
- Weekly: Specify the day of the week and time
- Retention: Specify how many recent backups to retain (older ones will be deleted automatically)
- Select Website: Choose the website you want to back up. You can select "ALL" to back up all websites
- Click "Add Schedule" or "Create Backup":
- Confirmation: You should see a success message. The scheduled backup will appear in the backup list
- Managing Backups:
- List Backups: Go to "Backup" -> "List Backups" to see completed backups
- Restore Backup: Select a backup and click "Restore"
- Download Backup: Option to download backup files
- Important Considerations:
- Monitor disk space for local backups
- For better disaster recovery, use remote backup destinations
- Periodically test restoring backups to verify they work
- Conclusion: Automated backups are now configured, providing a safety net for your website data.


20. How to Enable LiteSpeed Cache for Speed Optimization
- Intro: LiteSpeed Cache (LSCache) dramatically improves website performance through server-level caching.
- Prerequisites:
- Website running on CyberPanel with OpenLiteSpeed/LiteSpeed Enterprise
- For CMS: Appropriate LSCache plugin installed (e.g., WordPress LiteSpeed Cache plugin)
- Part 1: Server-Level Configuration
- LSCache is typically enabled by default in CyberPanel
- To verify:
- Go to "Websites" -> "List Websites" -> "Manage"
- Check for LiteSpeed Cache section/toggle
- For advanced configuration:
- Access OpenLiteSpeed WebAdmin at http://
:7080 - Navigate to Virtual Hosts -> your vhost -> Cache tab
- Ensure "Enable Cache" is set to "Yes"
- Access OpenLiteSpeed WebAdmin at http://
- Part 2: WordPress LSCache Plugin
- Install "LiteSpeed Cache" plugin from WordPress repository
- Basic Configuration:
- Enable caching in "LiteSpeed Cache" -> "Cache" tab
- Configure guest mode for optimal caching
- Advanced Features:
- Image Optimization (WebP generation)
- CSS/JS minification and combination
- Database optimization
- CDN integration
- Install "LiteSpeed Cache" plugin from WordPress repository
- Verification:
- Check browser Developer Tools (F12) -> Network tab
- Look for X-LiteSpeed-Cache: hit header
- Other CMS: Similar LSCache modules available for Joomla, Magento, etc.
- Conclusion: LiteSpeed Cache provides significant performance improvements with proper configuration.


21. How to Monitor Website Logs and Resource Usage
- Intro: Explain that monitoring logs helps troubleshoot issues, and tracking resource usage helps understand server performance.
- Part 1: Monitoring Website Logs
- Types of Logs:
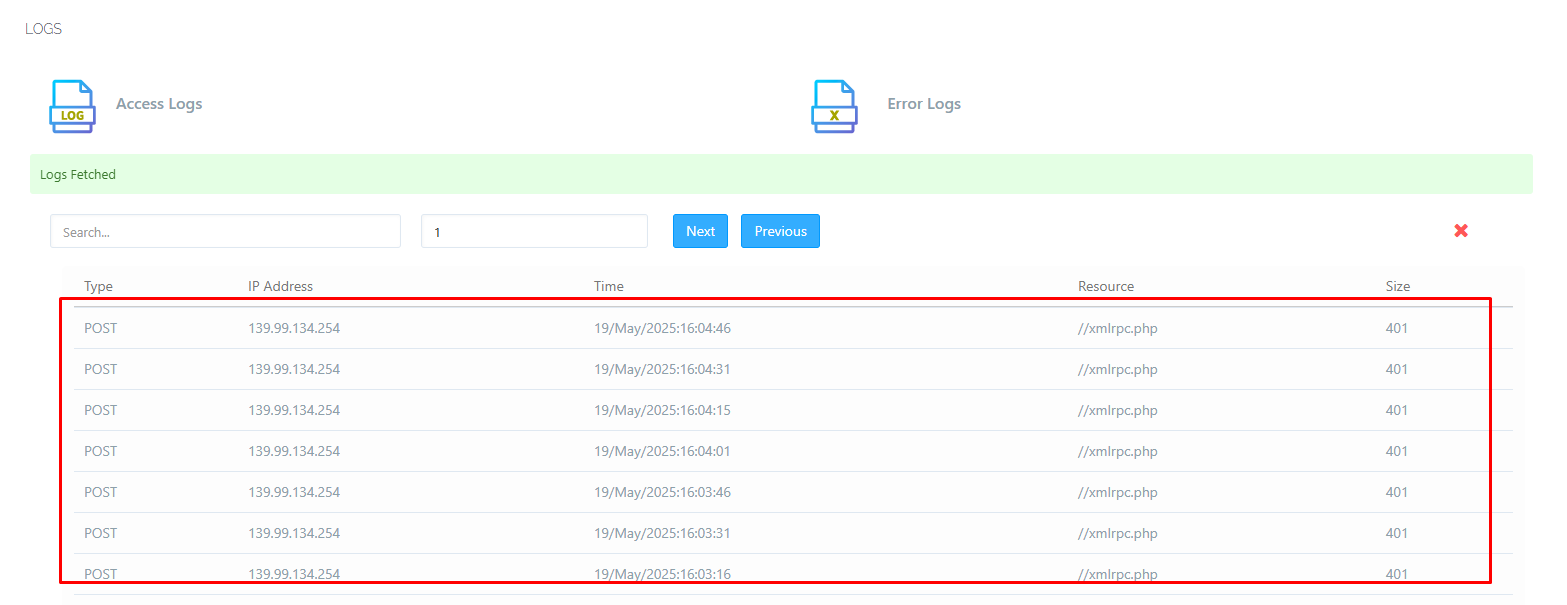
- Access Logs: Record all requests made to your website (visitor IPs, pages visited, user agents).
- Error Logs: Record errors generated by your website scripts (PHP errors, etc.) or the web server.
- Accessing Logs via CyberPanel:
- Log in to CyberPanel.
- For a specific website:
- Go to "Websites" -> "List Websites."
- Click "Manage" for the desired website.
- Look for a "Logs" or "Error Log" / "Access Log" section or button.

- You might see options to view "Access Logs" and "Error Logs" directly in the browser or download them.

- For OpenLiteSpeed Server Logs (more general):
- Go to "Server Status" -> "LiteSpeed Status" -> "View Error Log" / "View Access Log" (these are often server-wide, not site-specific).
- Alternatively, logs are often found via command line at /usr/local/lsws/logs/ (e.g., error.log, access.log, stderr.log).
- What to Look For:
- Error Logs: PHP errors (fatal errors, warnings, notices), 404 errors not found by the site, permission issues.
- Access Logs: Suspicious activity, traffic patterns, popular content.
- Types of Logs:
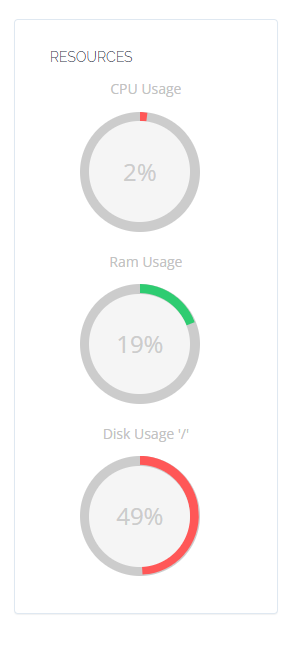
- Part 2: Monitoring Resource Usage
- Key Resources: CPU, RAM (Memory), Disk Space, Bandwidth, LiteSpeed Processes.
- Accessing Resource Usage in CyberPanel:
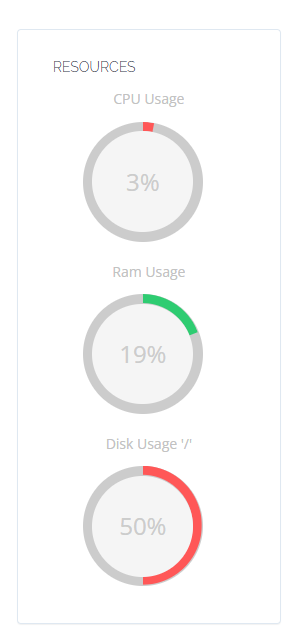
- Dashboard Overview: The main CyberPanel dashboard usually displays widgets for current CPU, Memory, and Disk usage.

- Server Status:
- Go to "Server Status" -> "Resource Usage" (or similar, name might vary slightly).
- This section often provides more detailed graphs or real-time updates for CPU, Memory, Disk I/O, and Network Traffic over time.

- LiteSpeed Status:
- Go to "Server Status" -> "LiteSpeed Status."
- This shows current connections, LiteSpeed processes, and other web server-specific metrics.

- Dashboard Overview: The main CyberPanel dashboard usually displays widgets for current CPU, Memory, and Disk usage.
- Understanding Resource Usage:
- High CPU: Could indicate inefficient scripts, high traffic, or insufficient server power.
- High Memory: Large applications, memory leaks in scripts, or too many processes.
- Low Disk Space: Affects website operation, email, backups.
- High Bandwidth: High traffic, large file downloads.
- Command-Line Tools (for advanced users):
toporhtop(for real-time process and resource monitoring).df -h(for disk space).free -m(for memory usage).-
- Conclusion: Regularly checking logs and resource usage helps maintain a healthy and performant server.


22. How to Create and Manage Databases in CyberPanel
- Intro: Explain that databases (usually MySQL/MariaDB) are essential for dynamic websites like WordPress, Joomla, etc.
- Prerequisites: Website added in CyberPanel.
- Steps to Create a Database:
- Log in to CyberPanel.
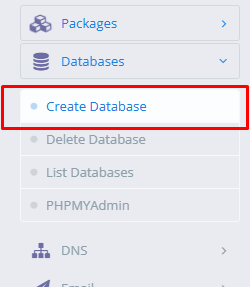
- Navigate to "Databases": Click "Databases" in the left sidebar.
- Select "Create Database": Click "Create Database" from the submenu.

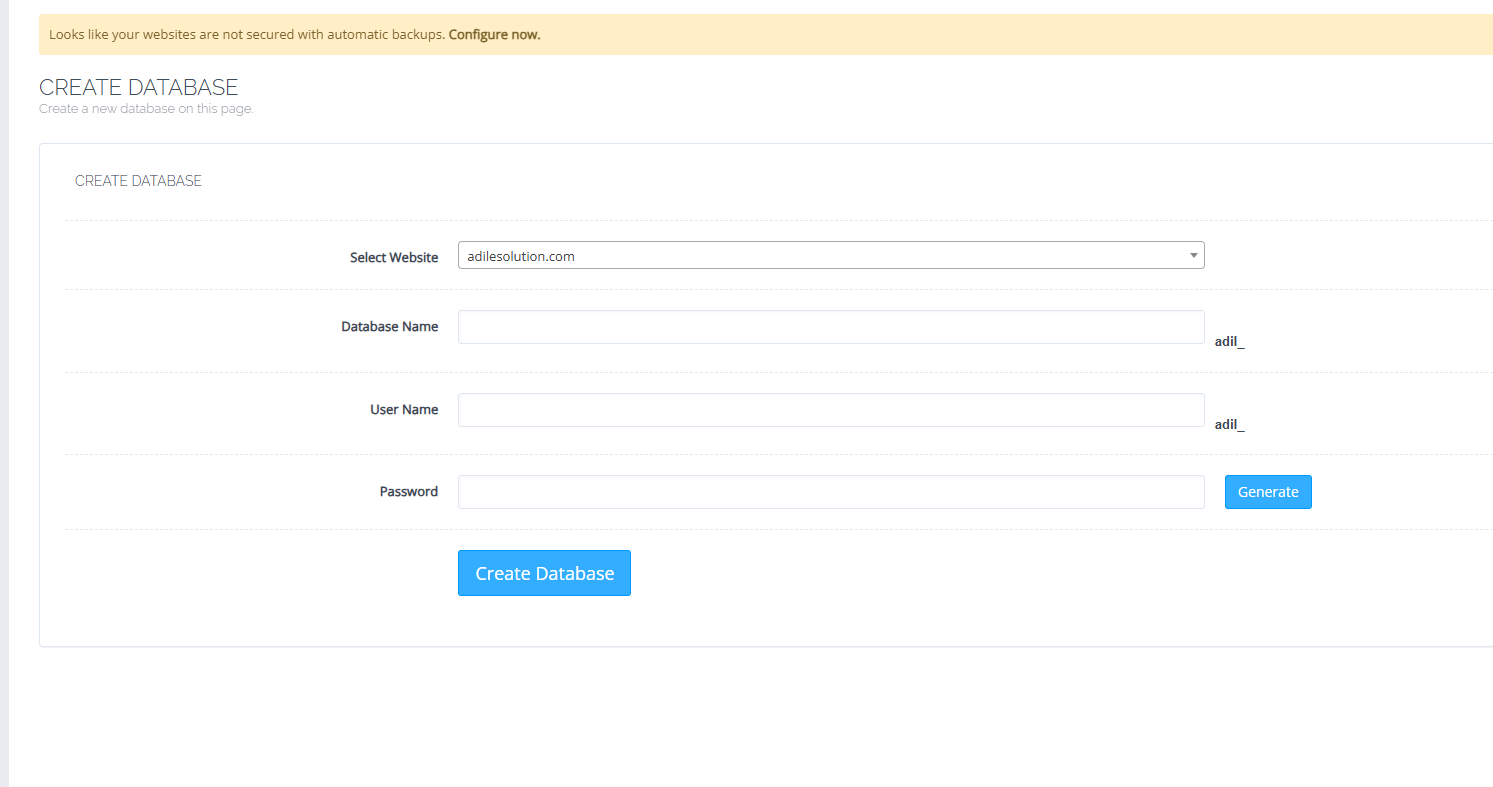
- Fill in Database Details:
- Select Website: Choose the website this database will be associated with from the dropdown. This usually prefixes the database name and username.

- Database Name: Enter a name for your database (e.g., mydb, wp_db). CyberPanel will typically prefix it (e.g., yourdomain_mydb).
- Database Username: Enter a username for accessing this database (e.g., myuser). CyberPanel will also prefix this.
- Password: Create a strong password or use the "Generate" button. Store this password securely.

- Select Website: Choose the website this database will be associated with from the dropdown. This usually prefixes the database name and username.
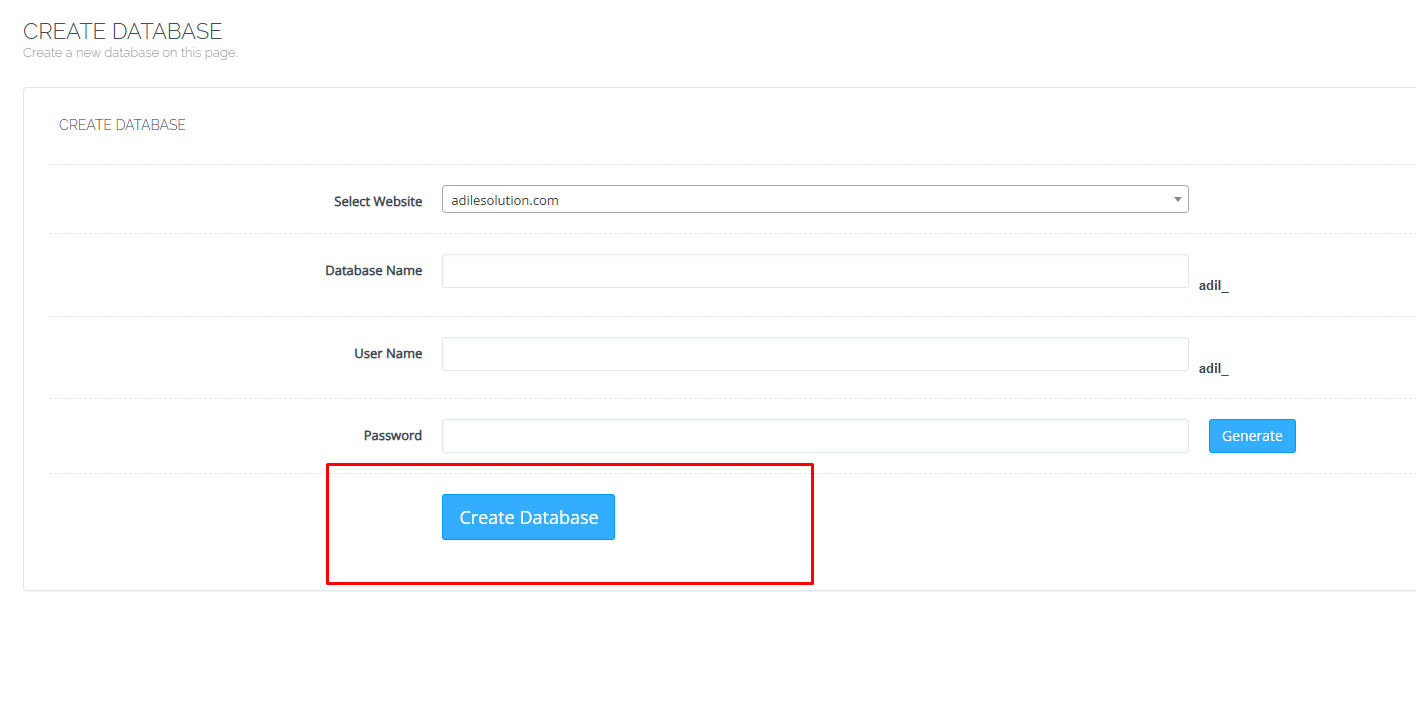
- Click "Create Database":

- Confirmation: You should see a success message with the full database name and username. Note these down.
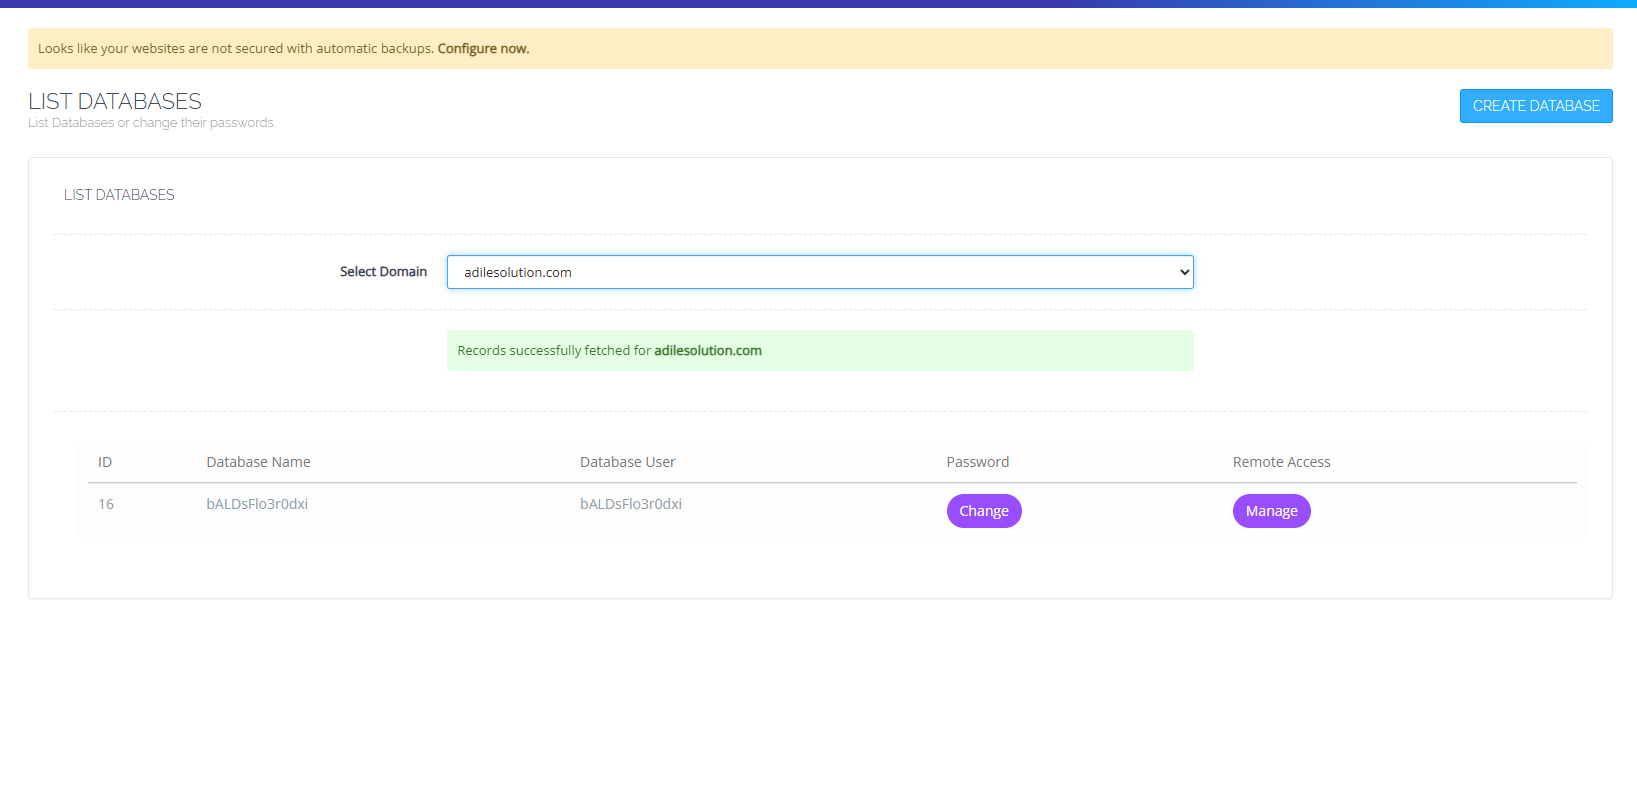
- Managing Databases:
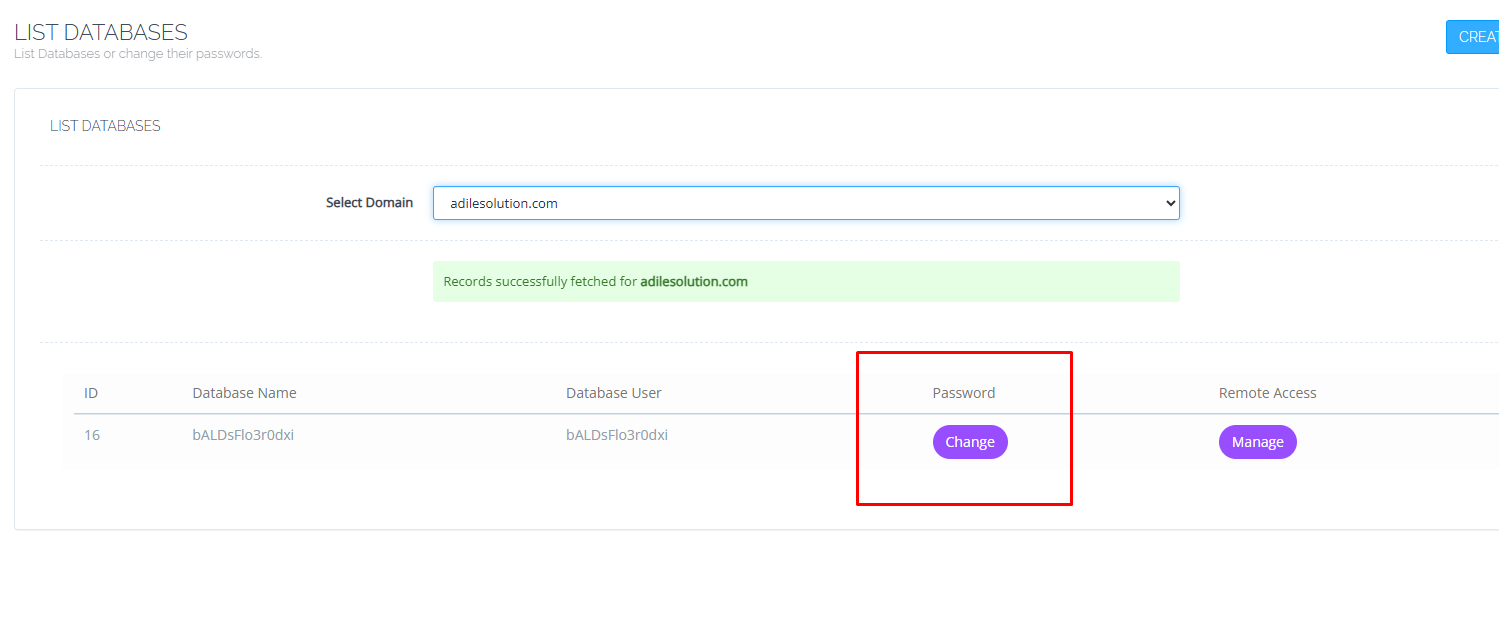
- List Databases:
- Go to "Databases" -> "List Databases."
- Select a website to see its associated databases.

- Change Password:
- In the "List Databases" view, you can usually find an option to "Change Password" for a database user.

- In the "List Databases" view, you can usually find an option to "Change Password" for a database user.
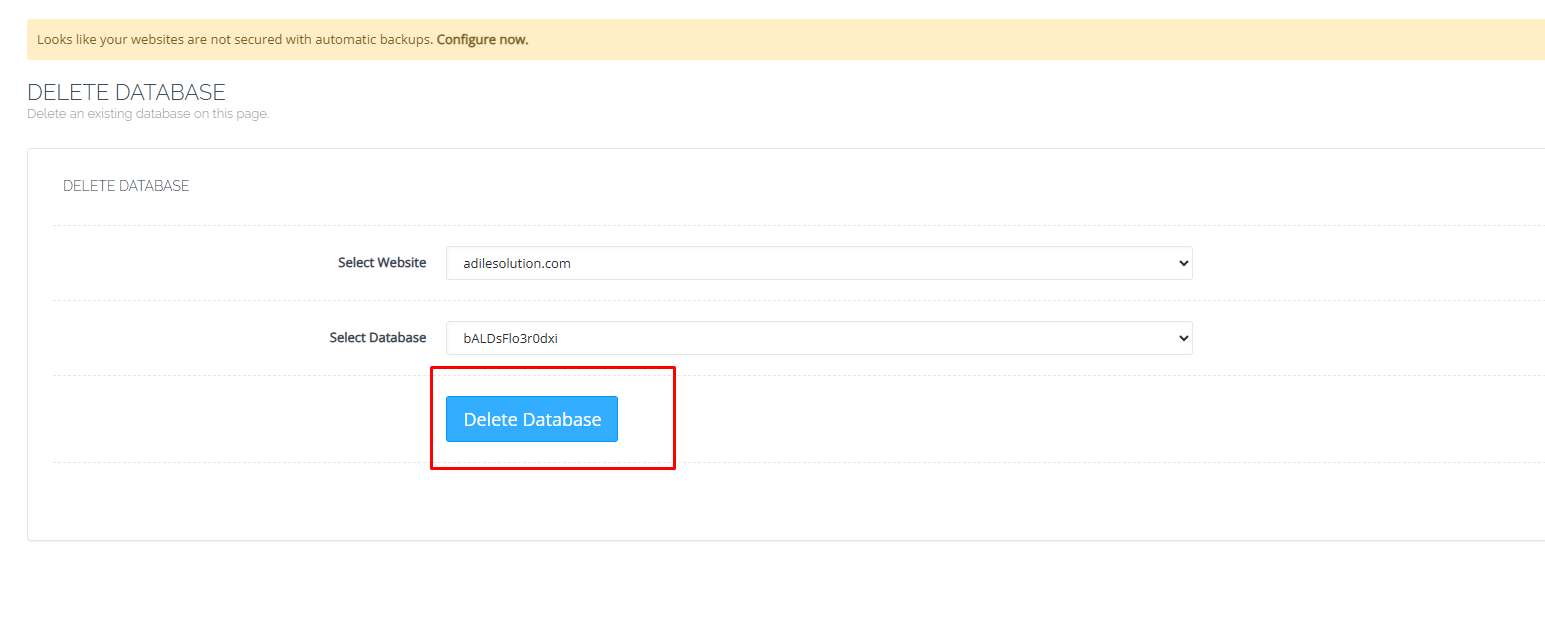
- Delete Database:
- In the "List Databases" view, there's an option to "Delete" a database. Be careful, this is irreversible!

- In the "List Databases" view, there's an option to "Delete" a database. Be careful, this is irreversible!
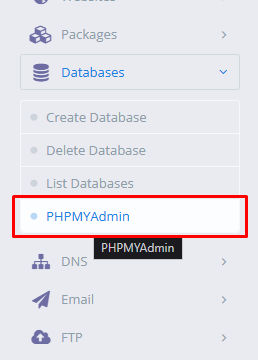
- Accessing phpMyAdmin:
- phpMyAdmin is a web-based tool for managing MySQL database content (running queries, importing/exporting data, managing tables).
- In CyberPanel, go to "Databases" -> "phpMyAdmin."

- This will usually auto-login you to phpMyAdmin if accessed from the panel for a site you manage, or it might present a login screen where you use the database username and password you created.

- List Databases:
- Conclusion: CyberPanel simplifies database creation and basic management tasks.


23. How to Add Subdomains and Parked Domains (Aliases)
- Intro: Explain the difference:
- Subdomain: A prefix to your main domain (e.g., blog.yourdomain.com), often for a separate section or application, with its own document root.
- Parked Domain (Domain Alias): Another domain name that points to the same website content as an existing domain (e.g., myotherdomain.com shows content from yourmaindomain.com).
- Prerequisites:
- Main domain already added to CyberPanel
- For subdomains: DNS A record for the subdomain (e.g., blog) pointing to your server IP
- For parked domains: DNS A record for the parked domain pointing to your server IP
- Part 1: Adding a Subdomain
- Log in to CyberPanel
- Navigate to "Websites" -> "Create Website" (subdomains are created like new websites but linked to a parent)
- Fill in Details for Subdomain:
- Select Package: Choose a package
- Select Owner: Usually admin
- Domain Name: Enter the full subdomain name (e.g., blog.yourdomain.com)
- Email: Admin email
- Select PHP: Choose PHP version
- Check SSL, DKIM, etc. as needed
- Click "Create Website"
- The subdomain will have its own document root (e.g., /home/blog.yourdomain.com/public_html)
- Alternative: Some CyberPanel versions may have "Child Domains" under a website's manage section for specific purposes
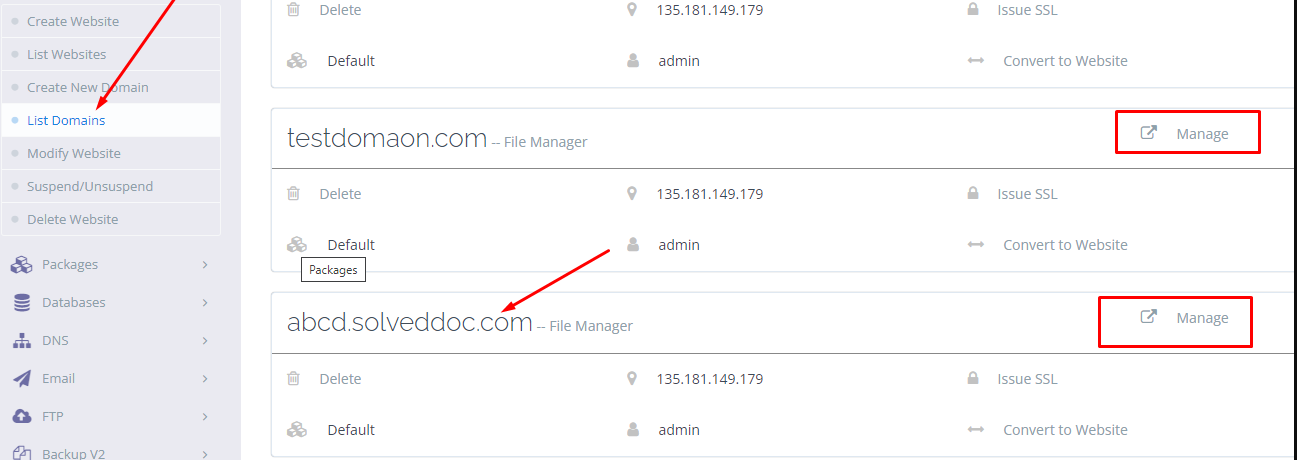
- Part 2: Adding a Parked Domain (Domain Alias)
- Log in to CyberPanel
- Go to "Websites" -> "List Websites"
- Click "Manage" for the main website
- Find "Add Domains" or "Domain Alias" or "Parked Domains"
- Enter the Parked Domain:
- Type the domain name you want to park (e.g., myotherdomain.com)
- Click "Add Domain" or "Create Alias"
- Ensure DNS A record points to your server IP
- SSL Setup:
- Issue SSL for the alias domain
- The alias domain should appear as an option in the SSL certificate for the main domain
- Re-issue the SSL to cover both domains
- Conclusion: CyberPanel allows you to easily expand your web presence with subdomains for distinct content and parked domains for multiple access points to the same site.


24. How to Migrate from cPanel to CyberPanel
- Intro: Briefly explain that CyberPanel offers a migration tool to simplify moving websites from cPanel.
- Prerequisites:
- Access to your cPanel account (username, password, and server IP/hostname).
- Sufficient disk space on the CyberPanel server for the migrated data.
- The cPanel server must be accessible from your CyberPanel server (firewalls, etc.).
- Steps using CyberPanel Migration Tool:
- Log in to your CyberPanel admin dashboard.
- Navigate to "Migrate" or "cPanel Migrator" (or similar term, usually in the main sidebar or under a "Tools" / "Server" section).
- Enter cPanel Server Details:
- cPanel Server IP Address: The IP of your old cPanel server.
- Username: Your cPanel username.
- Password: Your cPanel password (or API token if that method is supported).
- Security: Choose SSH or WHM API. SSH is common.
- Fetch Accounts: Click a button like "Fetch Accounts" or "Connect."
- Select Accounts to Migrate: Check the boxes next to the cPanel accounts/websites you want to migrate.
- Configure Migration Options (if any):
- There might be options for what to migrate (files, databases, emails). Usually, you'd migrate all.
- Start Migration: Click the "Start Migration" or "Migrate" button.
- Monitor Progress: CyberPanel will show the progress of the migration.
- Post-Migration Checks:
- Website files are in the correct public_html for each migrated domain.
- Databases are created and data is present (check via phpMyAdmin).
- Email accounts are created (if email was migrated).
- DNS records for the migrated domains will need to be updated.
- Test the websites thoroughly.
- Issue SSL certificates for the domains on CyberPanel.
- Manual Migration (If Tool Fails or Not Preferred):
- This involves:
- Taking full cPanel backups (.tar.gz files).
- Transferring them to the CyberPanel server.
- Manually creating websites in CyberPanel.
- Manually extracting files to public_html.
- Manually creating databases and importing SQL data.
- Manually creating email accounts.
- This is more complex and time-consuming.
- This involves:
- Important Notes:
- Ensure cPanel server allows remote SSH/API connections from your CyberPanel IP.
- Migration can be resource-intensive.
- Conclusion: CyberPanel's migration tool can significantly ease the transition from cPanel. Always verify after migration.


25. How to Fix Common CyberPanel Login Errors
- Intro: Address common reasons why users can't log in to their CyberPanel dashboard.
- Common Login Errors and Solutions:
- "This site can't be reached" / "Connection timed out" / SSL Protocol Error:
- Cause A: Incorrect URL/Port: You must use https://
:8090. - Solution: Double-check you're using https://, the correct server IP, and port 8090.
- Solution: Double-check you're using https://, the correct server IP, and port 8090.
- Cause B: CyberPanel Service Not Running: The lscpd service might be down.
- Solution (via SSH):
- Log in to your server via SSH
- Check status:
systemctl status lscpd - If not active, start it:
systemctl start lscpd - Enable it to start on boot:
systemctl enable lscpd

- Solution (via SSH):
- Cause C: Firewall Blocking Port 8090: Your server's firewall might be blocking port 8090.
- Solution: Ensure port 8090 (TCP) is open in your firewall configuration.
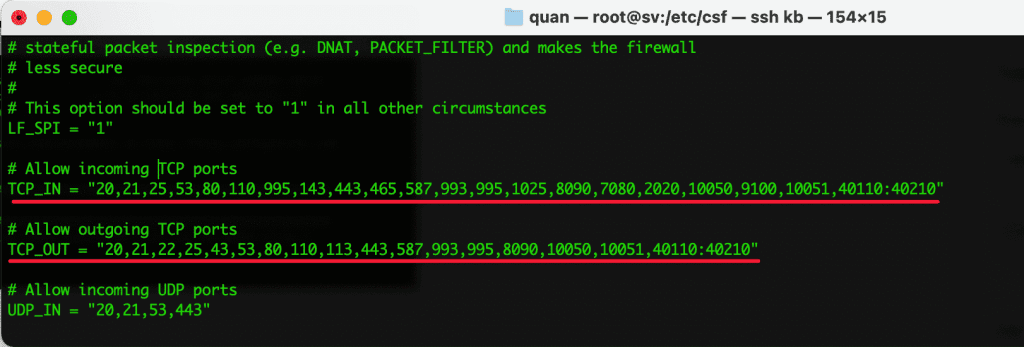
- For CSF (if installed): Check /etc/csf/csf.conf for TCP_IN, add 8090 if missing, then
csf -r - For firewalld:
firewall-cmd --permanent --add-port=8090/tcp, thenfirewall-cmd --reload

- For CSF (if installed): Check /etc/csf/csf.conf for TCP_IN, add 8090 if missing, then
- Solution: Ensure port 8090 (TCP) is open in your firewall configuration.
- Cause D: IP Address Changed: If your server's IP changed.
- Solution: Verify your server's current IP address.
- Cause A: Incorrect URL/Port: You must use https://
- "Invalid Username or Password":
- Cause A: Incorrect Credentials: Simple typo or forgotten password.
- Solution: Carefully re-type username (usually admin) and password.
- Cause B: Forgotten Admin Password:
- Solution (via SSH):
- Log in to server via SSH
- Run the password reset command:
For CyberPanel versions 1.7.1 and above:
adminPass
For older versions:
cd /usr/bin/
python anitPass.py --password
- Solution (via SSH):
- Cause A: Incorrect Credentials: Simple typo or forgotten password.
- Too Many Failed Login Attempts (IP Banned):
- Cause: Multiple incorrect login attempts might trigger fail2ban or CSF to ban your IP.
- Solution:
- Wait for the ban to expire (e.g., 10-30 minutes)
- If you have SSH access, you can unban your IP:
- CSF:
csf -drthencsf -ra - Fail2ban: Identify the jail (e.g., cyberpanel) and use
fail2ban-client unban
- CSF:
- Whitelist your IP if it's static
- Disk Full:
- Cause: If the server disk is full, services including CyberPanel might fail.
- Solution (via SSH): Check disk space with
df -h. Free up space by deleting old backups, logs, or unnecessary files.
- "This site can't be reached" / "Connection timed out" / SSL Protocol Error:
- Conclusion: By systematically checking these points, most CyberPanel login issues can be resolved.


26. Why My DNS Changes Are Not Taking Effect?
- Intro: Explain that DNS changes aren't instant and can take time to propagate across the internet.
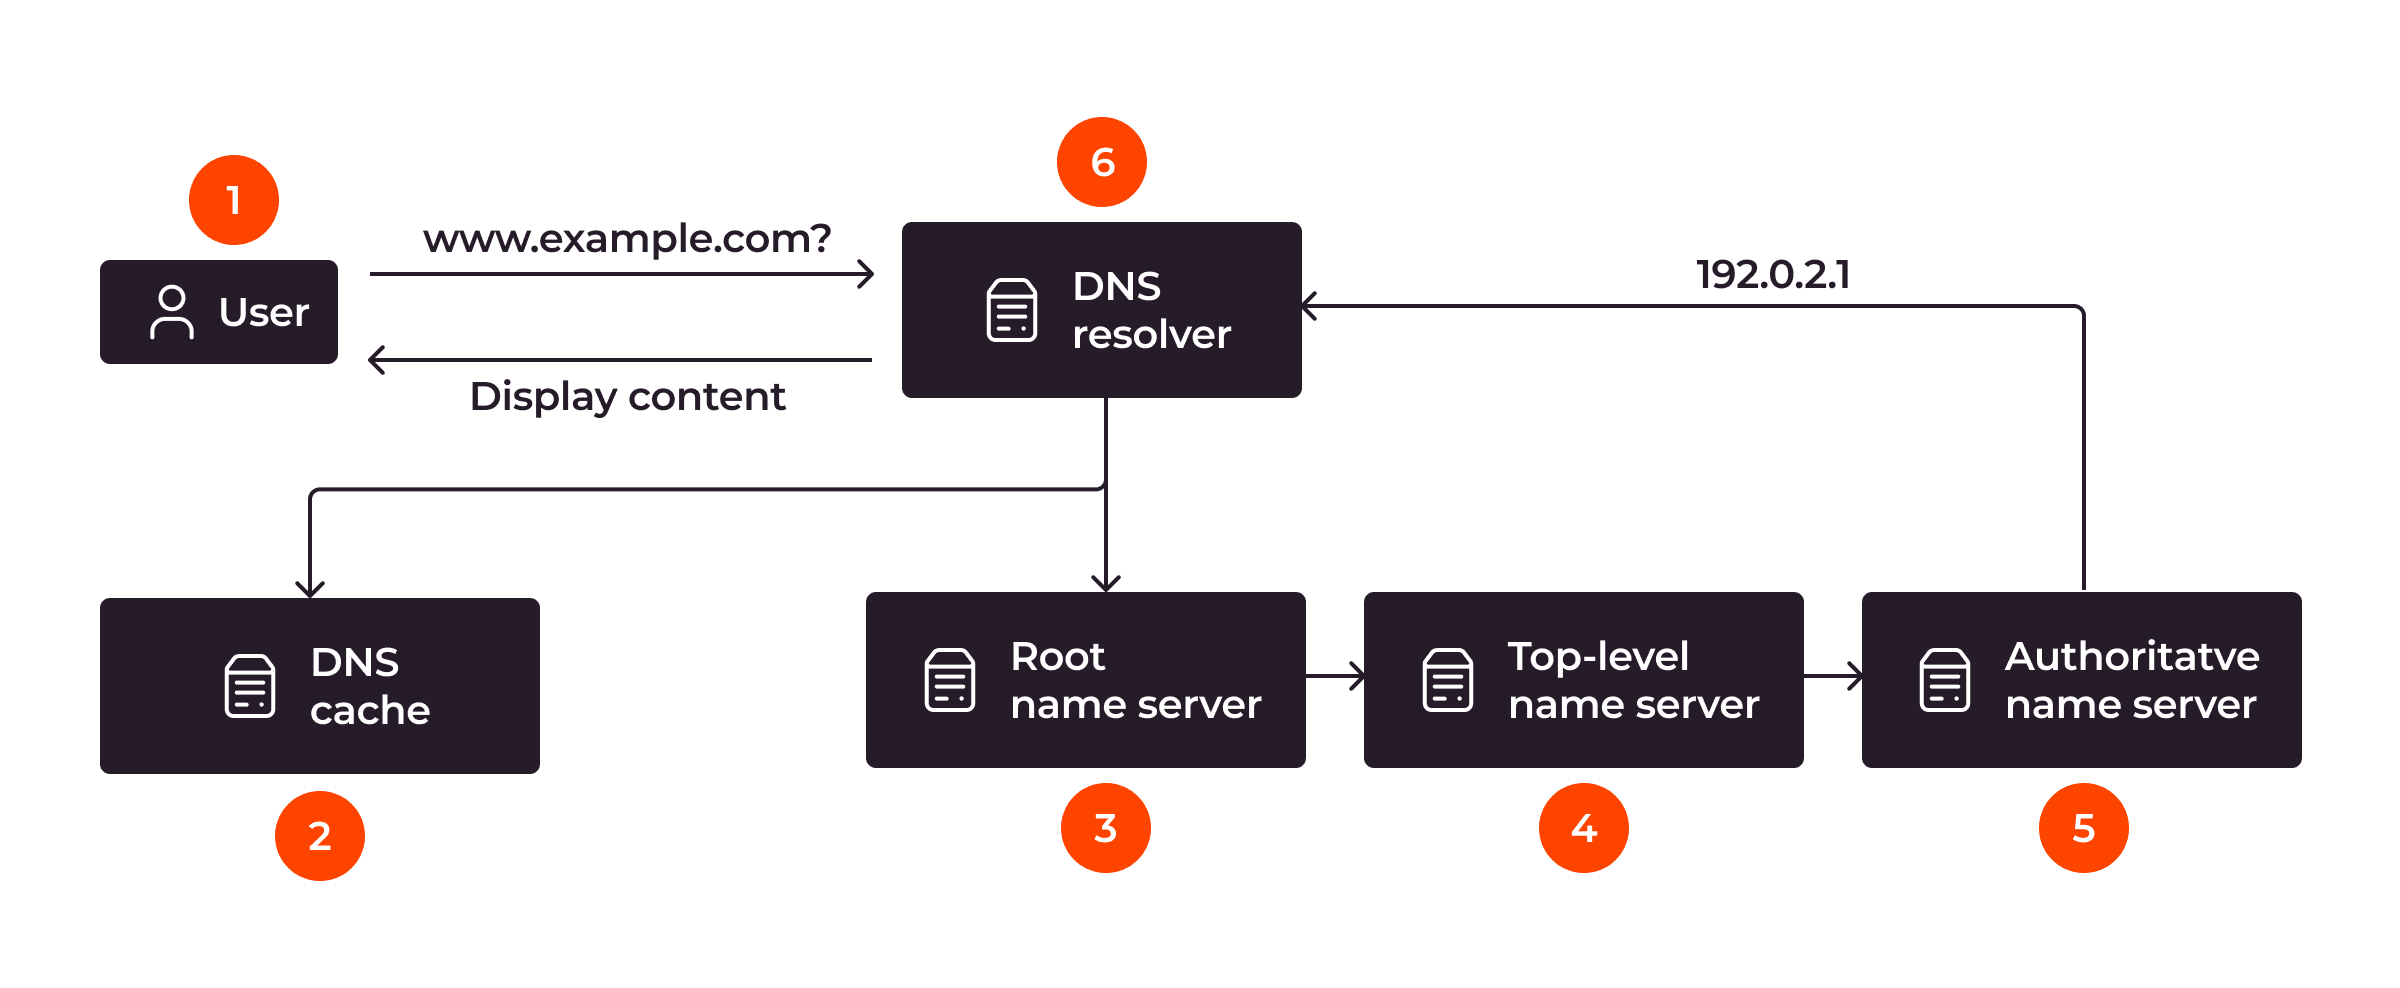
- Key Reasons and Explanations:
- DNS Propagation Time:
- Explanation: When you update DNS records, these changes need to be communicated from your authoritative DNS server to other DNS resolvers across the internet. This process can take anywhere from a few minutes to 48-72 hours.

- Explanation: When you update DNS records, these changes need to be communicated from your authoritative DNS server to other DNS resolvers across the internet. This process can take anywhere from a few minutes to 48-72 hours.
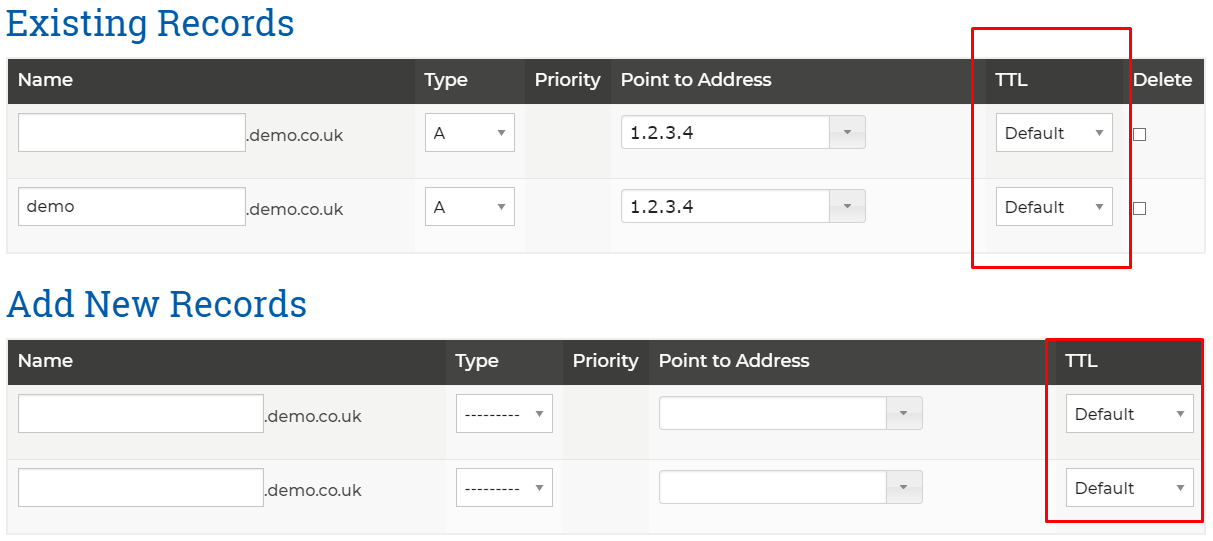
- TTL (Time To Live):
- Explanation: Every DNS record has a TTL value that tells resolvers how long to cache the record before checking for updates.
- Action: When planning DNS changes, lower the TTL a day in advance (e.g., to 300 seconds) to speed up propagation.

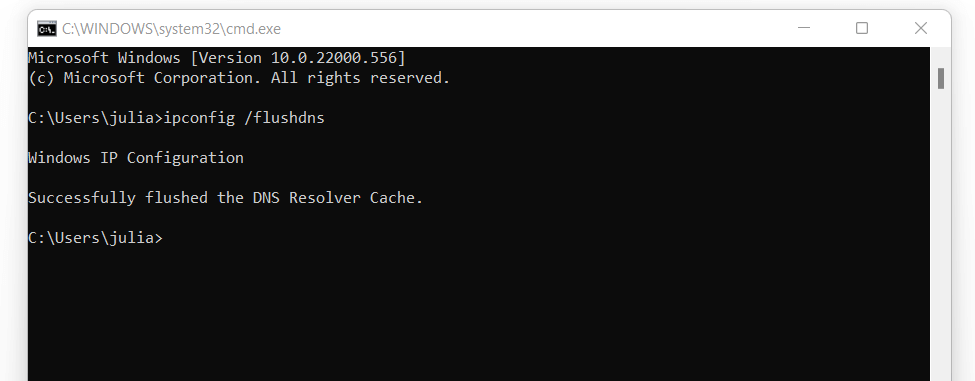
- Local DNS Caching (Your Computer/Router):
- Explanation: Your devices cache DNS lookups and might still have the old IP address.
- Solution:
- Flush DNS cache:
- Windows:
ipconfig /flushdns - macOS:
sudo dscacheutil -flushcache; sudo killall -HUP mDNSResponder - Linux:
sudo systemd-resolve --flush-cachesorsudo /etc/init.d/nscd restart
- Windows:
- Reboot your router
- Change to public DNS (8.8.8.8, 1.1.1.1)

- Flush DNS cache:
- Browser Caching:
- Explanation: Browsers cache DNS information.
- Solution: Clear browser cache or use incognito mode.
- Incorrect DNS Configuration:
- Explanation: Typos in DNS records or wrong record types.
- Solution: Double-check all DNS records at your provider.
- Using the Wrong Nameservers:
- Explanation: Changes won't work if you're editing DNS at the wrong provider.
- Solution: Verify nameserver settings at your domain registrar.

- Authoritative DNS Server Issues:
- Explanation: Your DNS provider might be experiencing problems.
- Solution: Check provider's status page.
- Tools for Checking DNS Propagation:
- DNSChecker.org
- whatsmydns.net

- DNS Propagation Time:
- Conclusion: Patience is key with DNS. Use checking tools and work through caching layers if changes seem stuck.

27. Email Not Sending or Receiving? Here's What to Check
- Intro: A troubleshooting checklist for common email problems on CyberPanel.
- Prerequisites: Email account created in CyberPanel.
- Checklist:
- DNS Records (Crucial! See Topic 10):
- MX Records:
- Check: Do they point to your CyberPanel server's hostname?
- Tool: Use an MX lookup tool (e.g., mxtoolbox.com).

- A Record for Mail Hostname: Does mail.yourdomain.com have an A record pointing to your server's IP?
- SPF Record: Is it present and correct for your domain?
- DKIM Record: Is it set up in CyberPanel ("Email" -> "DKIM Manager") and published in DNS?
- DMARC Record: Is it present?
- MX Records:
- CyberPanel Email Service Status:
- Check: Are Postfix (SMTP) and Dovecot (IMAP/POP3) running?
- How: In CyberPanel, go to "Server Status" -> "Services Status."
- Via SSH:
systemctl status postfix,systemctl status dovecot
- Mail Server SSL Certificate (See Topic 13, SSL for Mail Server):
- Check: Does mail.yourdomain.com have a valid SSL certificate?
- How: In CyberPanel, "SSL" -> "MailServer SSL." Issue/reissue if needed.
- Firewall Ports:
- Check: Are standard email ports open in your server's firewall?
- 25 (SMTP)
- 465 (SMTPS)
- 587 (SMTP Submission)
- 110 (POP3)
- 995 (POP3S)
- 143 (IMAP)
- 993 (IMAPS)
- Check: Are standard email ports open in your server's firewall?
- Email Client Configuration (See Topic 11):
- Check: Correct server names, ports, usernames, passwords, and SSL/TLS settings.
- Mailbox Quota:
- Check: Has the email account exceeded its disk quota?
- Check: Has the email account exceeded its disk quota?
- Server Disk Space:
- Check: Is the server out of disk space?
- How:
df -hvia SSH or CyberPanel dashboard.
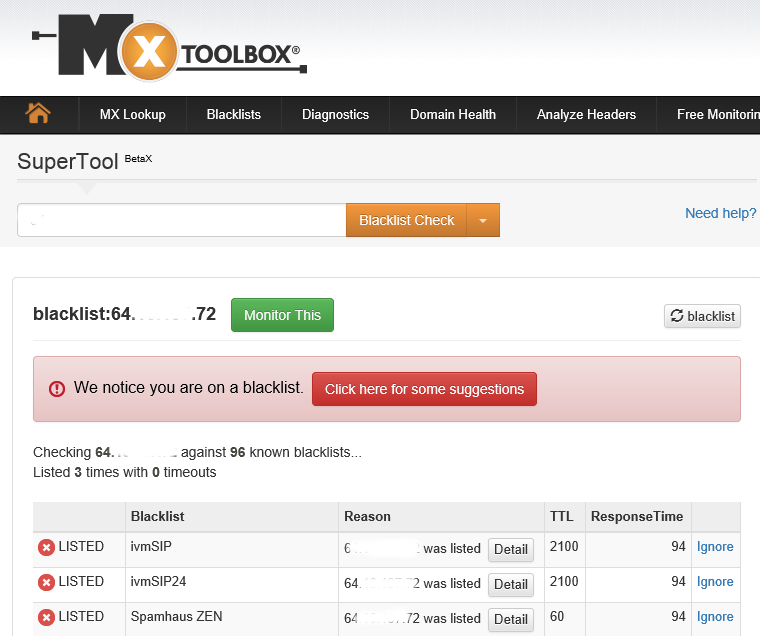
- Blacklisting:
- Check: Has your server's IP been blacklisted?

- Check: Has your server's IP been blacklisted?
- rDNS (Reverse DNS / PTR Record):
- Check: Does your server IP have a valid rDNS record?
- Mail Logs:
- Check: Examine mail server logs for specific error messages.
- Location (via SSH): Often /var/log/mail.log or /var/log/maillog.
- Check: Examine mail server logs for specific error messages.
- Sending Limits (if using external SMTP/relay):
- Check if you've hit sending limits with external services.
- Testing:
- Send a test email to check-auth@verifier.port25.com or use mail-tester.com.
- DNS Records (Crucial! See Topic 10):
- Conclusion: Email issues can be complex, but this checklist covers the most common culprits. Be systematic in your troubleshooting.


Need Domain Name?
85% Promo on Domain Names

Dedicated RDP
Poland RDP 50% recurring discount!
Recent Post
Custom AI Models vs. Pre-Trained ChatGPT: What’s Best for Your Business?
In our day-to-day lives, we use AI models extensively—for research, email handling, knowledge sharing, content creation, and more. Among these, the most prominent leader in the AI market is ChatGPT, which has become an integral part of our...
How to fix WordPress Media error “The uploaded file could not be moved to wp-content/2025/06”
Symptoms: After moving a WordPress website from one server to another or any security changes in server level may trigger the error. While uploading a file using WordPress Media the upload process failed and the error is “The uploaded file could not be moved to...
How to Transfer Files to a Linux VPS using SSH?
While file transfer between windows systems is easy and straightforward, it is a little tricky when it comes to transferring files between a windows system and a Linux VPS. However, it can be done easily using SSH. In Windows, you can just copy/paste a file or folder...
How to Test Network Speed on Linux VPS
We usually check the internet speed to verify if the network is okay or if we are getting what we have paid for. For Windows, Android or other GUI (Graphical User Interface) based OS, it is pretty simple. You can just open a web browser and type “speed test”. Many...
Related Posts

How to disable Windows SmartScreen
Are you having issues installing a program/software after downloading it? It is not responding or...

How to remove an IP from Remote Desktop Connection Application
Removing IP entries history from Remote Desktop Connection application: Sometimes we have to use...

How to use Microphone from RDP
Sometimes you want to use the microphone from the RDP for audio calls or meetings, but it is not...